The Plain of Six Glaciers Trail in Banff: Know BEFORE You Go
After hiking this trail for a second time on our latest trip to Banff, we were hiking back along the shore of Lake Louise when the question of what the best hike around Lake Louise came up.
I, Matt, asked Alysha which trail – the Plain of Six Glaciers trail or the Lake Agnes and Big Beehive Trail – she would choose if she only had time for one, knowing my answer already.
For both of us, the Plain of Six Glaciers is THE hike to do around Lake Louise.
The landscapes you’ll encounter, particularly at the final viewpoint, are unlike anything you’re likely to encounter at home (unless you live in the Rockies, Patagonia, or New Zealand, maybe).
Add in views along the way that get better and better as you climb a charming backcountry tea house, and you’ve got yourself one of the absolute best hikes in Banff.
In this guide, we’re going to go through everything we think you need to know to safely and smoothly hike the Plain of Six Glaciers in Banff.
Including how to manage the crowds that inevitably descend on this trail between the hours of about 10am and 3pm.
We’ll start with the logistics – where to park, and other things you need to know for a smooth trip – and then go into a trail report based on our own experiences hiking the trail.
Sound good to you? Let’s get into it.
Disclaimer: Some of the links in this post, like hotel links, are affiliate links, meaning at no additional cost to you, we make a little bit of money if you click through and book. That being said, we would never recommend something to you that we don’t stand behind 100%.
The Plain of Six Glaciers: Trail Details
- Length: 9 miles
- Elevation Gain: 1,900 ft.
- Season: July – October
- Trail Type: Out and Back
- Difficulty: Moderate
- Dog Friendly? Yes, on a leash
- Pass Required: Parks Canada Admission OR Parks Canada Discovery Pass
- Trailhead Location
The Route for Hiking the Plain of Six Glaciers
This is a fairly straightforward route. It’s an out and back hike that follows the Lake Louise lakeshore around the right side of the lake (if you’re facing the lake from the parking lot).
At the far end of the lake, you start a relatively gentle forested climb along the creek.
You’ll burst out of the treeline into a rockier section that is very exposed, but the views along this stretch of trail are the best of the hike.
You’ll climb up a rocky ridge, hit some switchbacks, and arrive at the Plain of Six Glaciers teahouse, which has bathrooms, toilets, tea, and snacks for you (though we’d hit it on your way back down to get to the glaciers ASAP to beat the crowds).
From there, it’s a relatively steep 0.7 miles up to the final viewpoint, where you have a pretty spectacular view up the chasm, lined with glaciers.
To get back to the parking lot, you simply return the way you came, stopping at the teahouse for a well-earned snack and cup of tea (Cream of Earl Grey is the move, we think) on the way.
How Difficult is This Hike?
Based on our experience hiking all over the Pacific Northwest and beyond, we’d put this hike firmly in the moderate category.
The elevation gain (almost 2,000 feet) is not terrible, especially when it’s spread out over the 9 mile journey. It’s a very steady climb.
The two things that make this hike feel more difficult are the exposure for the last third of the hike, and the distance.
9 miles is nothing to sneeze at, and you’ll spend roughly a third of it – arguably the hardest third, too – in a rocky landscape with very little tree cover.
The switchbacks right before the teahouse feel brutal, and the teahouse is a welcome refuge from the summer sun, which feels more intense in the Rockies.
However, that teahouse provides a good resting point halfway through the hardest part of the hike, which is also nice (though, if you’re here early, we’d push straight through to make it to the end of the trail before the crowds).
Be prepared with plenty of water, snacks, and sun protection (re-apply sunscreen!), and wear sturdy shoes (hiking boots are your friend here, because it is very rocky and uneven).
Getting to the Plain of Six Glaciers Trailhead
This section is, perhaps, the most important section of them all, which is why we have it here above the trail report.
This trail leaves from Lake Louise, which means that the parking situation is somewhere between annoying and downright nightmarish.
In terms of getting to the starting point for this hike, you have a few options; dealing with the parking situation by arriving super duper early, or avoiding the parking issues and taking public transportation to the trailhead.
Driving Yourself to Lake Louise
The first option is to drive yourself to Lake Louise and park in one of the two lots they have by the lake.
The lots are pretty big, but there are a few things to know about this option.
The summary is that we would ONLY do this if you are willing to ARRIVE at the trailhead by 7am at the very latest (6:30am on summer weekends).
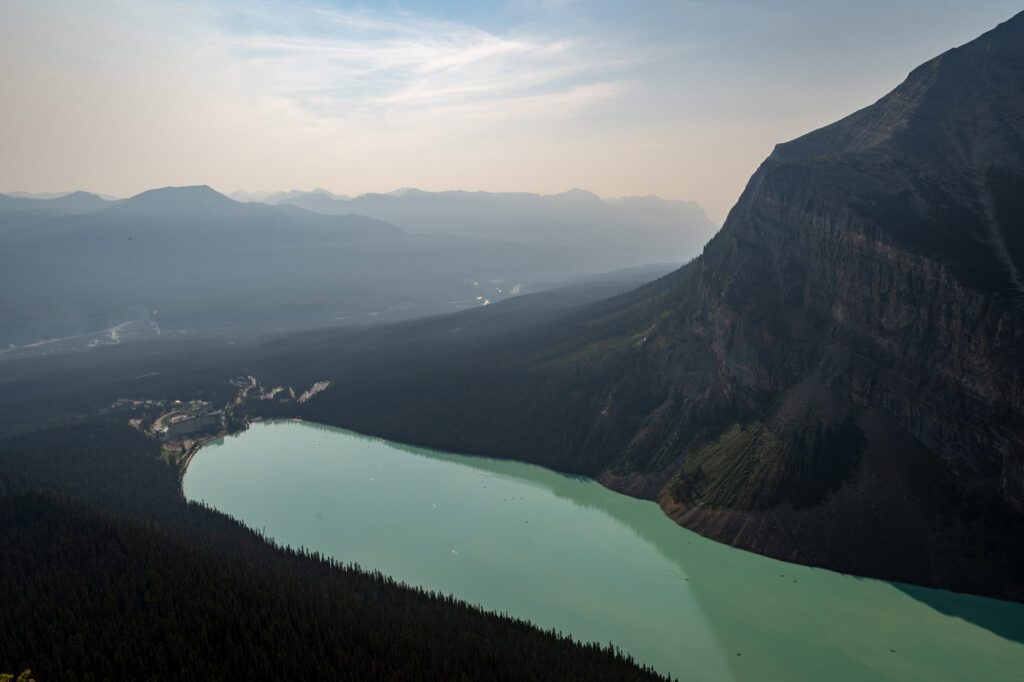
Lake Louise is easily one of the most popular tourist destinations in Banff National Park, and arguably in all of Canada.
There is a steady stream (okay, rushing river) of tourists from sunrise to sunset coming to marvel at the lake’s vibrant turquoise color backed by towering rocky peaks.
The first thing you need to know here is that, while there are two parking lots – the lower lot and the upper lot – both of the parking lots will fill up early in the morning (usually by 7am or so). We arrived at 6:15am, and the lower lot was full.
By the time we had fed the dog, gone to the bathroom, and gotten all strapped into our gear, the upper lot was filling fast (6:45am or so).
The second thing you should know is that once the lot is full, there is no waiting around for someone to leave.
There are parking attendants who will wave you along, and you basically have to drive all the way down to Lake Louise Village before you can turn around and try again.
Again, you need to arrive no later than 7am for a good shot at parking at the lake.
The last thing you should know is that, at the time of writing, parking at Lake Louise between 7am and 7pm for ANY duration costs $21 CAD. That is…expensive.
The biggest upside of driving yourself is that it allows you to get an early start on the trail.
Like the lake itself, this trail is one of the most popular hikes in Banff, which means it gets very, very busy between 10am and 3pm (ish).
Hitting the trail at 7am is a great way to enjoy at least a little bit of solitude.
Taking the Bus or Shuttle to Lake Louise
Don’t want to navigate the messiness of the parking lot at Lake Louise (or don’t want to wake up early)?
Lucky for you, Banff has done a pretty good job at creating options for people to get around via public transportation, which reduces congestion on roads and in parking lots because one bus can hold as many people as 20-25 cars.
There are two options here – the Parks Canada Shuttle, and the ROAM Transit 8x bus.
Which you choose depends mostly on where you’re coming from.
Let’s quickly talk through them so that you can figure out which option is best for you.
The Parks Canada Shuttle (From Lake Louise Ski Resort)
The first option is the Lake Louise Shuttle, which is operated by Parks Canada. This option leaves from the Lake Louise Park & Ride (here on Google Maps), which does mean that you would have to drive most of the way there if you’re coming from Banff or Canmore.
This shuttle runs directly from the park and ride out to the lake every 20 minutes between 6:30am and 6pm (the last return shuttle from the lake is 7:30pm), and there are some other useful routes (the connector between Lake Louise and Moraine Lake and the connector from the Lake Louise Campground) that might be useful, and are included with your reservation.
The shuttle costs $8 per adult, $4 per senior (65+), and is free for kids under 17.
Reservations are released in two windows – in the spring, and two days in advance at 8am Mountain Time. You do need to make a reservation in advance – no walkups are available.
Since things change often, we’d highly recommend heading over to the Parks Canada site for more information.
ROAM Transit (From the Town of Banff)
If you’re staying in Banff and don’t want to drive the 45 minutes or so out to Lake Louise to catch the Parks Canada Shuttle, ROAM Transit has a bus that runs directly from Banff to Lake Louise (there’s a stop in Lake Louise Village).
It’s route 8x, and it departs from the stop right outside of Banff High School (here on Google Maps).
The first bus of the day leaves Banff at 7am, and the ride takes about an hour, which puts you at Lake Louise around 8am.
The last return bus departs the lake at 11pm, putting you back in Banff around midnight.
This route costs $10 each way ($5 for seniors, children 17 and under are free), and you do need to make a reservation in advance (which you can learn about here).
This shuttle, like the one above, does sell out, so you want to make your reservations as far in advance as possible (especially for earlier shuttle times).
While this is more expensive than the Parks Canada Shuttle, it does mean that you can go directly from Banff, which makes it pretty useful if you’re staying in Banff and don’t want to drive to Lake Louise, or if you don’t have a car.
Hiking the Plain of Six Glaciers: A Complete Trail Guide
Now that we’ve got all the logistics and trail tips out of the way, on to the detailed trail guide.
Below, we’ll give you a play-by-play (ish) of what hiking this trail is like.
We’re breaking the trail up into four distinct sections to give you an idea of how the hike unfolds when you’re out there. Those sections are:
- The Lake Louise Lakeshore
- The Climb to the Teahouse
- The Final Path to the Glaciers
For each, we’ll give you the distance and elevation gain you’ll cover, a trail description to help you understand what to expect, and, of course, some pictures we’ve taken.
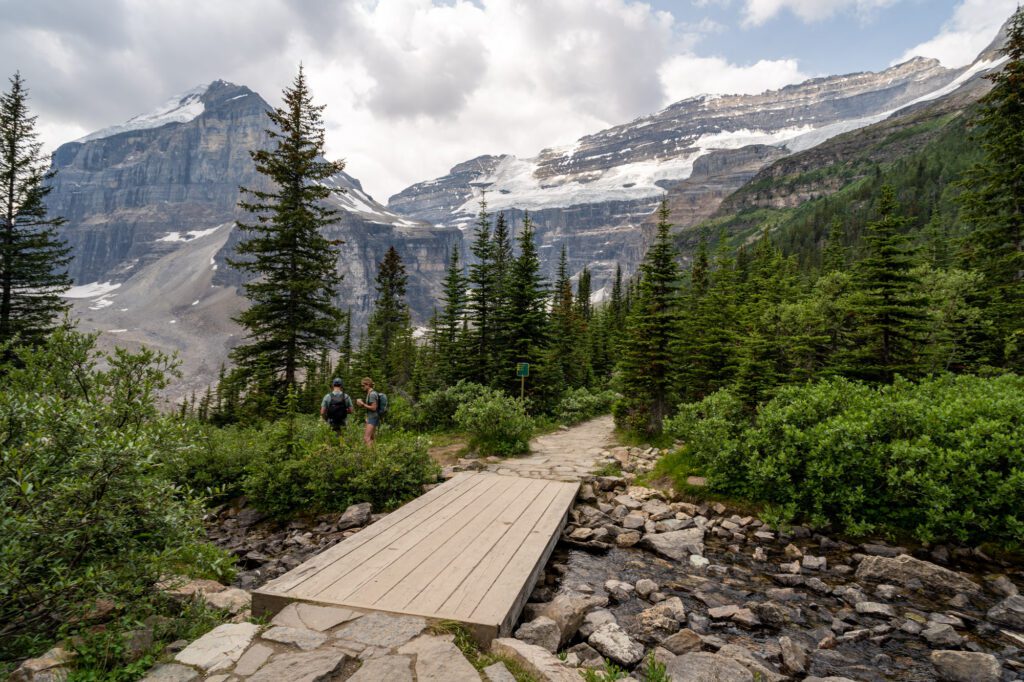
The Lake Louise Lakeshore Trail
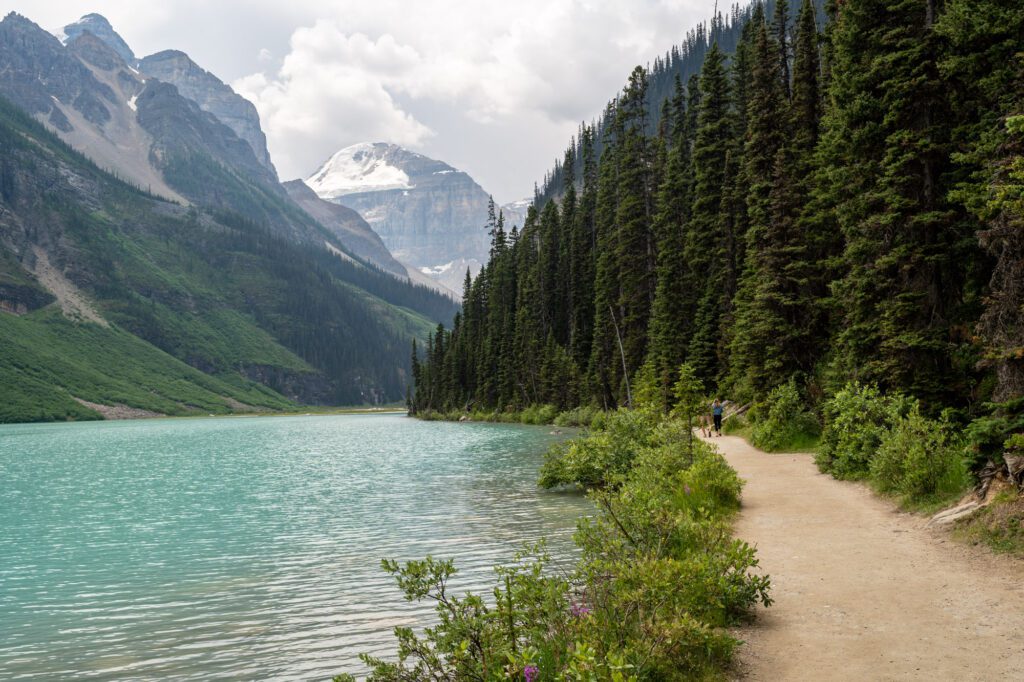
Length: 1.8 miles // Elevation Gained: 100 feet
The biggest section of this hike (as we’ve split it up, anyway) is the Lake Louise Lakeshore trail, which is a nice easy (and mostly flat) stroll along the shore of the lake.
You’ll spend roughly 3.6 miles of the 9 total miles on this flat, paved path, which is part of the reason why we think this is firmly in the moderate category.
The only thing to note about this section is that it will likely be very crowded, especially on the way back if you take our advice and get an early start.
It will also be beautiful, with great views towards the valley and across the turquoise water of the lake to Fairview Mountain.
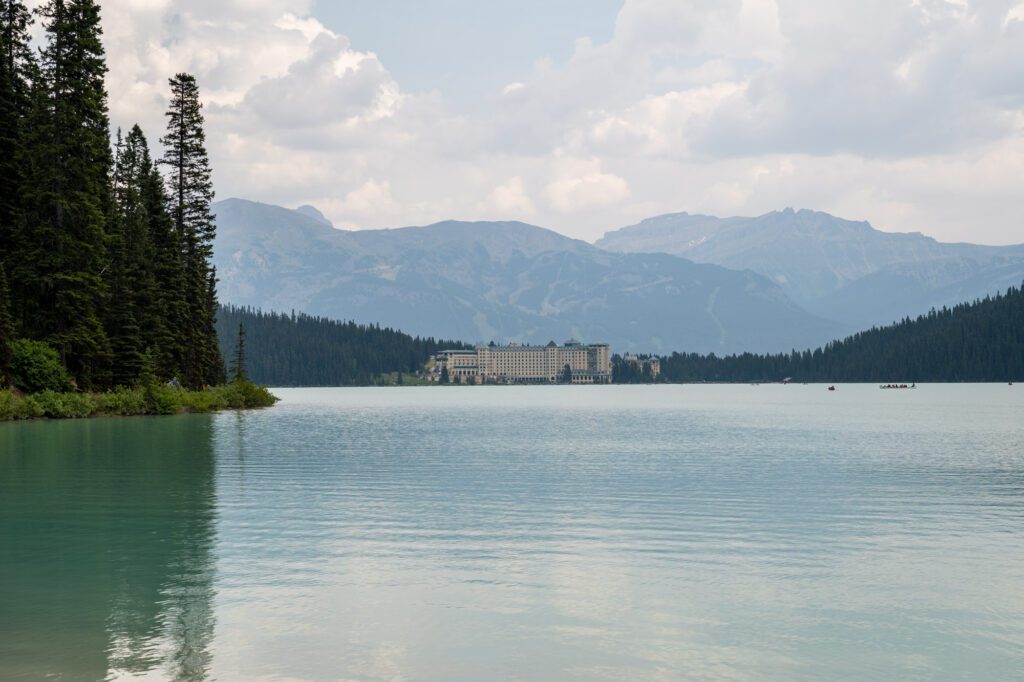
At the far end of the lake from the parking lot, you have some nice views back across the lake to the Fairmont Chateau Lake Louise, and you can get down to the beach for a water-level view.
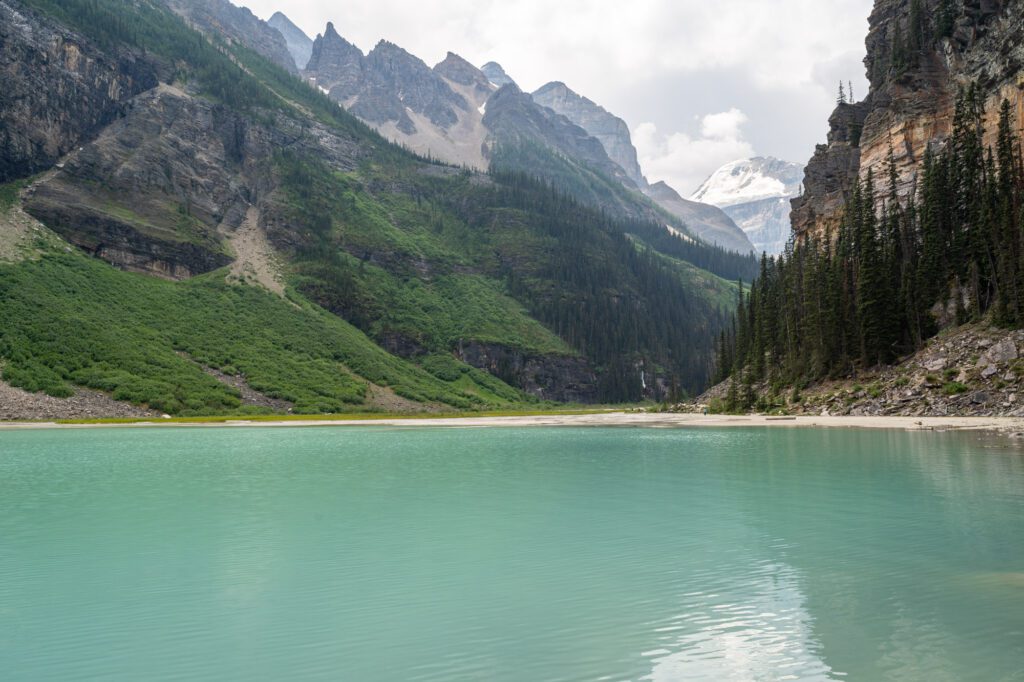
The Climb to the Plain of Six Glaciers Teahouse
Length: 2.0 miles // Elevation Gained: 1,250 feet
From that beach, the trail starts a fairly gradual climb all the way to the Plain of Six Glaciers Teahouse.
We considered splitting it into two distinct sections because the first mile has plenty of tree cover, while the second mile is completely exposed as you climb up a rocky spine and a quick set of switchbacks, making it feel A LOT harder, especially on a hot day in the summer around midday.
Gaining 1,250 feet over the course of two miles is right in the middle of the “moderate” category, but the exposure on the second half of this stretch is no joke, and you’re going to want to make sure you have plenty of water, sunscreen, and snacks to keep you going.
The other thing to note is that the terrain is not particularly flat – there are some big rocky steps, some rocky slopes, and even a strip along a narrow ledge with a drop off on one side.
Hiking shoes or boots with solid traction are going to be your best friend here.
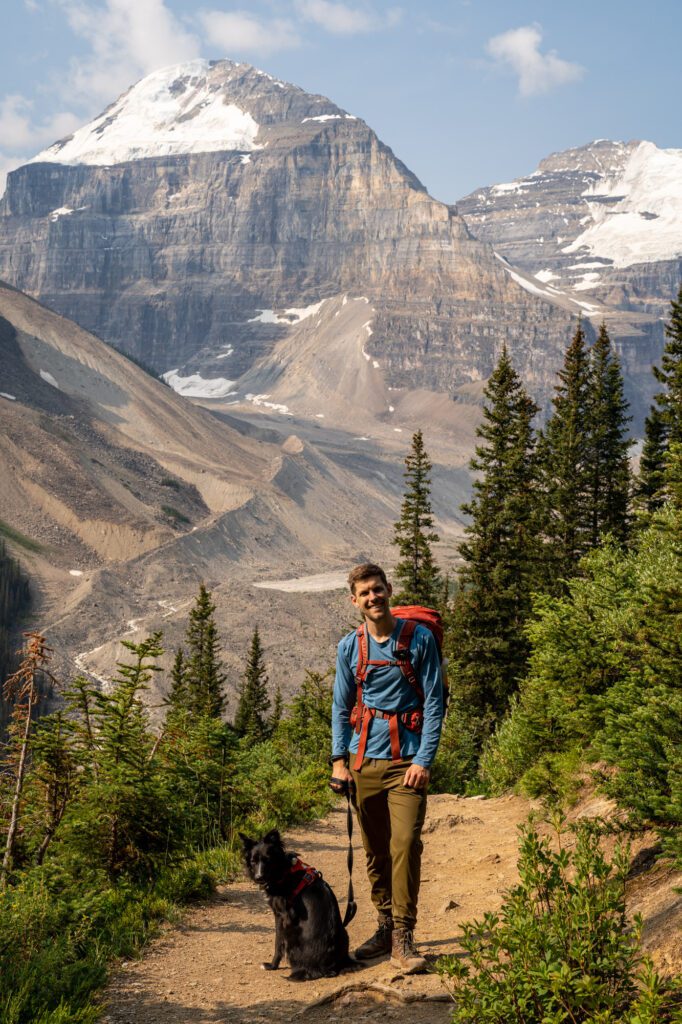
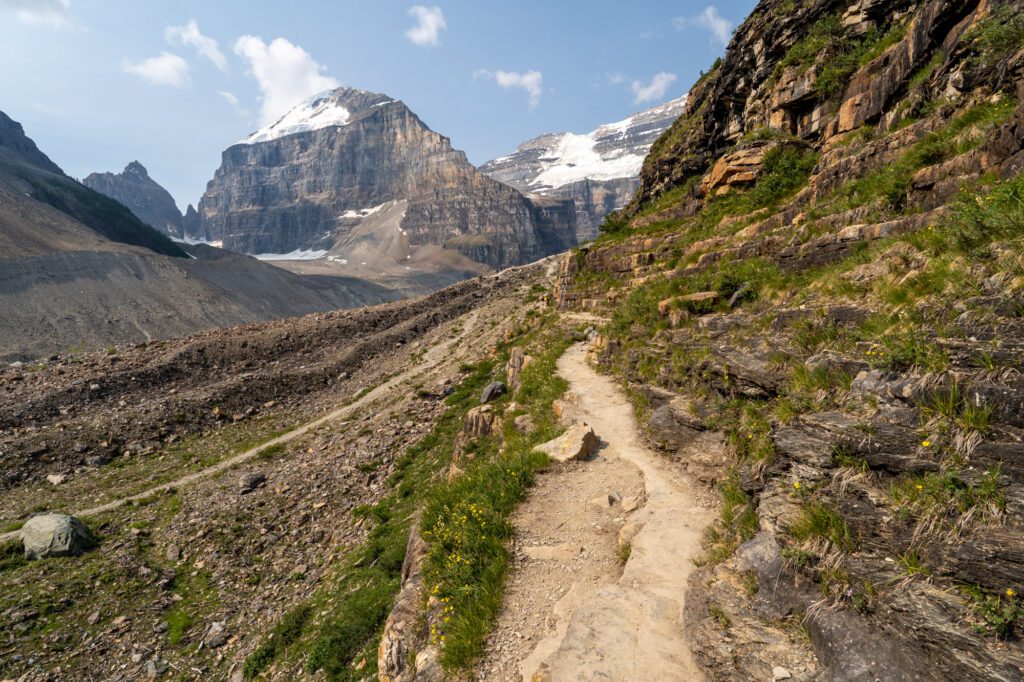
Like we alluded to above, the first piece of this middle stretch of the Plain of Six Glaciers hike climbs, alternating between forested and exposed and following a small creek that runs from the glaciers down into Lake Louise.
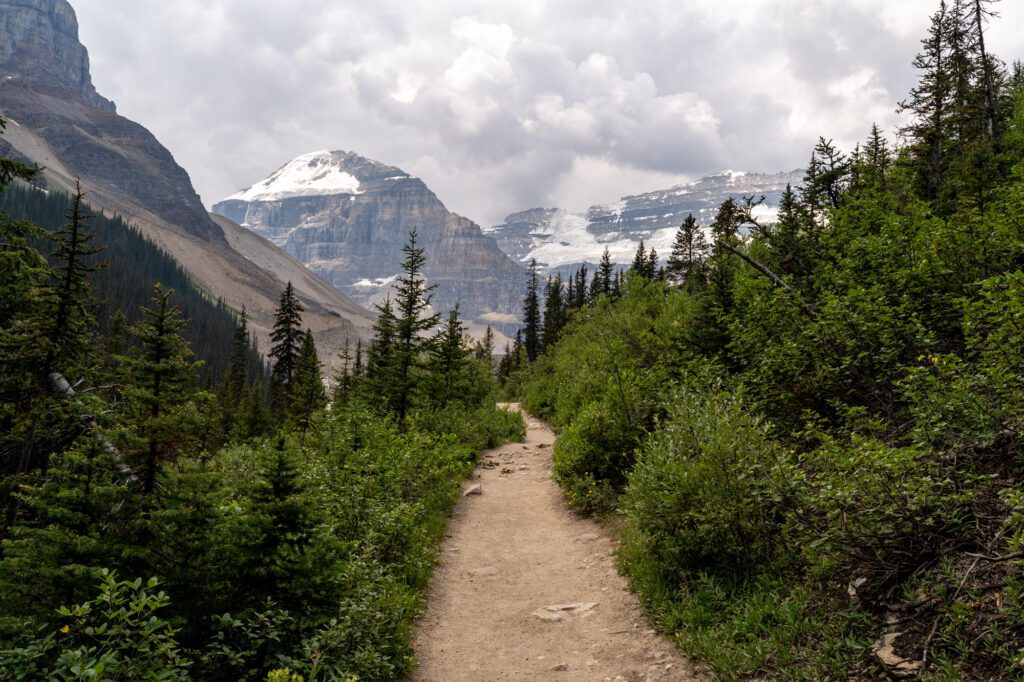
At about the halfway point, you hit the intersection with the Highline Trail (which will connect you to the Big Beehive Trail if you’re doing both), where the trail changes a bit.
It gets more rocky, more steep in places, and more exposed, with little to no shade available between here and the teahouse.
From that trail junction, it’s a mile to the teahouse. Over the course of that mile, you’ll hit the narrow cliffside portion of the trail, the climb up the rocky slope, and a set of switchbacks before briefly entering the forest before you arrive at the teahouse.
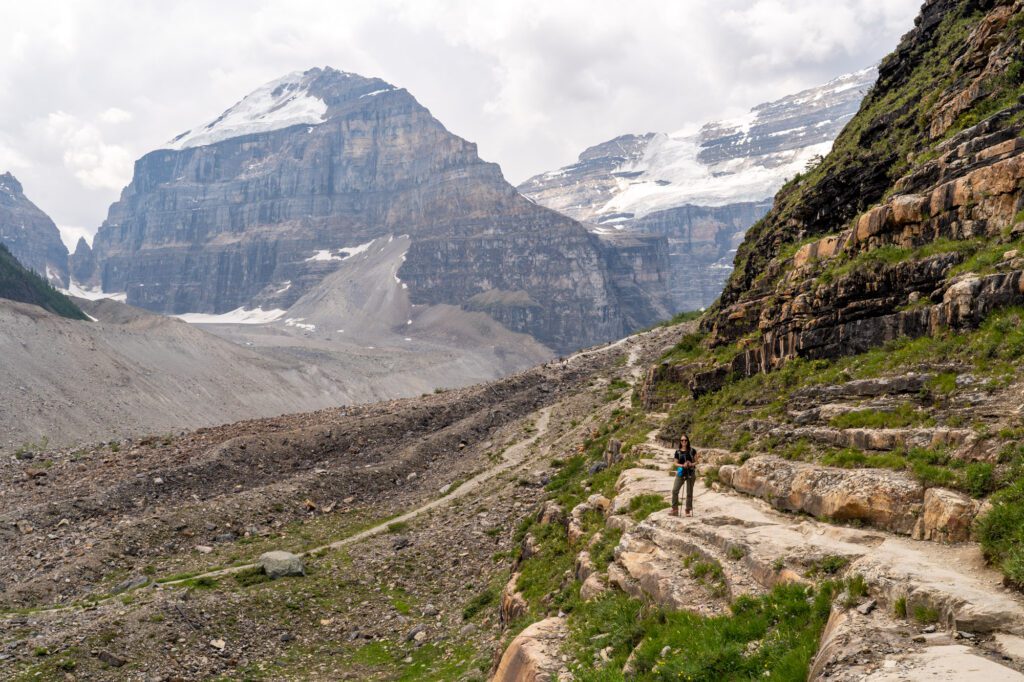
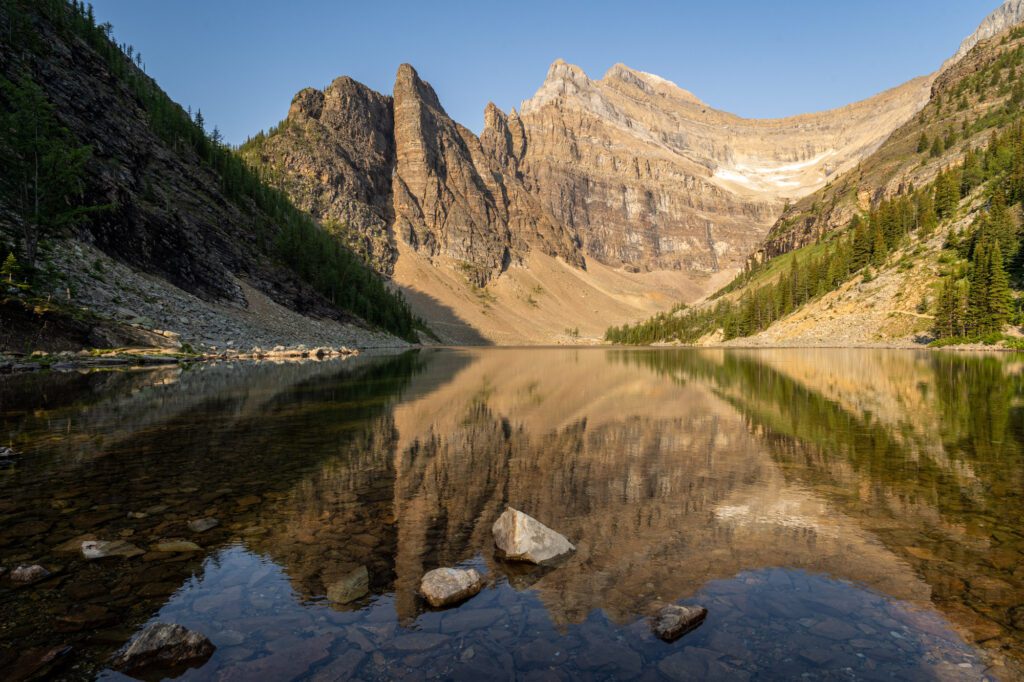
The second half of this middle section is the most eventful stretch of trail, we think, and also has some of the best views both up the trail towards the glaciers and towering rocky peaks, and back down the trail towards Lake Louise.
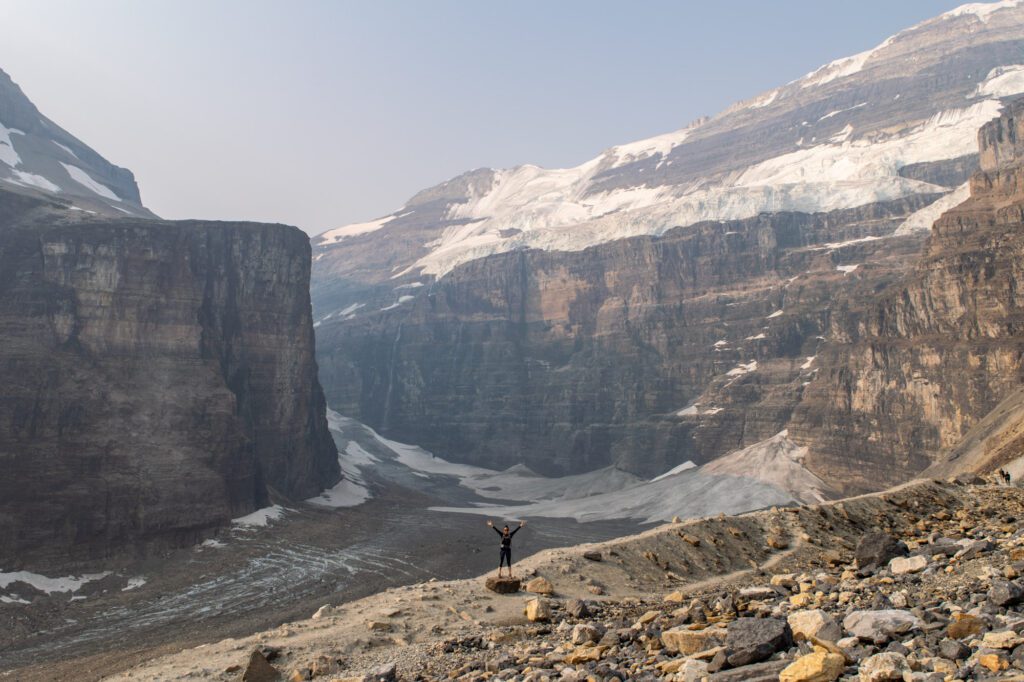
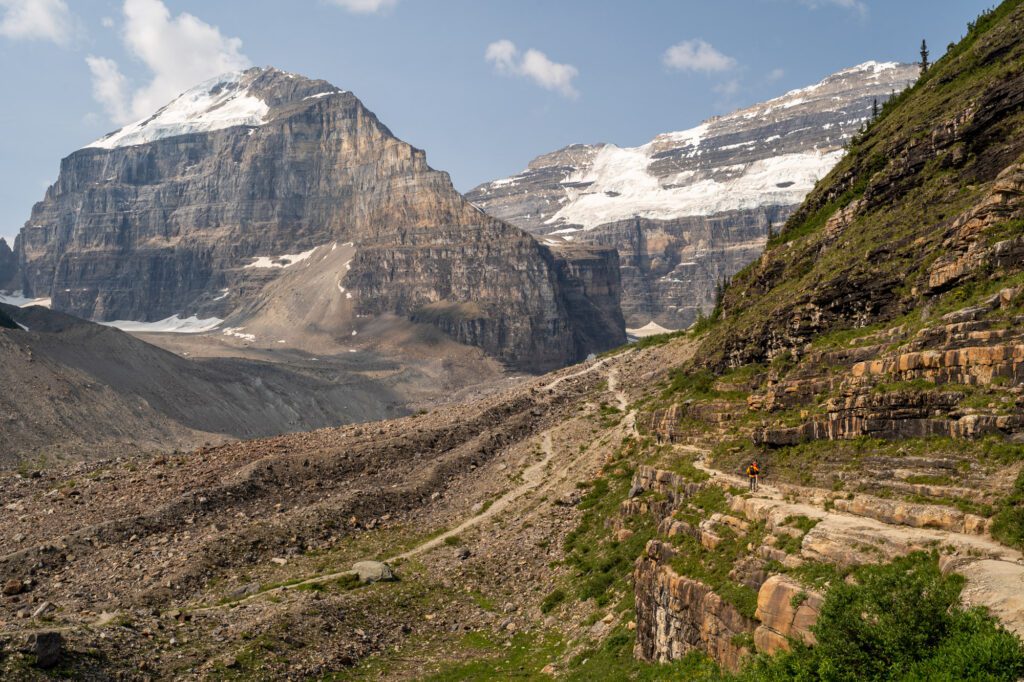
The Final Ascent From the Teahouse to the Glaciers
Length: 0.7 miles // Elevation Gained: 450 feet
This last section of trail takes you from the Plain of Six Glaciers Teahouse up to the… Plain of Six Glaciers.
It’s the rockiest and steepest section of the trail, but it’s worth it for the view up to Abbot Pass and the hut that sits at the top of it.
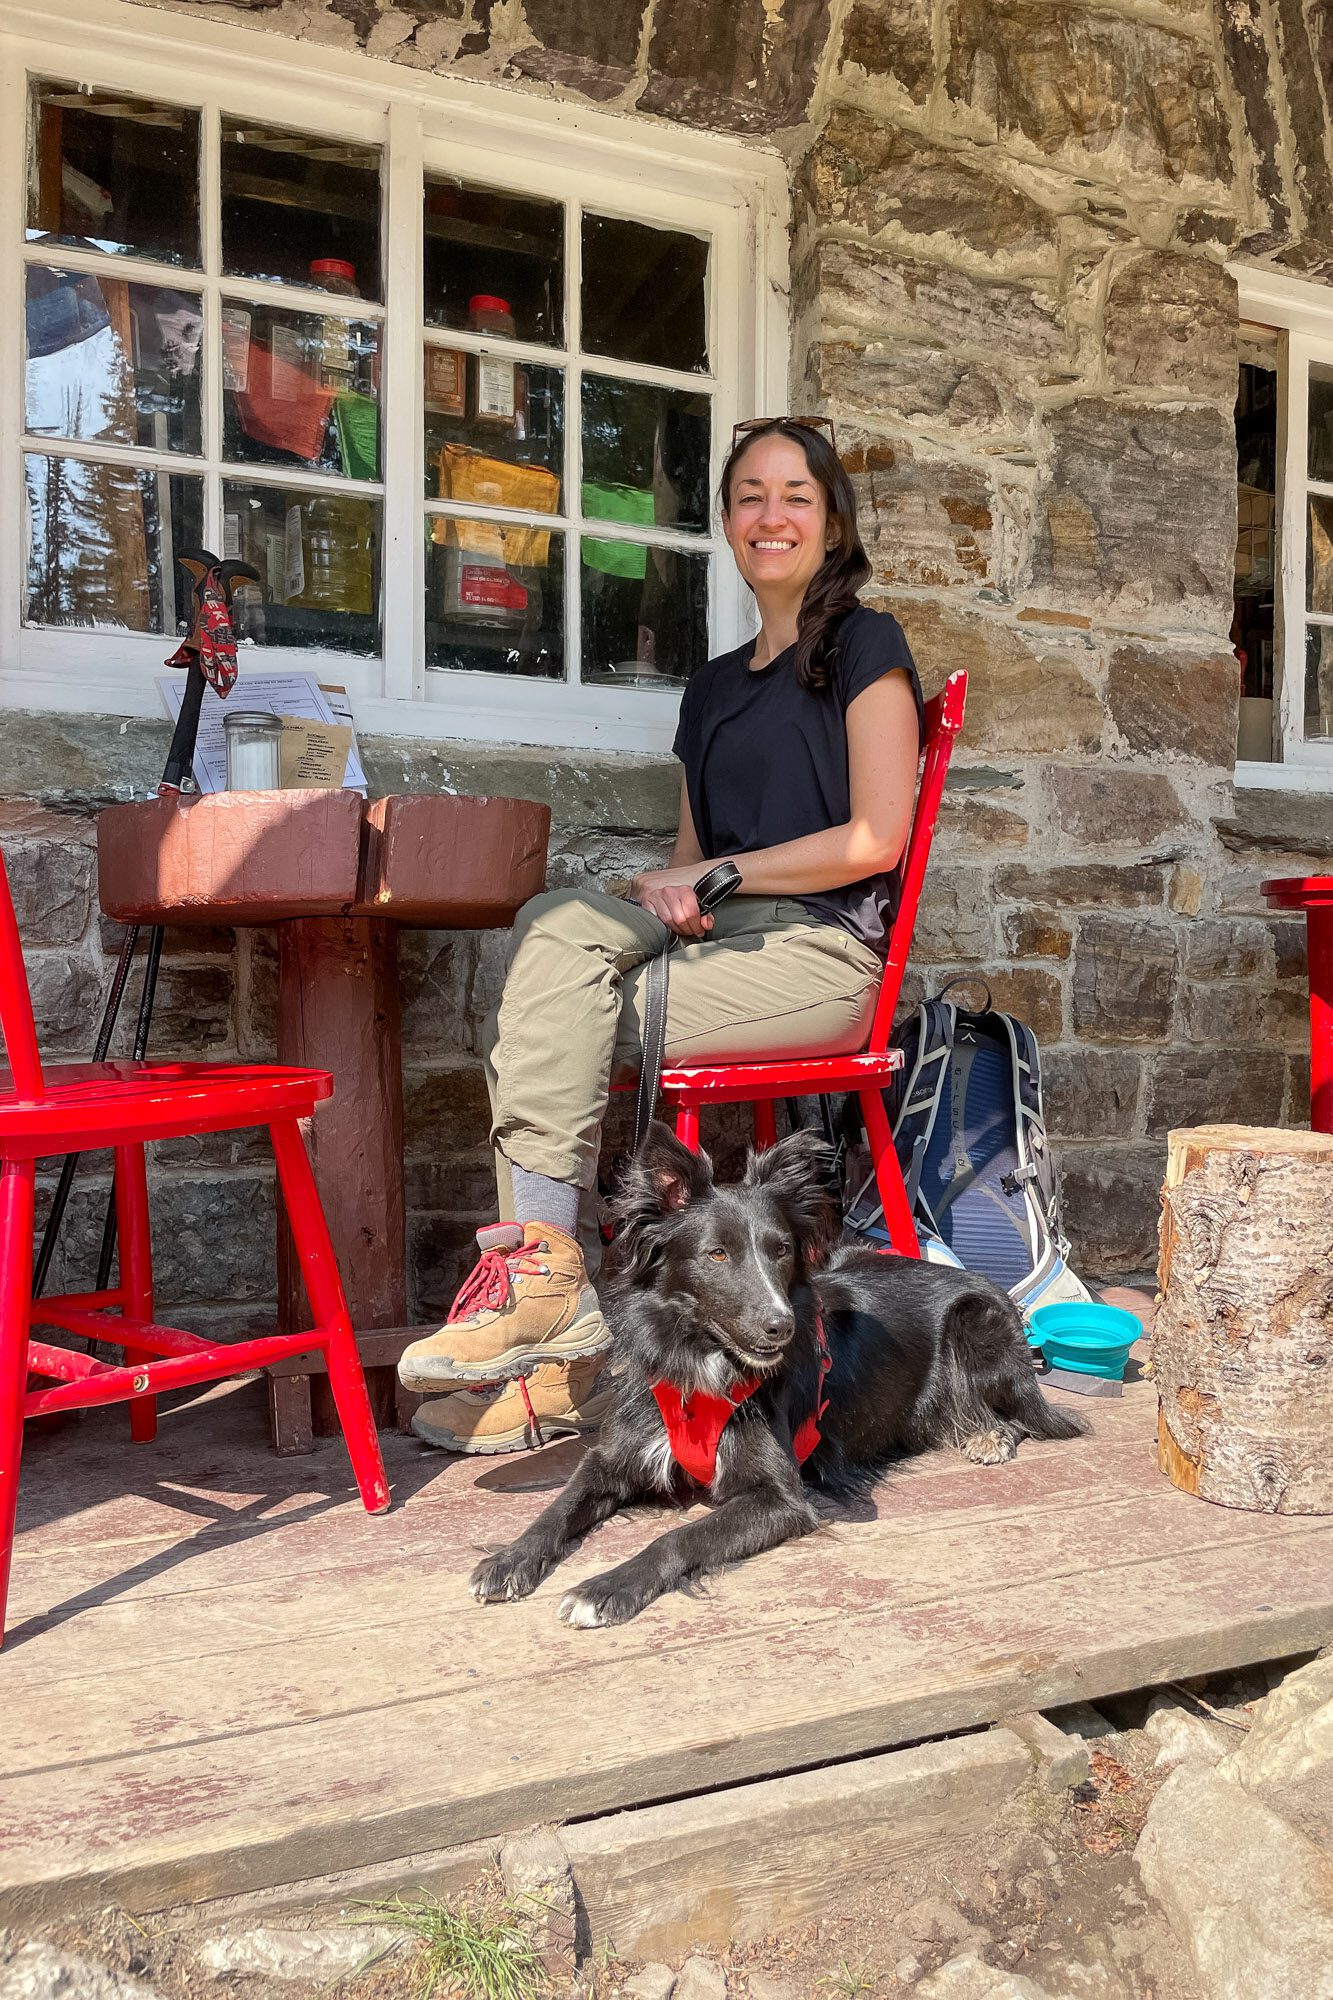
Before we get to the trail, it’s worth talking about the teahouse. These backcountry teahouses had us enamored on our first trip because it’s such a unique experience.
They serve both tea and food, which is all made on propane stoves at the teahouse.
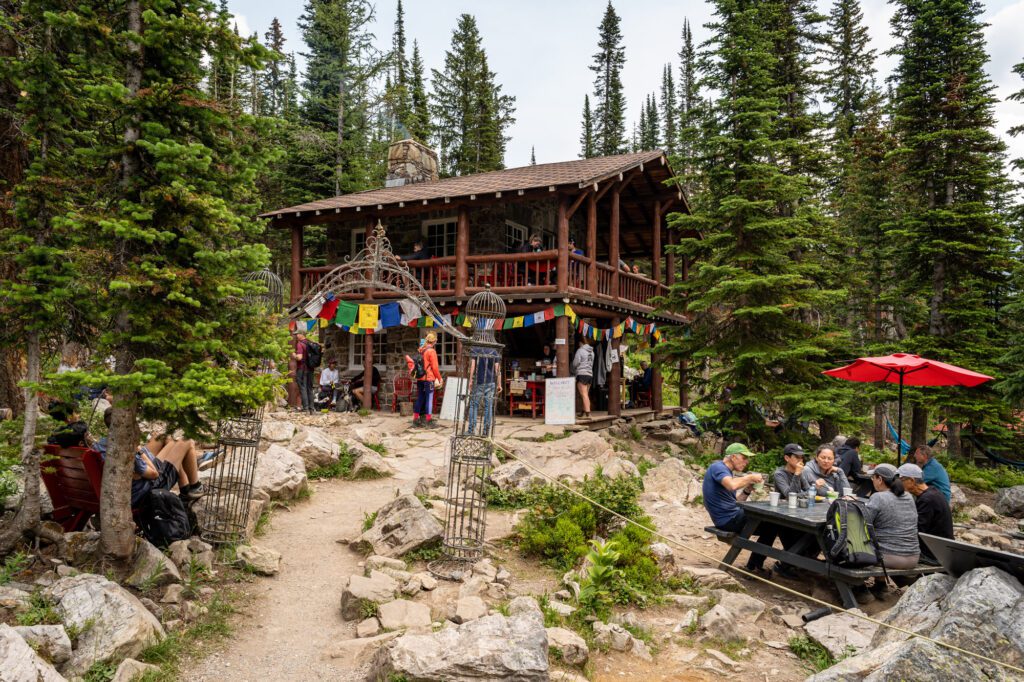
First of all, how do they get all of the stuff? The employees of the teahouses get one big shipment of food, tea, and supplies at the beginning of the season (delivered by helicopter) and then carry everything else in.
Staff work on four or five day increments, where they hike the same trail you do to get to the teahouse with any supplies they or the teahouse need, and then head back down to Lake Louise once their stint is over.
Our recommendation, especially if you’re up here early (the teahouse opens from 9am to 4pm) is to head straight through to the Plain of Six Glaciers to beat the crowds, then stop at the teahouse on the way back down for a well-earned snack and cup of tea (cream of earl grey is the GOAT).
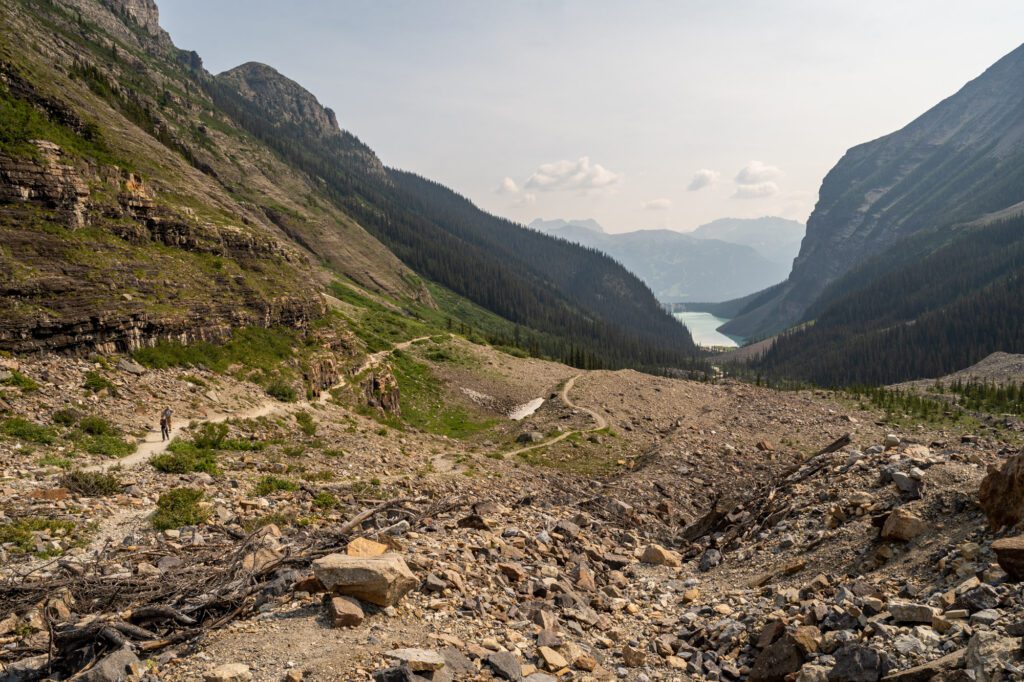
The trail itself starts off very similar to the last stretch of trail before you reach the teahouse, but then it morphs into a set of rocky switchbacks interspersed with big rock steps.
Eventually, you reach the viewpoint at the base of the valley.
The coolest part, at least to us, is the fact that you can see up that huge crevice to the hut at the top of the pass, which someone has ACTUALLY climbed at one point (terrifying).
It’s called Abbot Hut, named after climber Philip Abbot (we later learned that he actually died free climbing Mount Lefroy, which is on the left side of Abbot Pass, which is also named after him).
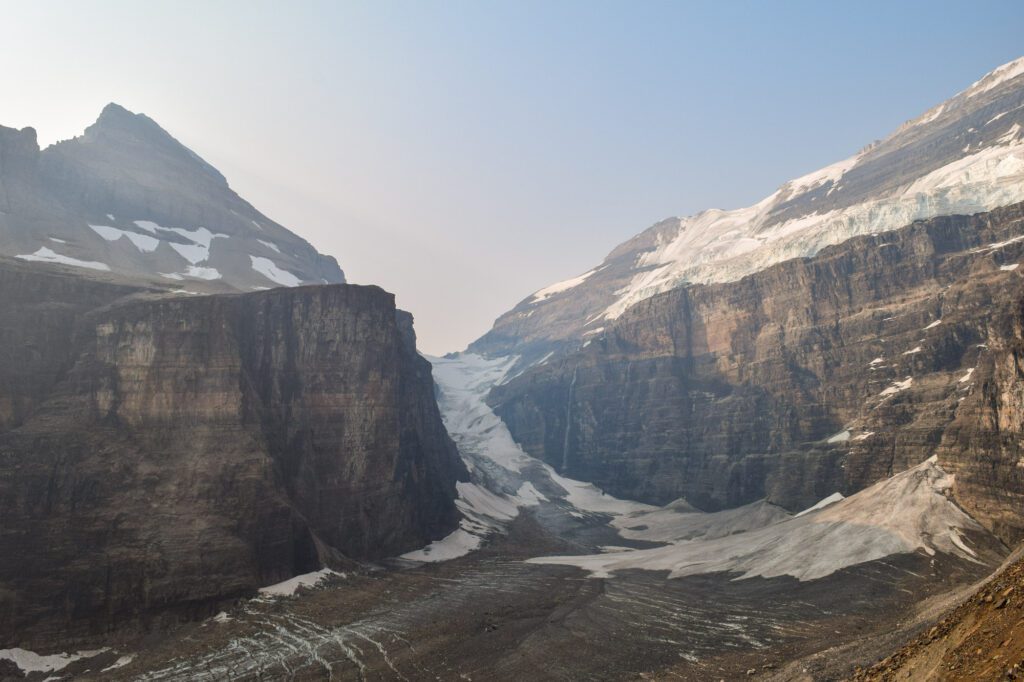
On your approach, you’re likely going to hear huge cracks and booms as snow melts and ice shifts. Lupine was not a fan of the big booms, to say the least.
While there are no bad views to be had up here, the best view involves a quick scramble up the rocky slope to your right, where you’ll have a better vantage point up to Abbot Pass.
Extending Your Hike: The Full Glaciers/Beehives Loop
If you’re looking to extend your hike, there’s really one option that we’d recommend, and it’s the one we did on our last trip to Banff – the Big Beehive / Plain of Six Glaciers loop.
This hike takes you up to the Plain of the Six Glaciers first, following the route above, when the sun is marginally less intense.
On the way down, you’ll connect with the Highline Trail to take you up to the Big Beehive and its excellent views out over Lake Louise and the valley beyond.
From there, you descend down to Lake Agnes and the Lake Agnes Teahouse before making the final, forested descent back down to Lake Louise.
Now, this is a long hike – 12 miles with 3,300 feet of elevation gain – and you need to be prepared for a 5-8 hour extravaganza, depending on how many stops you make along the way.
That means carrying lots of water (we carry at least 2L per person), some snacks, extra sunscreen, plenty of layers, and sturdy hiking boots (Alysha likes her Columbia Newton Ridge boots, which are an excellent first pair of hiking boots).
Trekking poles might also be useful for the steep downhill sections to save your knees – we swear by trekking poles now, after years of thinking they were lame.
The upsides of doing this longer route are that you get to do both teahouses and the two main hikes near Lake Louise in one day, and you only have to deal with parking or the shuttle once if you want to do both the Plain of the Six Glaciers and the Big Beehive/Lake Agnes Trail.
The Best Time to Hike This Trail
Like many hikes in the mountains, the best time to hike this trail is undoubtedly between the summer and early fall, roughly from mid-June to mid-October.
In the winter and spring, the higher elevation sections of this trail can be covered in snow and ice, and are at higher avalanche risk than the area around Lake Louise.
We wouldn’t recommend it – there are plenty of better options with lower avalanche risks in Banff.
We’d only recommend this hike in the summer and fall, but you shouldn’t expect to find solitude while you hike.
This is one of the most popular and highly trafficked hikes in the park, so be prepared to encounter PLENTY of other people along the journey.
There is one consideration for visiting in the summer and fall that has become all too familiar for residents of the western United States and Canada over the past few years, and that’s smoke from nearby wildfires.
During both of our recent trips up to Banff, we had significant parts of our trips where wildfire smoke was thick in Banff and Jasper.
One was in July and one was in September, so planning your trip at a certain time doesn’t really help all that much.
It’s a reality of life on a planet whose climate is changing at an alarming pace, and there’s really nothing you can do to work around it if you have a limited time in the Canadian Rockies.
We like using IQAir to track air quality, and they have a somewhat accurate (as accurate as something like this could be) forecast feature that helped us plan around particularly bad air quality days.
Just remember that things can change on a dime, even within a few hours, based on wind and precipitation.
For example, we hiked the Wilcox Pass trail in the morning and got a lot of smoke obstructing some of the views.
Then, we checked a webcam later that day when we had gotten back home, and it was completely clear.
Are Dogs Allowed on the Trail?
Yes! Part of the reason we found ourselves in the Canadian Rockies on our last trip is that we had recently adopted our dog, Lupine, and were looking for a fun, dog-friendly hiking trip.
We loved our first trip to Banff and Jasper, so we decided to spend three weeks making our way from home to Banff and back again.
While dogs are allowed, they need to be on a leash at all times in the park, and you need to pack out any trash (read: dog poop) with you.
We have saddle bags for Lupine so that she can carry her own water, snacks, and waste.
The other thing to know is that dogs are not allowed inside the Plain of Six Glaciers tea house, though they are allowed on the patio.
Things to Know Before You Go
Here are a couple of other things to keep in mind before you hit the trail.
You need a Parks Canada Pass while you’re in the park. You have two options – buy a pass for the number of days you need it for, or buy a Discovery Pass, which gives you access to all national parks in Canada for a full year.
At a high level, the math on the Discovery Pass works out if you’re spending 7 days or more in the parks, though there are some permutations around family passes that might make the math change in your particular instance.
You can buy both versions at the park entrance stations, or online in advance.
Teahouse hours. The Plain of Six Glaciers teahouse is open seasonally during the summer and early fall, from 9am to 4pm.
That means that if you get a super early start on the trail, you’ll likely arrive at the teahouse before it opens.
We’d recommend that you just continue up to the Plain of Six Glaciers viewpoint, then come back down and enjoy the teahouse on your way back down.
This trail is very exposed. Especially from the junction with the Highline Trail through to the end of the hike.
Aside from a brief forested section around the teahouse, there is basically no shade for that last two miles or so.
Be prepared with plenty of water, sunscreen, and other sun protection (glasses and a hat).
Layers are your friend. As you get up to the glaciers, you’ll get a cool breeze, which will be a nice change from being hot and sweaty from the climbing.
However, once you stop and admire the view for a few minutes, you’re going to start to get cold, which is why layering is so important.
We started early, when it was pretty cold, and were layered to the gills with a long sleeve shirt, fleece, and our puffy jackets (we both love our Patagonia Nano Puffs as a lightweight layering piece).
By the time we got into the heart of the climb, all of those layers were off, and they went right back on at the base of the glacier once we had stopped and cooled off.
You’re hiking at elevation. Remember that you’re at elevation in the Rockies (Lake Louise is 5,250 feet above sea level, and you’ll get up above 7,000 feet by the end of the hike), so if you’re coming from sea level, the hike is going to feel a little harder than you’re used to.
This is why we recommend starting with an easier hike first to get acclimated, and tackling the more difficult hikes later in your trip.
You can read more in our Banff itinerary or Canadian Rockies itinerary (which includes Jasper and Yoho).
You’re in bear country. Both black and Grizzly bears live in Banff National Park, and we saw both (though never up close on a hiking trail, thankfully).
Our biggest tip is to make plenty of noise on the trail – Matt is known for freestyle singing as we hike – so that you avoid any surprise encounters.
You’ll also want to have bear spray, which you can get in town if you’re flying in (you can’t bring bear spray on a plane or across the border if you’re coming from the US by car).
You should check with your hotel or lodge because many of the best places to stay in Banff will lend it to you.
Expect afternoon thunderstorms in the summer. As if you needed another reason to get an early start, we got thunderstorms nearly every single day sometime between noon and 4pm.
If you do a hike above the treeline, you’ll want to be on your way down by the time they roll in.
Trail closures are fairly common in Banff. Mostly because of bear activity or weather. Check here for current conditions.