4 Days in Moab, Utah: Planning An Incredible Moab Itinerary
We loved Moab, and think that it’s well worth spending four days exploring this adventure town, particularly as a part of a broader Utah National Parks road trip. Between the amazing diversity of landscape in Arches National Park and Canyonlands National Park, and some of the things to do in Moab outside of the national parks, you could probably spend a full week and not run out of things to do.
Below, you’ll discover how to make the most of your 4 days in Moab.
You’ll cover a ton of ground, including both Arches and Canyonlands National Parks and some of the more off the beaten path gems. You’ll find everything you need to know to plan an amazing Moab itinerary – when to go, how to to get there, where to stay, and what to do and see.
For a deep dive on Moab’s best activities, read our guide to the best things to do in Moab, which includes all the best hikes in Arches National Park and Canyonlands, along with some other outdoor activities nearby, and our guide to finding a perfect place to stay in Moab.
Disclaimer: Some of the links in this post, like hotel links, are affiliate links, meaning at no additional cost to you, we make a little bit of money if you click through and book. That being said, we would never recommend something to you that we don’t stand behind 100%.
4 Days in Moab: A Complete Moab Itinerary for First Timers
Here’s exactly how we would spend your time in Moab if it’s your first time.
Think of this as a “best of” guide – we did almost everything listed here, along with a few things that we wouldn’t necessarily recommend, which didn’t make the list.
Day 1: Arches National Park
On your first day, you’ll be driving from the airport and you’re probably going to be arriving mid-afternoon depending on what time your flight was (try and get the earliest flight possible!).
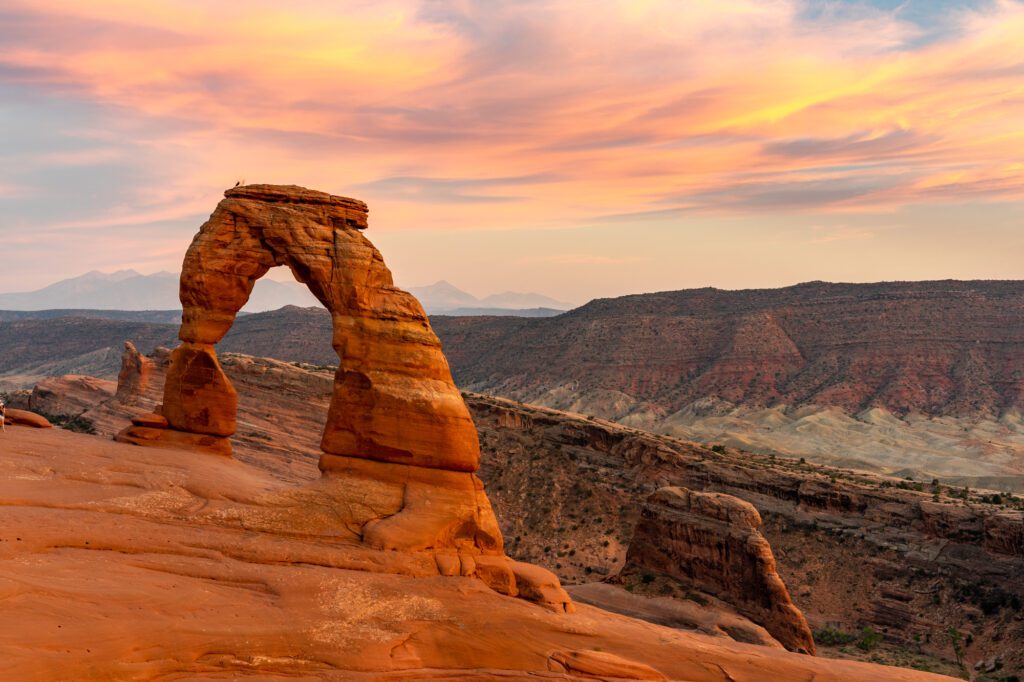
Delicate Arch for Sunset
Check into your accommodations for the next few days and head up to Arches National Park for that sweet, sweet golden hour light and sunset at Delicate Arch.
It’s a three mile hike (round trip) that was a little harder than we thought it would be, but that didn’t stop literally a hundred people – ages five to 65 – from doing it. It will probably be crowded if you’re there anytime between April and the end of October, but it’s worth it. You’ll climb up a section of rock, so you’ll want to wear your hiking shoes with plenty of grip.
Side note: I saw so many people with the stylish and affordable Columbia Newton Ridge Hiking Boots on our four month trip – they would be a great choice for this trip. They’ve got men’s and women’s versions, and waterproof versions too, and they come in under $100.
There’s one short section of the trail right before you get to the arch that’s narrow with a steep drop off, so keep an eye on your kids.
If you do that hike at sunset, make sure to bring a headlamp for the way down. It gets dark FAST, and the last thing you want is to be hiking down the slab of rock in the dark.
Day 2: More Arches!
A few hours is not NEARLY enough time to see all the amazing stuff at Arches, so spend your second day in Moab back in the park. Go early and pack a picnic lunch – there are no restaurants inside the park, and you’ll want to spend the whole day exploring.
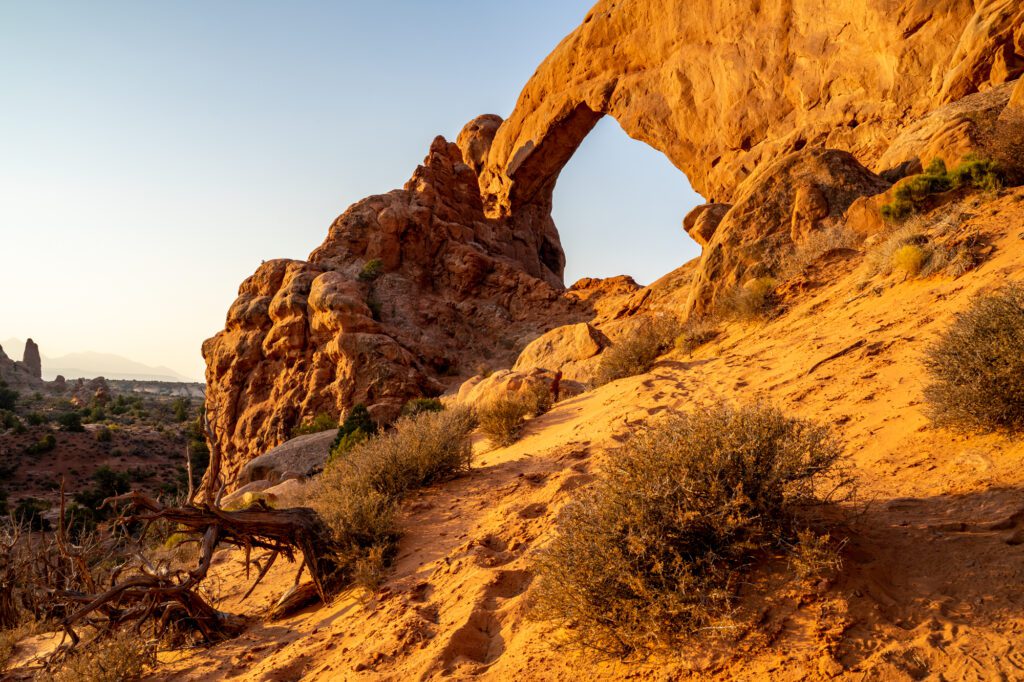
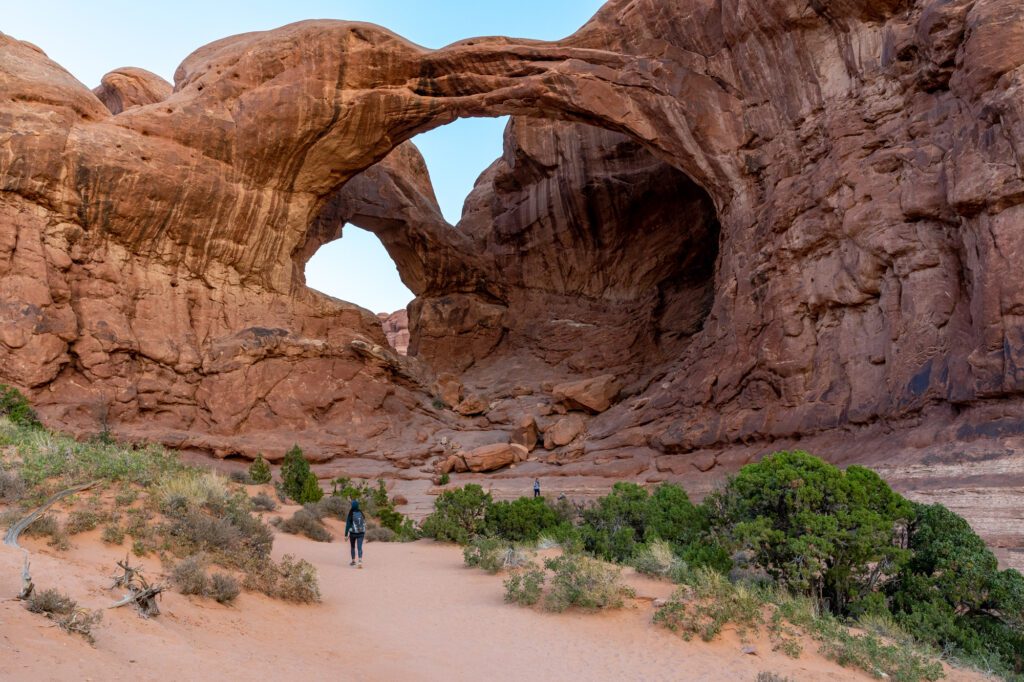
The Windows, Turret Arch, and Double Arch

First thing in the morning, head to the Windows area to take in the North and South Windows, Turret Arch, and Double Arch.
If you can swing it, try to spend sunrise at the Windows, which face east and are the perfect spot to watch the sun come up over the horizon. Then make the short walk to Turret Arch, which is along the same small loop, and then down to Double Arch, which is an impressive piece of natural beauty – make sure to climb up to look out the window at Double Arch!
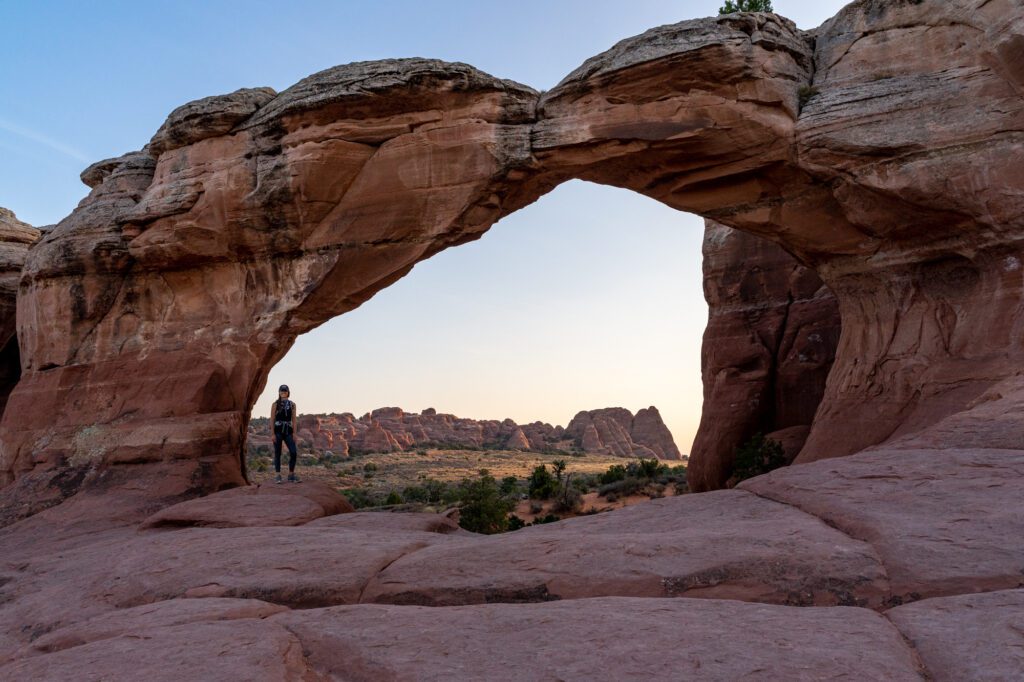
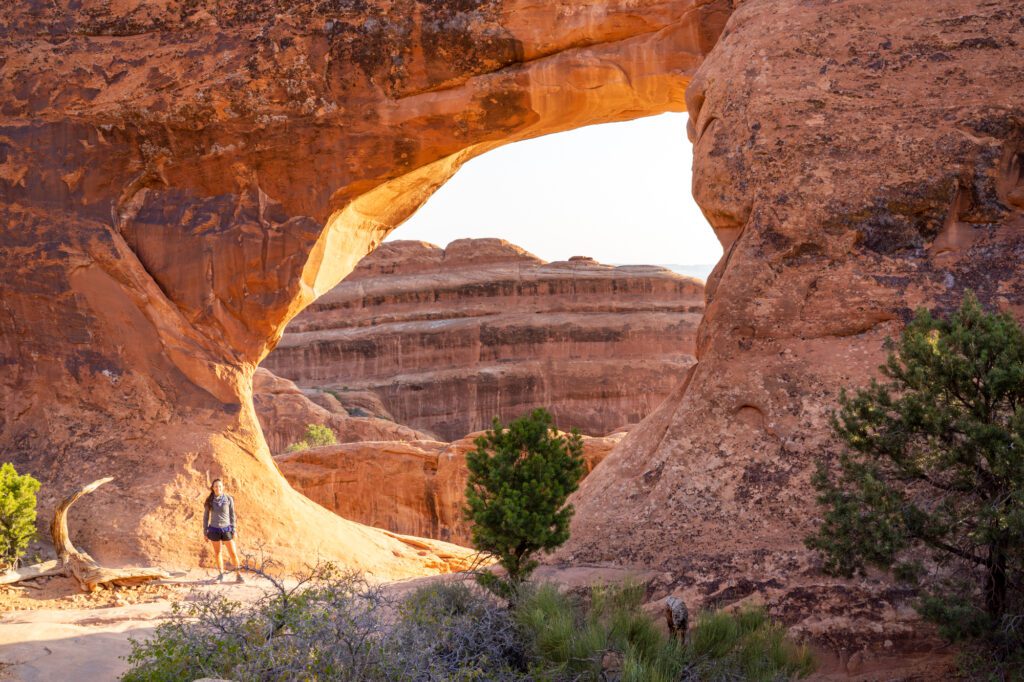
Devils Garden: The Best Hike in Arches National Park
Once you’ve seen all of that, hightail it to the Devils Garden trailhead to do the best hike in Arches National Park.
It’s a long, exposed hike with multiple scrambles and climbs on sheer rock faces, but it’s 100% worth it. There are three levels, depending on what you’re looking for, but I’d recommend the longest option where you’ll see a total of SEVEN different arches.
- Short Option – ~2 Miles RT: Hike out to Landscape Arch, then hit Tunnel Arch and Pine Tree Arch on the way back.
- Medium Option – ~2.7 Miles RT: Hike out past Landscape Arch, do the offshoot to Navajo Arch and Partition Arch.
- Longest (And Best) Option – 8 Miles RT: The whole shebang. See all the arches, including Double O, and return on the primitive trail. I’d skip Dark Angel, which we didn’t find terribly impressive.
Whichever hike you choose, you’ll need to bring at least two liters of water, snacks, and sun protection. The sun is brutal, and this area is fairly exposed with almost no shade in some parts. People die from the heat out here, so take it seriously.
There is a nice picnic area near the Devils Garden campground, so head there to eat your picnic lunch and relax in the shade to gather some energy for the next stop.
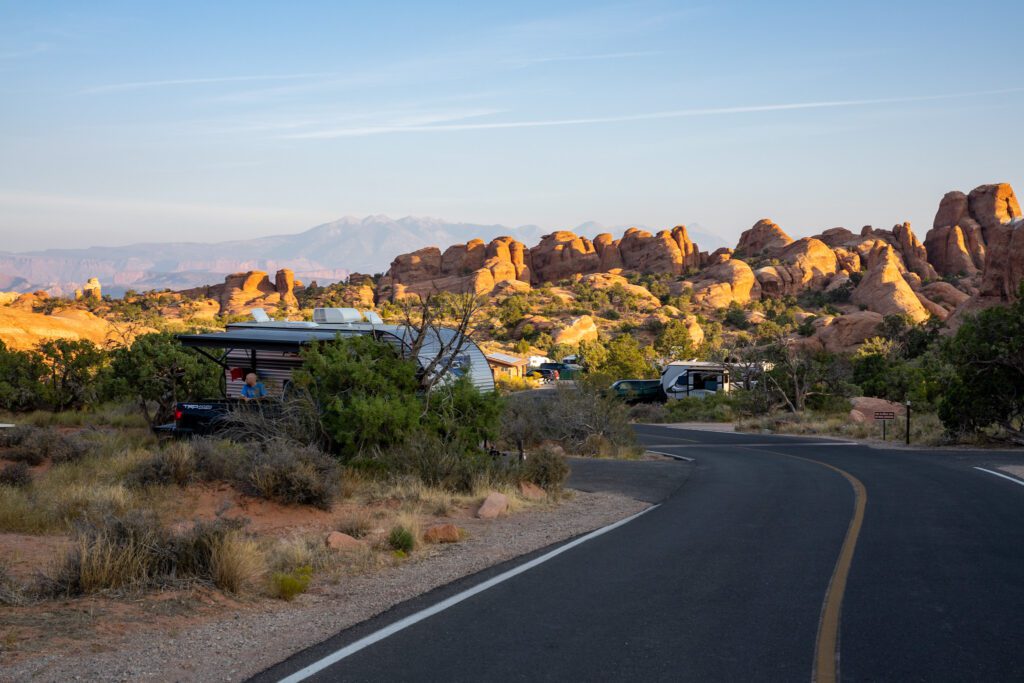
Broken Arch & Skyline Arch
In the afternoon, head to the Devils Garden Campground amphitheater to park your car. Or, better yet, stay at the campground so you don’t have to deal with parking at all on this day! There are two short and easy hikes here that are a perfect end to your time in Arches.
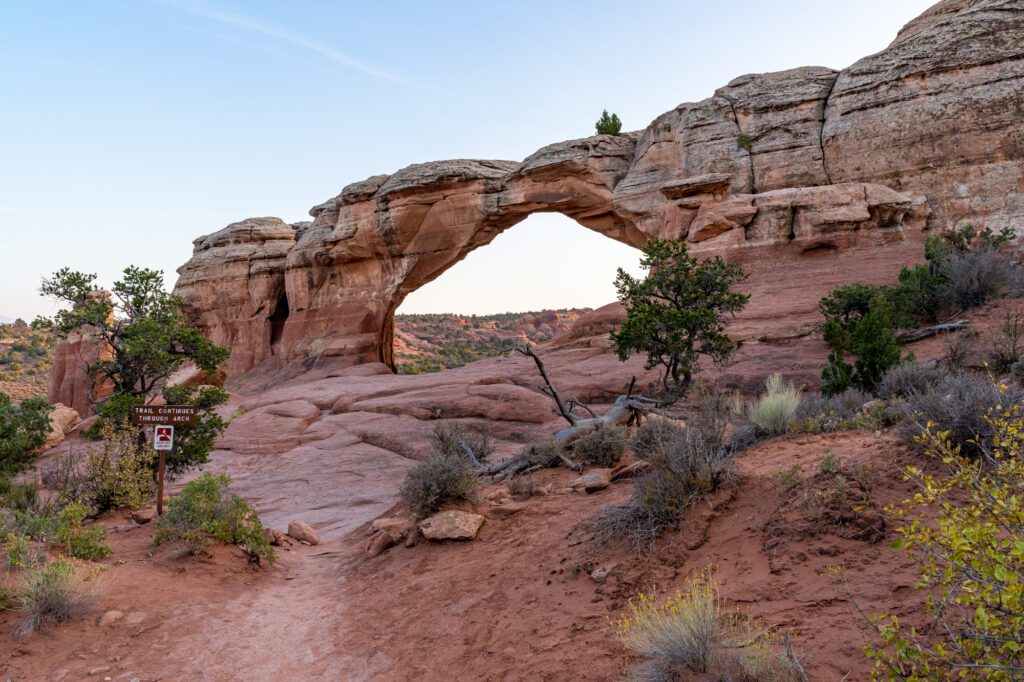
First, do the trail to Broken Arch, which is a short hike through the sagebrush to a big arch with a crack down the middle – a little scary, but definitely worth seeing. It starts at the second bathroom in Devils Garden, which is a short walk along the campground road from the Amphitheater parking area.
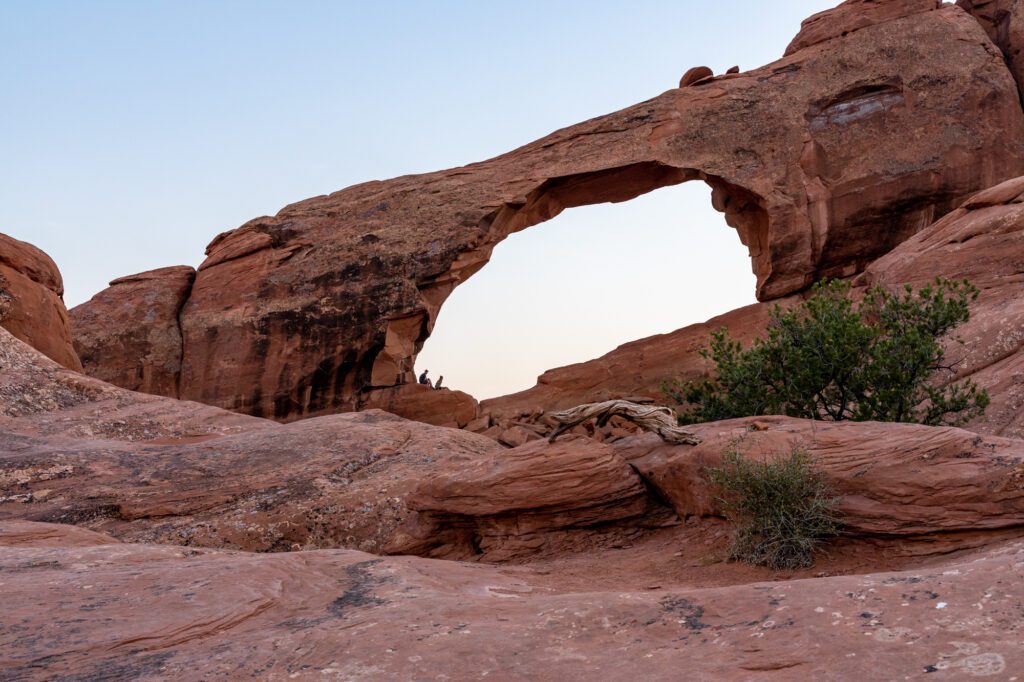
Depending on how you’re feeling after Broken Arch, either continue on to Sand Dune Arch (which is a little “meh” after all the other ones you’ve seen today), or take the trail back to the campground, which would be a right when the trail forks.
The best view of Skyline Arch is actually from a primitive trail behind the Amphitheater at Devils Garden Campground, which is why you parked your car there. Head out the back of the Amphitheater and climb the rocks directly behind it for a nice view – you can climb into the arch, but be careful not to tread on the plants and fragile landscape. Stick to the rocks when you can.
At this point, you’ve done a ton in one day and have seen the major highlights in Arches. I’d call it a day and head back to town or camp.
If you missed Delicate Arch at sunset the day before, head there and do the three mile hike in to see the spectacular arch with hundreds of your closest friends (at least in high season).
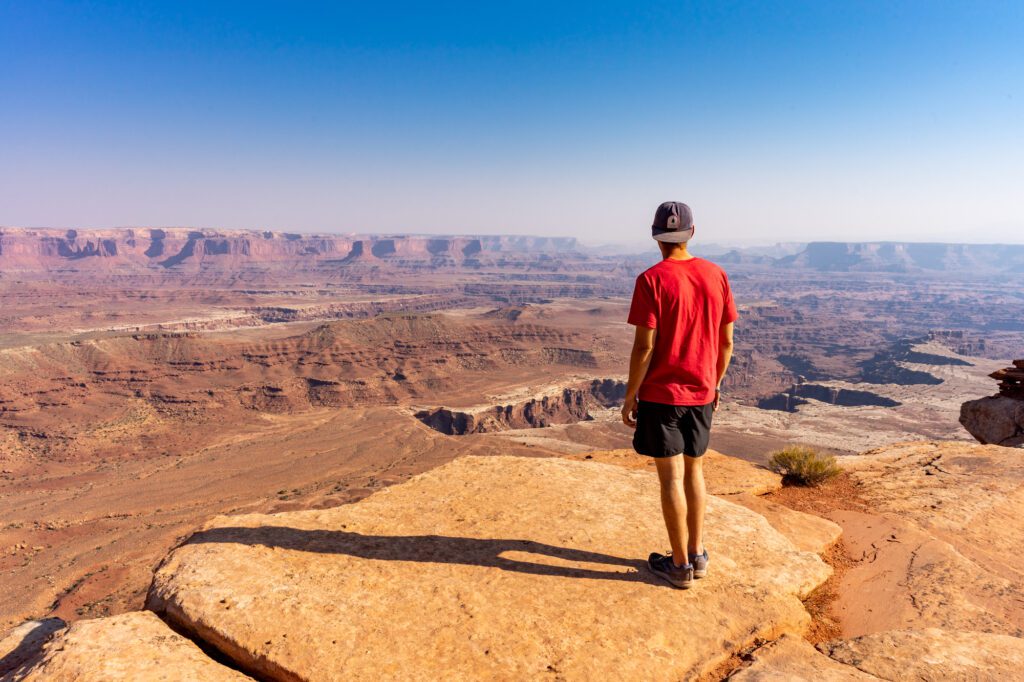
Day 3: Canyonlands National Park
Canyonlands is a completely different experience than Arches, which we really liked. Arches is all about towering… arches.
Canyonlands is about the vast, deep canyons created by millions of years of erosion and crazy earth stuff (that’s the technical term).
I was telling Alysha at one point that, theoretically, I understand how this area came to be. But I still don’t really understand. That’s how impressive it is. I know the science (kinda, I mean I took rocks for jocks in college, so I’m basically an expert!) but I’m still blown away at just how crazy the landscapes in this part of the world are.
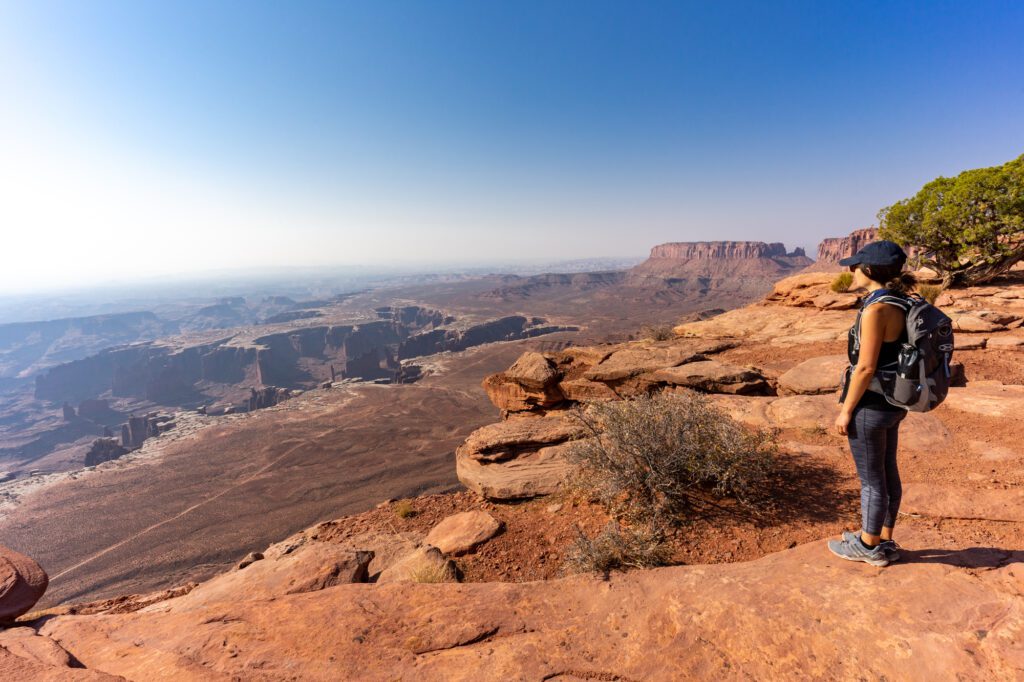
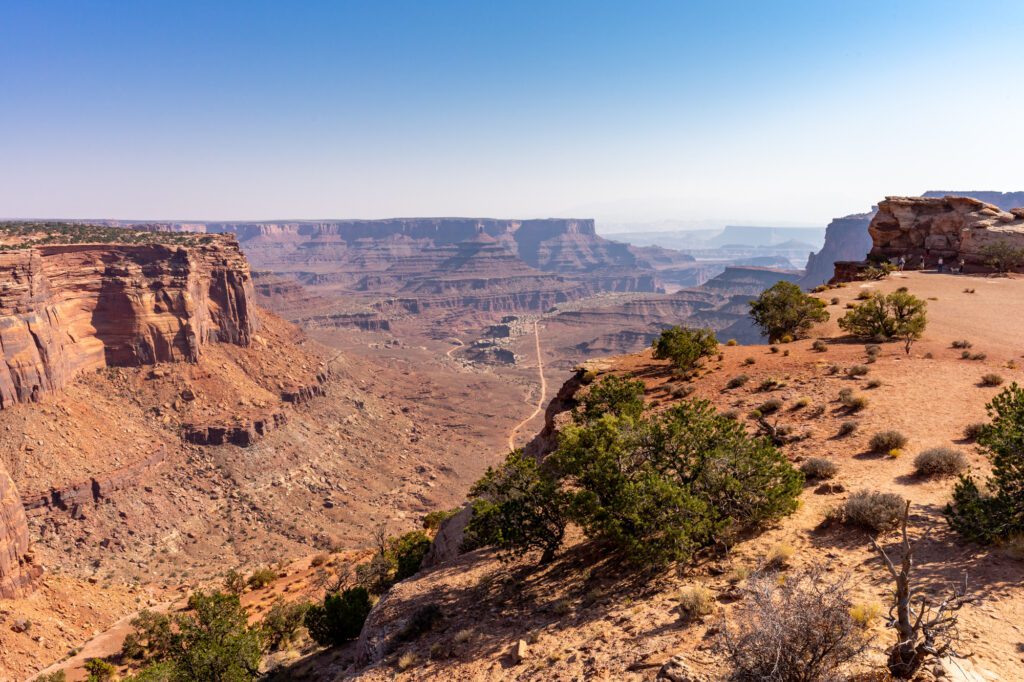
Canyonlands is broken up into three parts. There’s Island in the Sky, which is the section you should focus on if you have just one day because it’s the most accessible from Moab. The other two sections – Needles and the Maze – are a long drive away from Moab, and the Maze is hardly even accessible at all.
If you’ve got more time, it’s worth a drive to the Needles area, which is where you’ll find some of the best hiking in Moab, or it could be worth taking a 4×4 tour to get off the beaten track in Canyonlands and see more of the park.
With one day, you should focus on Island in the Sky. Here’s how to spend a perfect day.
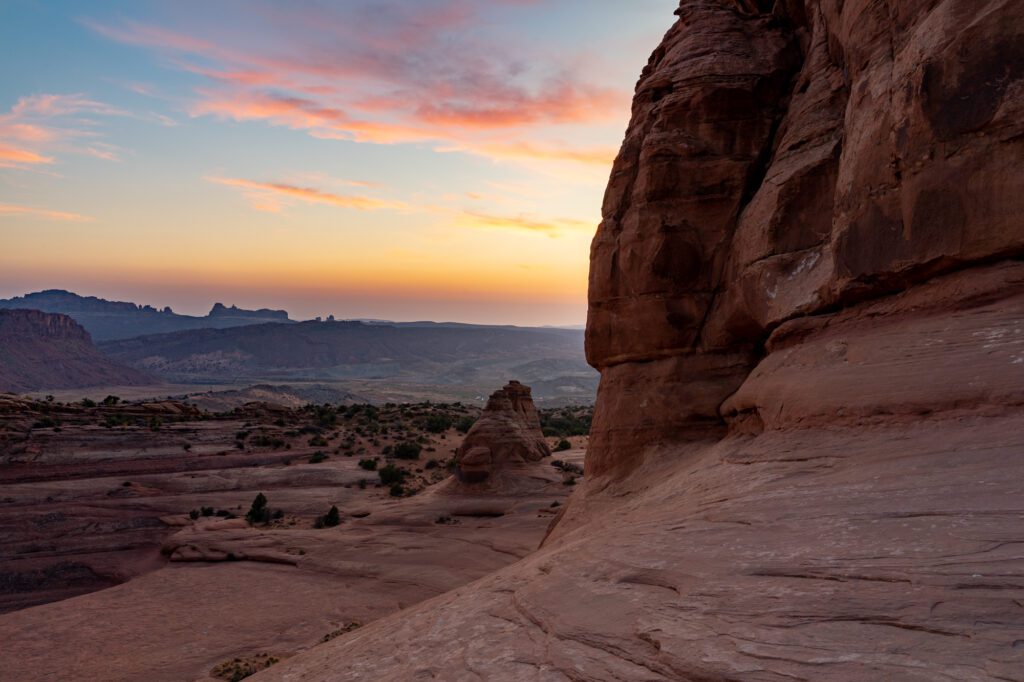
Sunrise at Mesa Arch
Your first stop, along with nearly everyone else visiting Canyonlands, should be the stunning Mesa Arch. It’s a favorite spot of all the photographers at sunrise, when you can get a spectacular shot through the arch with a sunburst as the sun comes over the horizon (see below for my favorite photo of the trip!), which means you’ll probably be there with a hundred other people.
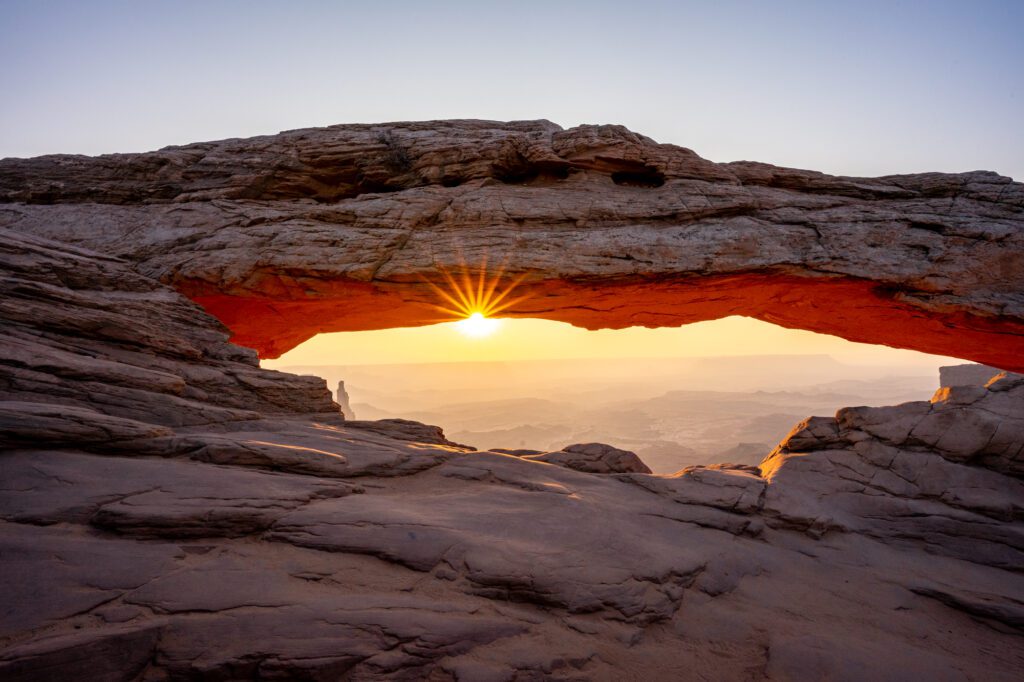

It’s a quick hike in – get there for sunrise if you can, although it’s pretty spectacular throughout the rest of the day too.
Grand View
Next, head all the way to the end of the road to Grand View. Here, you can do a short hike out to a point that really illustrates the vastness of the landscapes in Canyonlands.
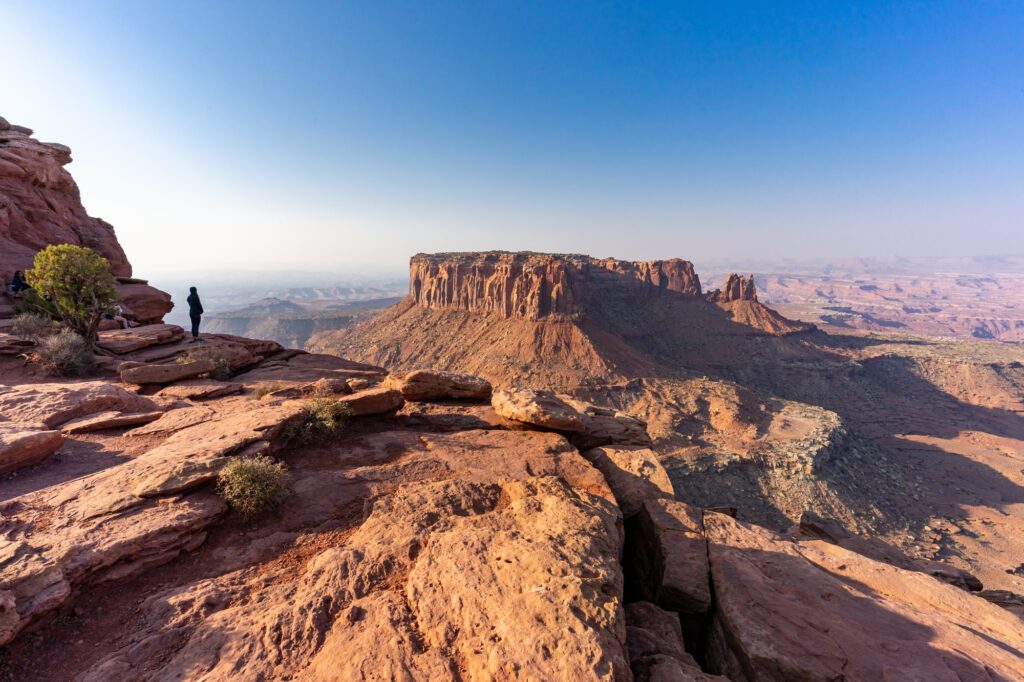
The Scenic Viewpoints in Island in the Sky
Then head back north and hit all the viewpoints along the road, including the White Rim Overlook (a short 1.8 mile round trip walk to an overlook of the canyons below), Buck Canyon Overlook, Shafer Canyon Overlook, and finally the Visitor’s Center.
If you’re looking for a longer hike, you’ve got two solid options along this route.
First is the first 2.6 miles (one way) of the Lathrop Canyon Trail, which will take you right down to the rim of the canyon with some pretty spectacular views.
The second option is the Gooseberry Canyon trail, which takes you down the wall of the canyon on steep switchbacks and gets you down along White Rim, which is cool, but STEEP.
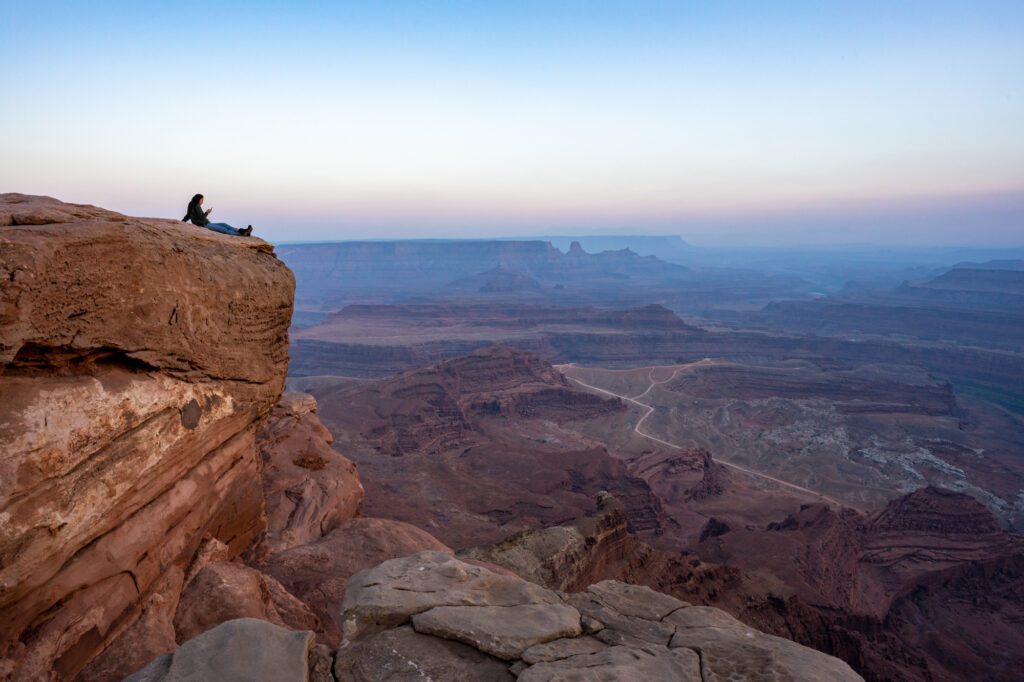
Sunset at Dead Horse Point State Park
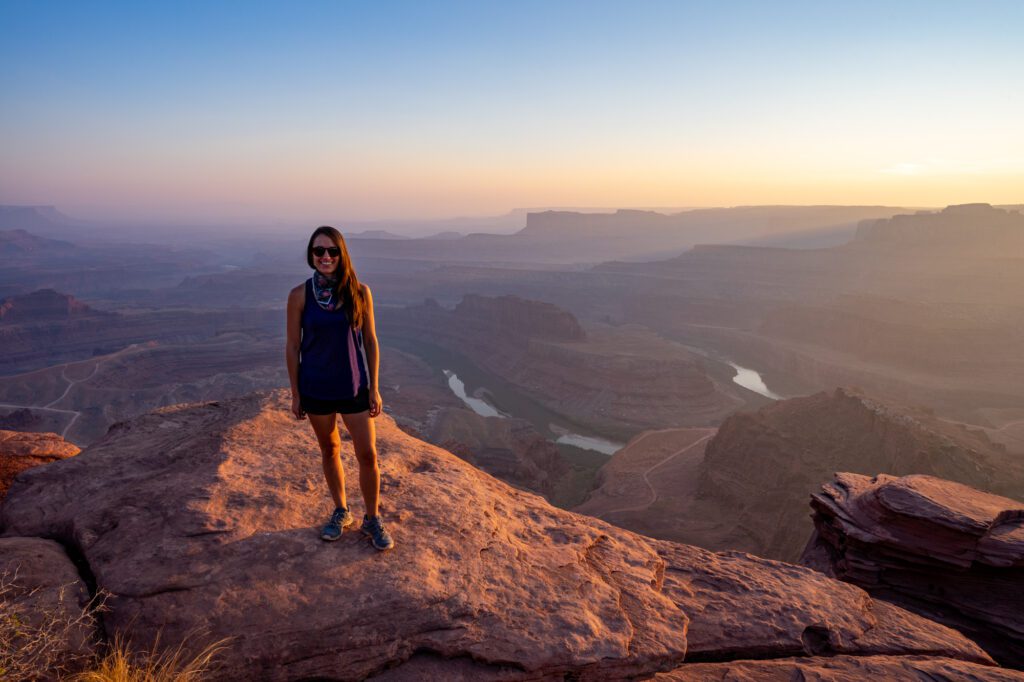
Catch the sunset at Dead Horse Point State Park, which is along the road back from Canyonlands to Moab. It’s going to cost you $20, but it’s well worth it for one of the most spectacular views in Moab.
Day 4: Beyond the National Parks

On your last day in Moab, escape the crowds that flock to the national parks and hit what turned out to be a few of our favorite spots in Moab.
Corona Arch
First, head to Corona Arch early in the morning. We got there just before sunrise and watched the sun come up over the canyon behind us and light up the arch with only a handful of people around. If you’re planning a sunrise hike, get there a half hour before sunrise. The hike in is just over a mile and has a tricky climb that requires you to use cables, and a ladder, so make sure to bring a headlamp.
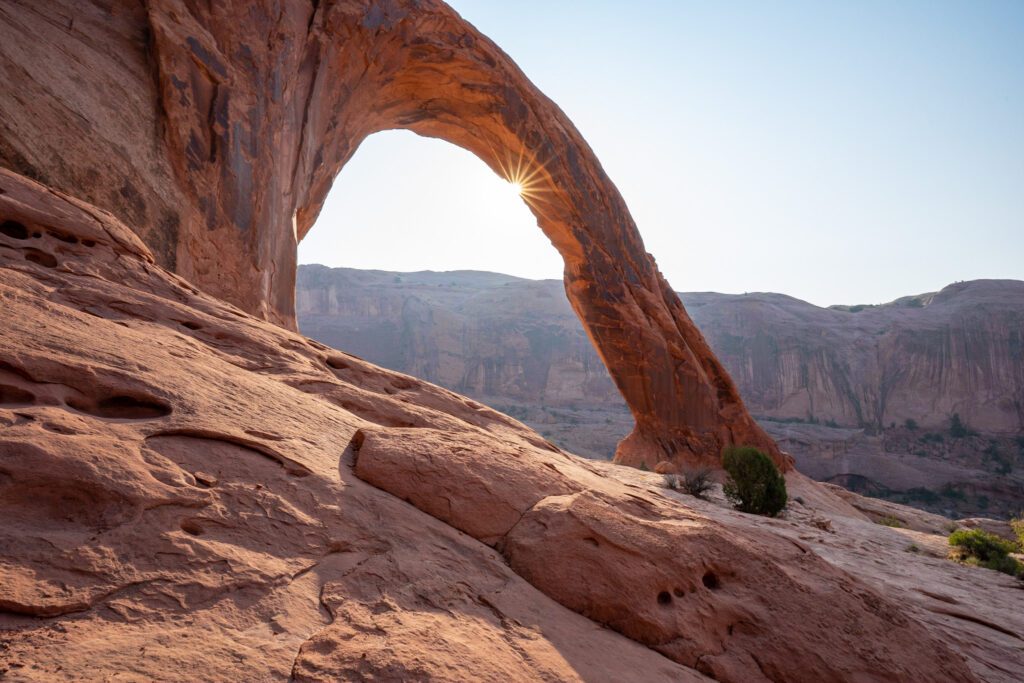
While you’re there, don’t miss nearby Bowtie Arch, and the odd face in the rock wall that we noticed on the far side of Corona Arch.
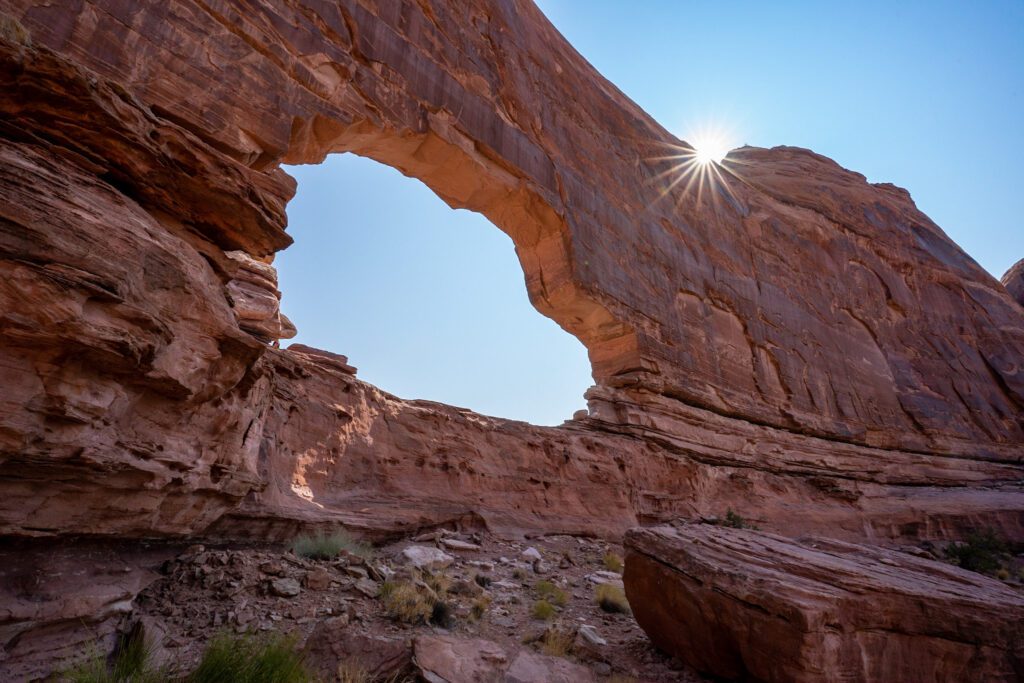
Jeep Arch
Your next stop is Jeep Arch, which is a 3.5 mile hike in from a trailhead a quarter mile up the road from Corona Arch. You could even walk there, if you’re worried about parking.
It’s a cool loop through the desert (it’s completely exposed with no shade – bring plenty of sunscreen, water, and a hat) that actually takes you up and through the arch as part of the trail loop. Super cool. Alysha thinks it’s called Jeep Arch because it looks like a Jeep, but I’m not sure that I buy it. See for yourself below. We loved this hike, and saw six total people along the way, which was a refreshing change from Arches and Canyonlands.
Exploring the Town of Moab
Head back into Moab for lunch and a relaxing afternoon. There’s tons of shopping and places to eat along Moab’s main drag, so you’ll have plenty of choices.
If you need to eat gluten free – make sure to double check with whatever place you choose that they meet your requirements around cross-contamination – look at 98 Center (Asian food with killer Pho), Miguel’s Baja Grill (Mexican), and Sweet Cravings (sandwiches).
If you’re looking for a good cup of coffee in Moab, head to either Moab Coffee Roasters which is an odd combination of candy store, gift shop, and coffee shop, or Horsethief Coffee, which is in the lobby of Moab Springs Ranch.
Scenic Drive Along Highway 128
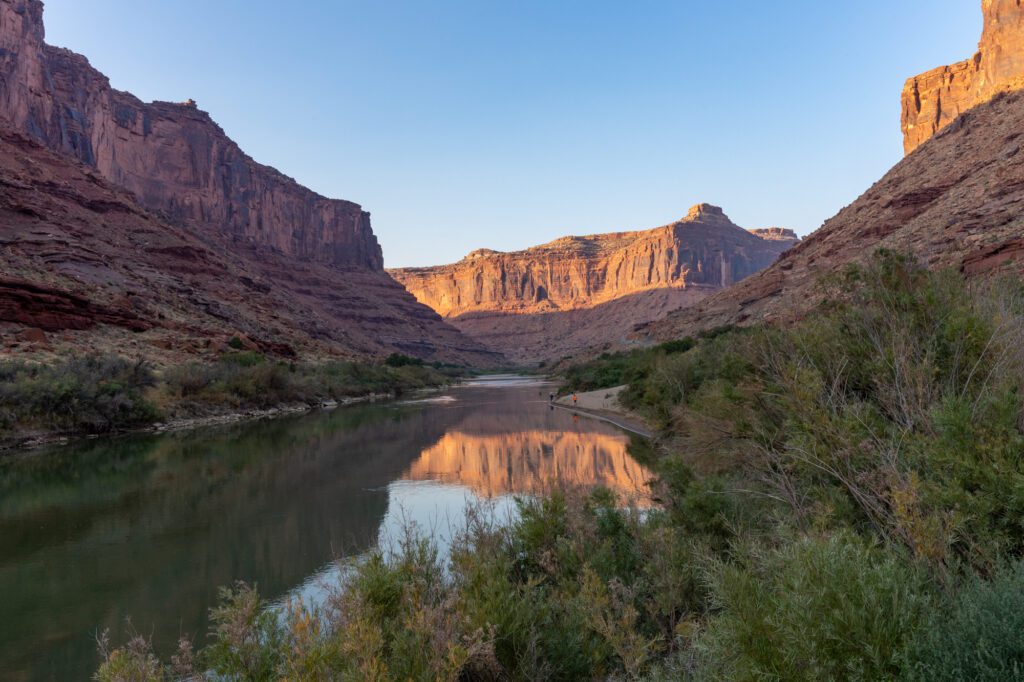
For your last hurrah in Moab, head out on a scenic drive on Highway 128 along the Colorado River about two hours before sunset.
This road is gorgeous, particularly when the golden sun is shining down the canyon, creating perfect reflections in the surprisingly calm water of this portion of the Colorado.
Head out at least past Big Bend and Fisher Towers before turning around. It’s a hair under 30 miles round trip, and will probably take an hour with plenty of stops for photos and soaking in the views.
Where to Stay in Moab
If you want to camp at Devils Garden, either book WAY in advance, or diligently check three times a day for openings (this is what we did, and ended up getting three nights). Given the popularity of Arches National Park, there really aren’t that many campsites. And the location can’t be beat – you’ll be able to walk to the trailhead for the best hike in the park, and you’ll be closer to places like Delicate Arch and the Windows than people coming from the town of Moab.
If you’re up for camping, definitely stay a night at Devils Garden. Book as far in advance as possible – it’s competitive.
Pssst! We have a whole guide on where to stay in Moab to help you find the best place to stay, whether you want a free campsite or a swanky hotel.
However, staying inside Arches National Park isn’t a great place to stay to explore Canyonlands and other areas around Moab, which is why we stayed in the town of Moab too.
We’d recommend staying one night at Devils Garden if you can swing it, and then the other three nights in the town of Moab itself. That way, you’ll be in prime position to get up early and explore Arches from inside the park, and you’ll be in a better position for Canyonlands by staying in Moab.
In Moab, we’d recommend:
- The cabins at Moab Springs Ranch, which we were drooling over when we stopped there for coffee. They do have a three night minimum, so if you’re here for less than that you’ll need to look elsewhere.
- Looking for a good value, mid-range hotel in Moab? There’s a surprising number of solid, well-priced hotels right in town. Look at the Expedition Lodge (we actually booked this place, but ended up canceling and camping instead), the Best Western Plus Canyonlands Inn, and the gorgeous Hoodoo Moab.
- Under Canvas Moab for a glamping experience in the desert you won’t forget anytime soon
There’s also a bunch of great vacation rental options in Moab, which is usually what we opt for when we’re not camping since I have Celiac Disease, and having a kitchen and the ability to cook makes life WAY easier (not to mention cheaper). If you’re looking for a little more space for you and your group and a homier feel, look at a vacation rental. Click here to find the perfect vacation rental in Moab.
How to Get to Moab
Getting to Moab is a little tricky, and will likely involve either an expensive flight, OR a long drive. Which isn’t a problem if Moab is part of a broader Utah road trip, but is annoying if you’re just going to Moab.
You can fly into Moab’s small airport, but flights are limited, and they all have at least one connection unless you’re flying from Denver or Salt Lake City, or somewhere else close by. Plus, it’s relatively expensive.
The other option, the one with more driving, is to fly into Salt Lake City or Denver, rent a car, and drive. From Salt Lake City, it’s a four hour drive into Moab. From Denver, it’s closer to six (we actually did the Denver to Moab drive, and there are some cool stops along the way, like Colorado National Monument).
With that, you’ll have wrapped up an amazing trip to Moab, where you covered a ton of ground and got to see Arches, Canyonlands, and some of the hidden gems nearby.
More on Utah’s National Parks
- How to Plan an Incredible Utah National Parks Road Trip
- 4 Days in Moab: A Complete Moab Itinerary
- 12 Awesome Things to Do in Moab, Utah
- The Best Places to Stay in Moab, Utah
- How to Spend One Day in Arches National Park
- A Complete Guide to Hiking in Arches National Park (6 Hikes)
- How to Spend One Day in Bryce Canyon National Park
- 6 Amazing Hikes in Bryce Canyon National Park
Thanks for this post–it was very helpful for our 4 days in Moab with 2 teenagers. We also enjoyed Longbow Arch which is on Potash Road near Corona Arch. It was almost deserted and a nice hike to take our little dog along.
Hey Susan! Good find – added it to my saved places on Google Maps for the next time we’re in Moab!
Appreciate your post.
It cleared up the driving directions to Moab and gave us a clear view of what we wanted to see around this area .