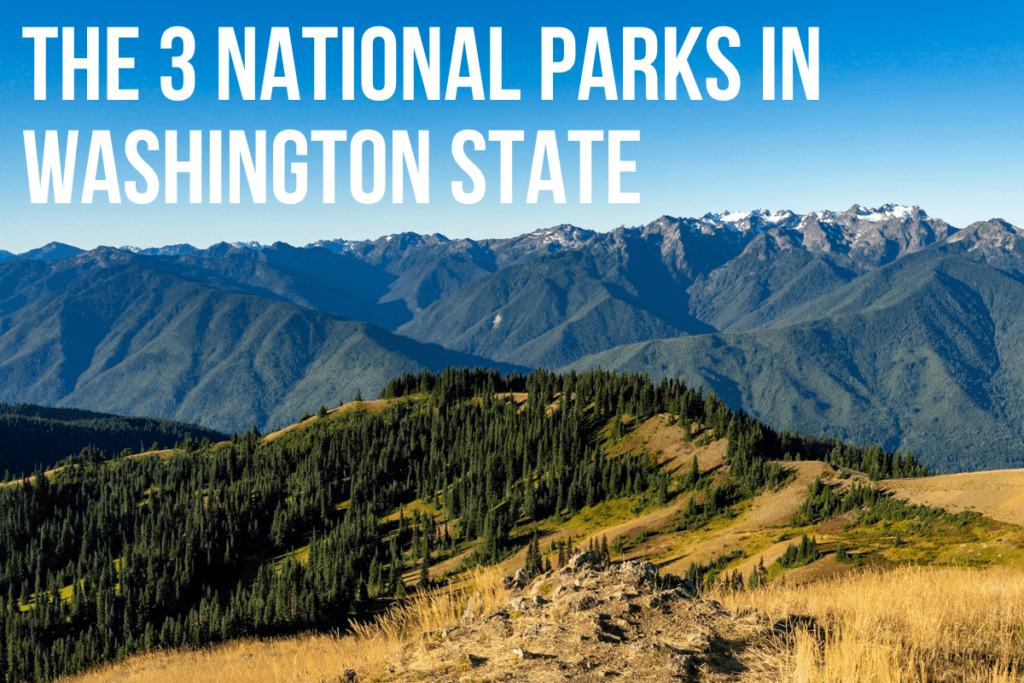
Visiting Mount Rainier National Park: What You Need to Know
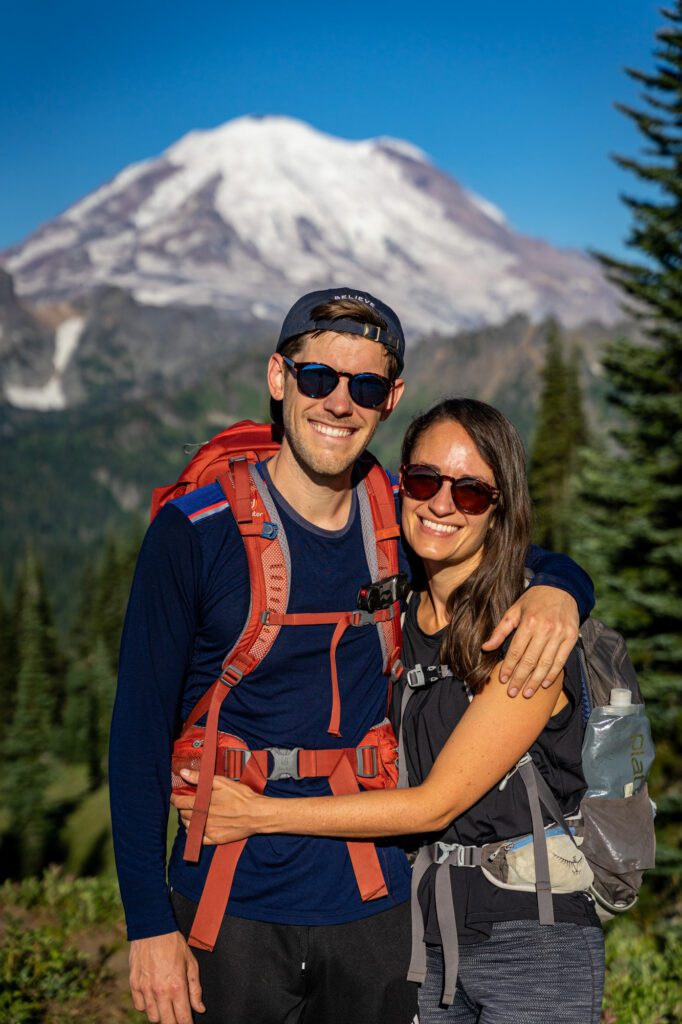
Growing up in Seattle, Matt and his family judged the weather – at least in part – by whether “The Mountain” was out (and that’s still true to this day).
That “Mountain” is, of course, Mount Rainier, which rises 14,000 feet above the surrounding area, which is largely at sea level.
That juxtaposition makes it one of the most visually impressive peaks that we’ve ever seen.
From the lush wildflower meadows in the early summer, to the waterfalls in Paradise and the showstopping views at Sunrise, we think that a visit to Mount Rainier National Park should be on every Pacific Northwest resident’s bucket list.
We love Mount Rainier National Park, and make AT LEAST one (usually more) trip every summer from our home down in Portland up to the park.
However, all of the reasons that we love the park have caused visitation numbers to explode over the past several years, and there are a few important logistics you need to know as you plan your trip (which we’ll cover below).
In this guide, we’re going to do our best to cover everything we think you need to know to plan a trip to Mount Rainier National Park.
- Logistics like how to think about the different regions of the park, when to visit (it’s important!), how many days to spend in the park (it depends on what you want to see!), and how to get to each region of the park.
- Our favorite things to do and see (including hikes), and how to organize them into an itinerary that makes sense.
Throughout the guide, we’ll share our favorite finds and experiences in Mount Rainier National Park based on our (many) trips to help you plan your unforgettable trip.
Sound good to you? Let’s get into it.
Disclaimer: Some of the links in this post, like hotel links, are affiliate links, meaning at no additional cost to you, we make a little bit of money if you click through and book. That being said, we would never recommend something to you that we don’t stand behind 100%.
Where is Mount Rainier National Park?
Mount Rainier is an active volcano in the Cascade Mountain Range and part of the Pacific Ring of Fire that sits southeast of Seattle, Washington’s biggest city.
Soaring 14,411 feet above sea level, Mount Rainier is the highest mountain in the state of Washington and the most glaciated peak in the continental United States.
One of our favorite aspects of Mount Rainier is the fact that the entire area surrounding it is at roughly sea level, which makes the towering peak that much more impressive (for reference, the 14ers in the Rockies are surrounded by land that’s at about 5,000 feet above sea level, give or take).
As the most topographically prominent mountain, Rainier’s snow-capped peak—located about 60 miles southeast of Seattle—can be seen from lakes, city skylines, and highways across western Washington.
Typically, a “good weather” day in Seattle is measured by whether or not the Mountain is out (at least partially), and it’s a key element of the Seattle skyline as seen from our favorite viewpoint in Seattle, Kerry Park.
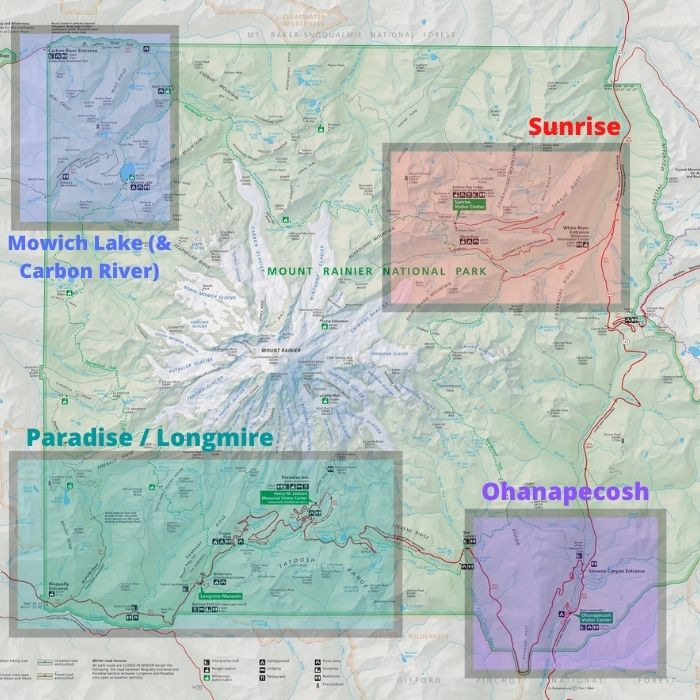
A Crash Course in Mount Rainier National Park’s Geography
Mount Rainier National Park is a big park, covering 369 square miles and surrounding the glaciated peak on all sides.
However, there are only four main parts of the park that are accessible without a long, multi-night backpacking trip.
Here’s a quick summary of each to help you decide which area is right for your trip to Rainier.
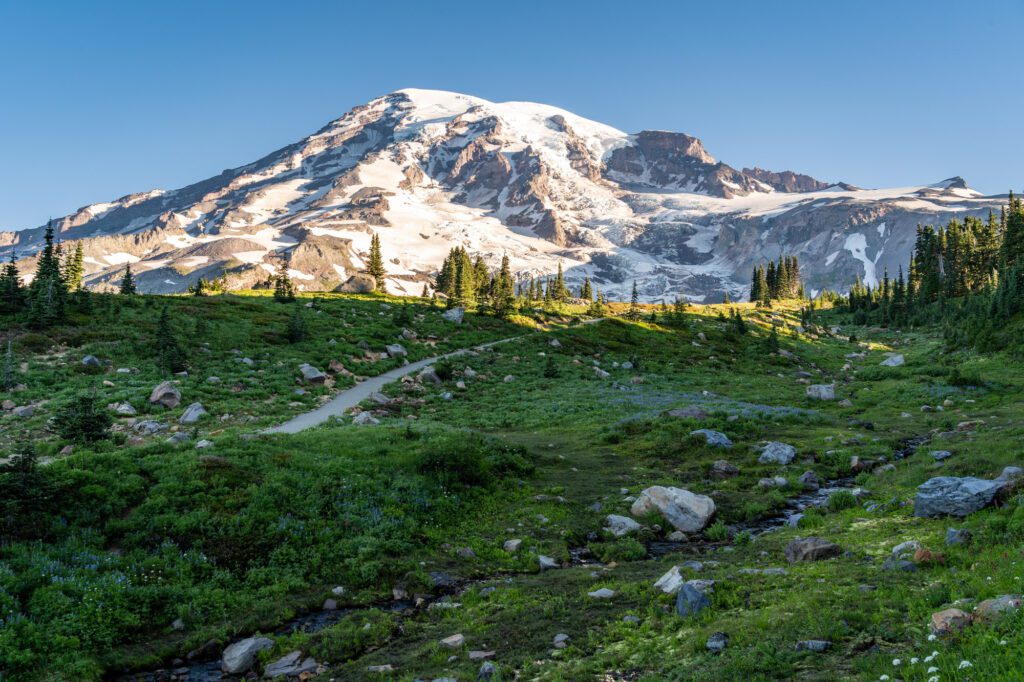
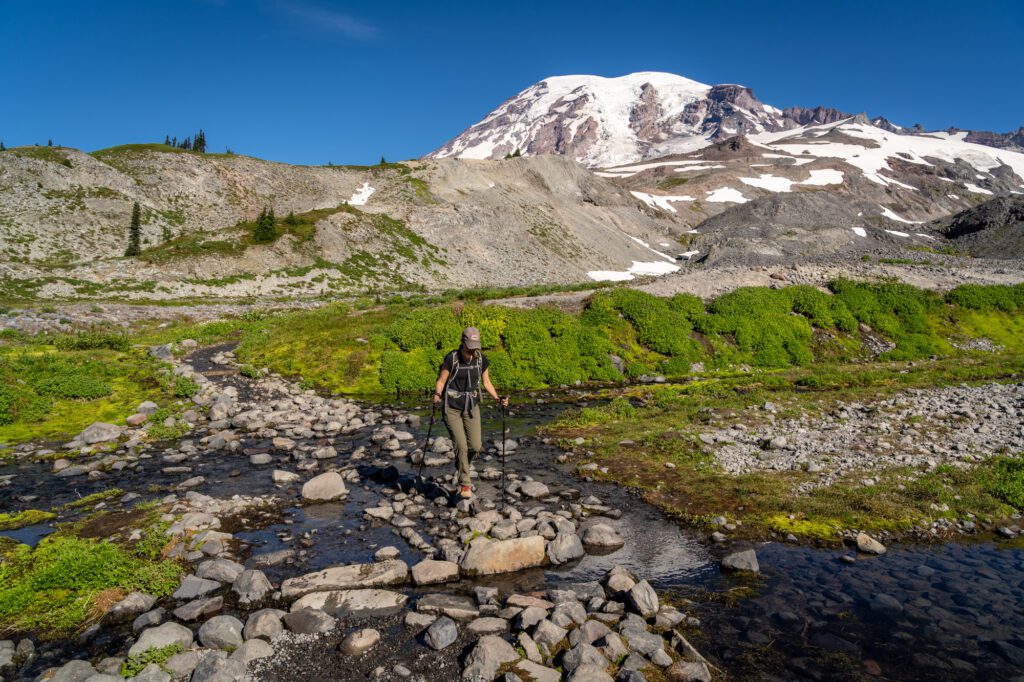
Paradise – Best for first-time visitors: Paradise is the most popular area to visit, located on the southern side of the Mountain, and home to some great day hikes at Mount Rainier.
It’s where you’ll find the best waterfall hikes at Mount Rainier, along with countless meadows bursting with wildflowers in the summer.
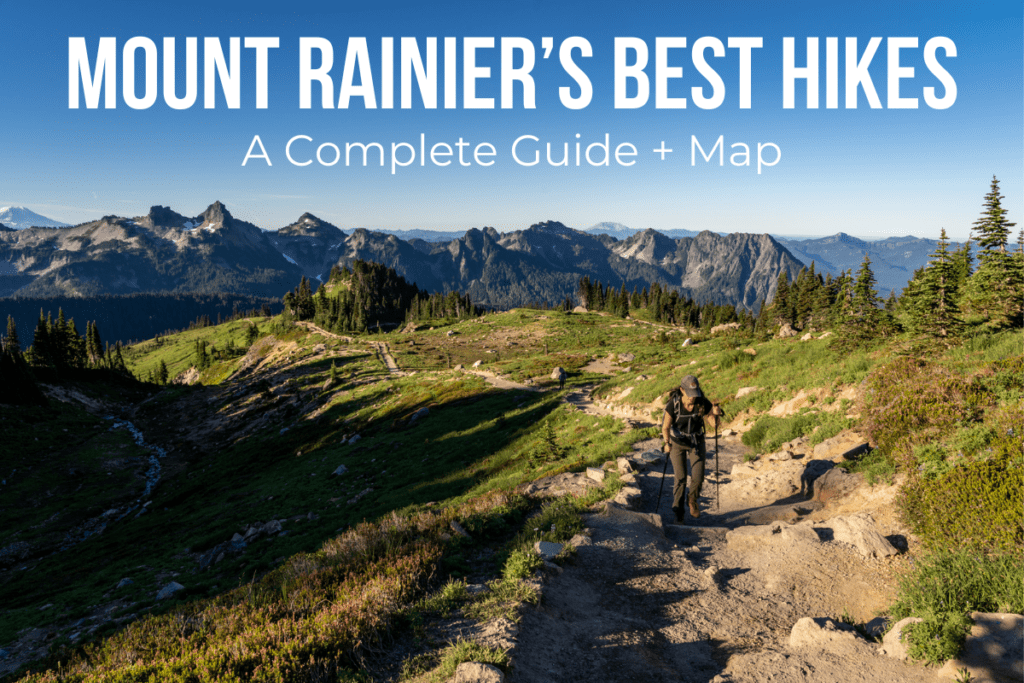
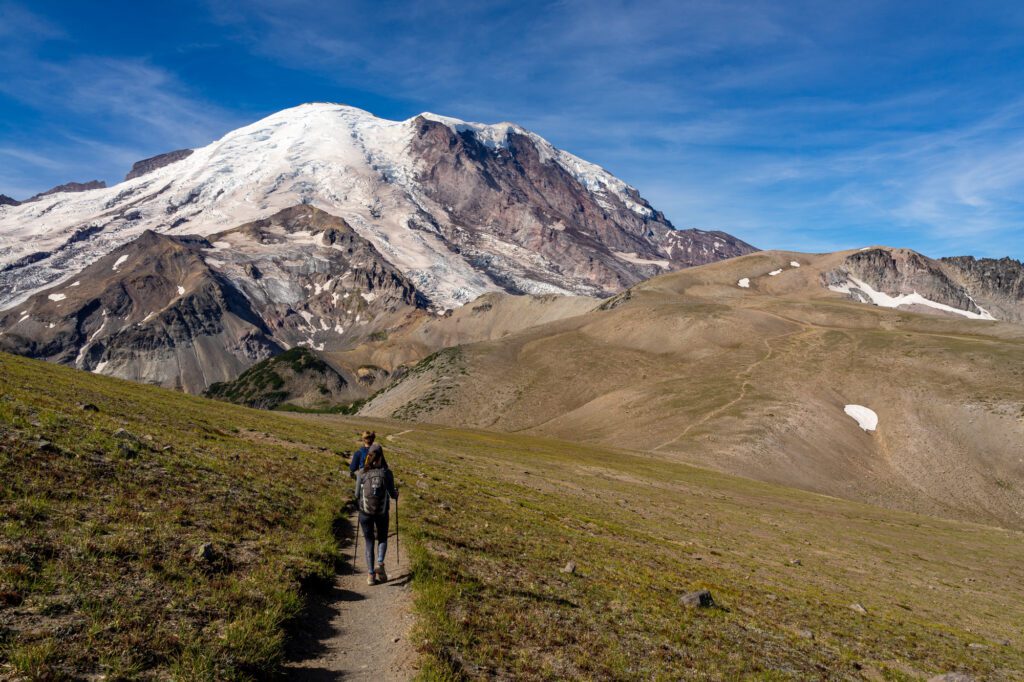
Sunrise – Best for hikes with epic Rainier views: Sunrise, which is on the east side of the park, has a large network of hiking trails winding through the rugged yet stunning wilderness.
It is also home to the highest point in Mount Rainier National Park that you can drive to. This is probably the part of the park with the best selection of epic, long hikes to tackle.
Ohanapecosh – Best for family-friendly hikes: This part of the park is at the southeastern corner, near the Stevens Canyon Entrance of the park.
There are a couple of family-friendly hikes in the area, a large campground (that’s generally the least competitive in the park), and it’s a good central location between Paradise and Sunrise.
However, it’s basically an old-growth forest, so you’re not getting those unobstructed Rainier views.
Mowich Lake –Best for peace and quiet: Mowich Lake, on the northwestern side of the Mountain, is the quietest area of Mount Rainier National Park.
It is free from the tourist hype of Paradise and Sunrise, and the long and arduous bumpy gravel road to get there cuts the number of visitors significantly.
There are two great hikes here though that are worth braving the bumpy drive for (ideally in a high-clearance vehicle).
The other thing to note here is that the access roads for some regions of the park – namely Sunrise and Mowich Lake – close for the winter, and remain closed through the spring into June (and sometimes July – it depends on the weather).
IMPORTANT NOTE FOR MOWICH LAKE: The bridge on the road outside the park has failed, and there is currently no plan for fixing it.
There is no access to Mowich Lake for the forseeable future (aside from hiking in on the Wonderland Trail).
You can check road status here (it’s called Carbon River Road).
More on that in the “best time to visit” section below, though.
Here’s a map to help you visualize how those regions fit together.
How Many Days Should You Spend at Mount Rainier?
How many days you should spend at Mount Rainier depends on A LOT of different factors, including season, appetite for driving, and how much hiking you want to do.
At a high level, we think 3 days is the right amount of time to see both Paradise AND Sunrise (along with a short stop at Ohanapecosh in between them, which is all you really need).
Three days will allow you to do a long hike at both Paradise and Sunrise, see the waterfalls, spend an evening or two watching the sunset over a lake (ideally with a reflection of Rainier to marvel at), and more.
If you have one or two days, we’d focus on EITHER Paradise or Sunrise.
And if it’s your first time in the park, we’d choose Paradise for your first visit which has our favorite hike in the park, a collection of amazing waterfalls, a couple of beautiful lakes, and excellent displays of wildflowers in the early summer.
If you want to tackle one (or both) of the hikes near Mowich Lake, add another day for each hike.
That means, to see the entire park and circumnavigate the mountain, doing a counterclockwise loop from Mowich Lake to Paradise to Sunrise (or vice versa), you’re going to need at least four or five days.
More on how to organize your time below in the “itineraries” section.
The Best Time to Visit Mount Rainier National Park
This is, perhaps, the question we get most often about our guides for Mount Rainier, North Cascades National Park, and Mount Baker.
And it’s because our definition of “summer” as residents of the Pacific Northwest seems to be slightly different than the definition in other parts of the country and world.
This is especially true when talking about hiking in the Cascades, which Rainier sits smack dab in the middle of.
There are two considerations to keep in mind when we’re talking about when to visit Mount Rainier: the trail conditions and the road conditions.
Here’s the thing about the Cascades: snow lingers in the Cascades well into June, and usually into July. The higher you go in terms of elevation, the longer snow is going to linger.
As a result, if you visit during the last week of June, which is technically summer and seems like a perfectly reasonable time to visit, you’re going to find most of the higher elevation trails in the park (which means most of our favorite trails) still covered in snow.
A few years ago, we hiked the Skyline Trail with my mom for her birthday – which is in late July – and found A LOT of snow still lingering on the trail (we also encountered the same at Sunrise later in that trip).
You’re also likely going to find that the roads to Mowich Lake and Sunrise are still closed to vehicles. Those roads usually open in either late June or early July, and it depends on the year and the weather in the winter and spring.
The road to Paradise through Longmire is open year round (though it closes during intense snow storms).
You can (and should) check the status of the roads in the park on the National Park Service site before you leave for your trip.
Another resource we use often to check trail conditions is the Washington Trails Association, whose recent trail reports are invaluable in understanding what you’re getting yourself into so you can be prepared before you go (e.g. whether there’s snow, the condition of the road to the trailhead, etc).
All that being said, in general, the best time to visit Mount Rainier National Park in terms of both trail and road conditions is going to be late July through the middle of October.
The summer months – late July and August – bring the best weather (warm days and nights, lower precipitation) along with incredible displays of wildflowers to the meadows that you’ll find all over the park.
The last week of July and first week of August is when we’ve had the best luck finding wildflowers at Rainier, but it totally depends on the year.
However, those months are also the two most popular months for visitors, which means the crowds are going to be a little bit intense and you’ll likely encounter more competition for parking spots, campgrounds, and entry permits.
September and October bring slightly more unpredictable weather – cooler temperatures, shorter days, and a higher chance of precipitation – but lower levels of visitors (especially midweek).
Starting in the last week of September, fall color starts to light up those same meadows and hillsides with shades of yellow, orange, and red.
The fall color show continues through the middle of October, when the first significant snowfall of the season generally happens and marks the end of the hiking season.
Generally, our favorite time to visit the park is in mid-September, when things are a little quieter because kids are back in school.
Getting to Mount Rainier National Park
First thing’s first, you’re going to need a car to get to Mount Rainier National Park. There is no public transportation option available.
Because the park’s regions are so different in terms of location, and therefore travel time, we’re going to separate them here.
Getting to Paradise (The Henry M. Jackson Visitor Center)
Paradise is on the southern side of Rainier, and it’s the most popular part of the park.
- From Seattle: 2 hours and 45 minutes // 107 miles
- From Tacoma: 2 hours // 77 miles
- From Portland: 3 hours // 152 miles
Getting to Sunrise (The Sunrise Visitor Center)
The Sunrise Visitor Center sits on Rainier’s eastern flank, and is the highest point in the park that you can drive to.
- From Seattle: 2 hours and 15 minutes // 96 miles
- From Tacoma: 2 hours // 82 miles
- From Portland: 3 hours and 30 minutes // 184 miles
Getting to Ohanapecosh (The Ohanapecosh Visitor Center)
Ohanapecosh is an old growth forest tucked away on the southeastern side of Mount Rainier, close to the town of Packwood.
- From Seattle: 2 hours and 20 minutes // 97 miles
- From Tacoma: 2 hours // 83 miles
- From Portland: 2 hours and 50 minutes // 152 miles
Getting to Mowich Lake
Mowich Lake might seem like the closest part of the park to Seattle – it’s on the northwestern side of the mountain, after all – but a long, bumpy washboard gravel road makes this drive a lot longer than it should be.
- From Seattle: 2 hours and 30 minutes // 72 miles
- From Tacoma: 2 hours // 48 miles
- From Portland: 4 hours // 185 miles
Where to Fly Into to Visit Mount Rainier
If you’re coming from out-of-state, there are two viable airports near Mount Rainier National Park.
The best option in terms of both flight selection and distance from the Mountain is Seattle-Tacoma International Airport (SEA), which is more commonly known as “Seatac” to Seattleites.
Flying into Seatac is going to put you a hair over two and a half hours (107 miles) from the Henry M. Jackson Visitor Center, the hub for everything at Paradise, and about the same to the Sunrise Visitor Center on the other side of the park.
Your other option is Portland International Airport (PDX), which is our home airport and is our favorite airport in the US.
It’s a much less chaotic airport than Seatac (we HATE flying out of Seatac because security lines are ridiculous, even with Pre-Check), but it has a significantly smaller selection of flights – especially direct flights – and is slightly further from the park.
From PDX, it’s going to be around three hours to Paradise, and can be almost four hours to Sunrise.
Like we said, it’s slightly further, but it’s worth checking prices for both.
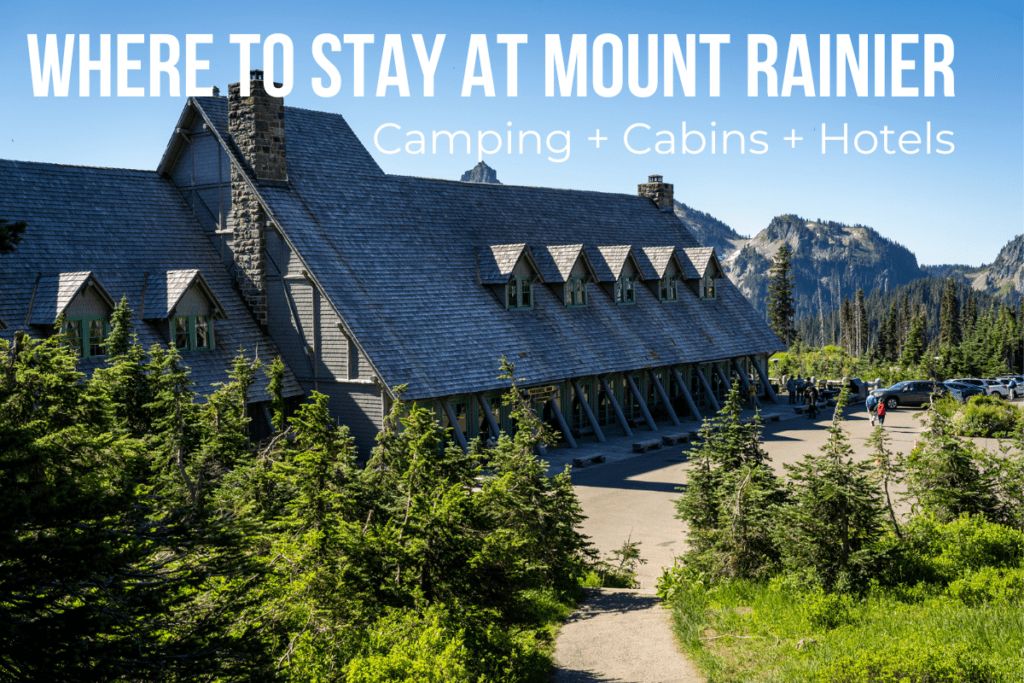
Where to Stay at Mount Rainier
Because the park is fairly spread out and sprawling, circumnavigating the Mountain, it really matters where you stay, and this section is meant to help you decide the best home base (or home bases) for exploring the park.
For a taste of why it matters, it takes a full three hours (if not more due to traffic) to drive from Mowich Lake to the Henry M. Jackson Visitor Center at Paradise, and about the same to the Sunrise Visitor Center.
Our high level recommendation here is to split up your nights in the park so that you’re staying in each region that you’re visiting in order to maximize your time and minimize time driving back and forth.
For example, if you’re doing both Paradise and Sunrise over three days, spend your first two nights at Paradise, and then spend your last night near Sunrise.
It’s worth mentioning up front thatif you want to spend all of your nights in one place, Packwood is the best place to do that.
It’s about an hour from both Paradise and Sunrise, and it’s also the most well-equipped town near the park.
Here’s a summary of the best places to stay in the park (and nearby).
For more details and information, head over to our guide to where to stay near Mount Rainier.
Campgrounds Inside Mount Rainier National Park
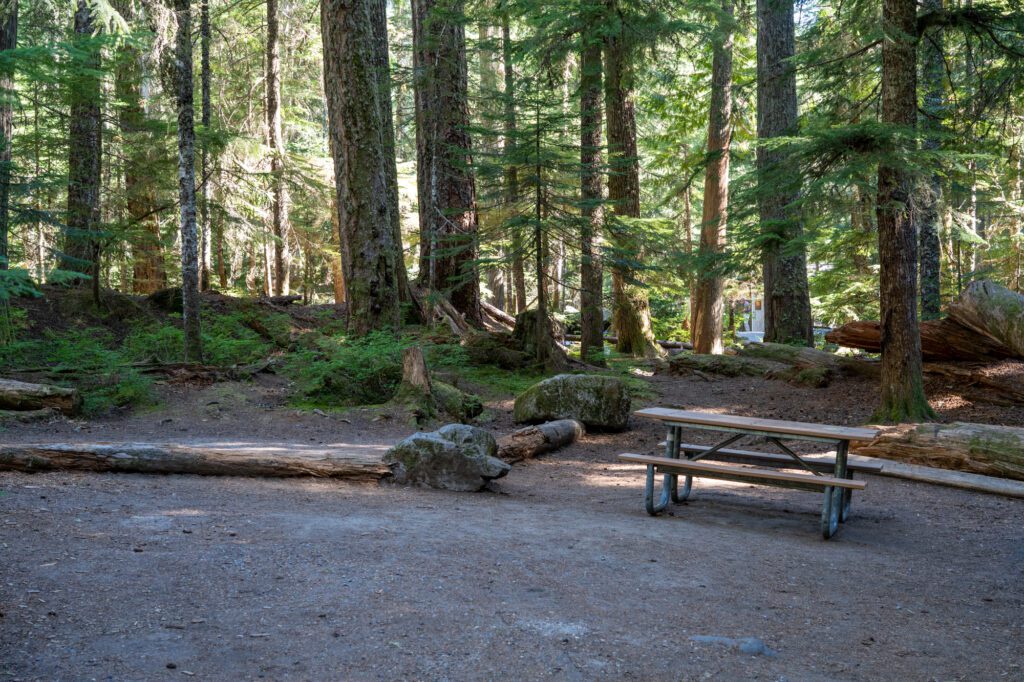
There are four main campgrounds inside the park and, conveniently, there is one campground in each of the park’s four regions.
However, the bad news here is that they are all very competitive (especially the three that you can reserve in advance), and the rules for when they go on sale are complicated and ever-changing.
We’ll do our best to cover it all in this short section, but for more on camping in the park, head to the National Park Service’s guide.
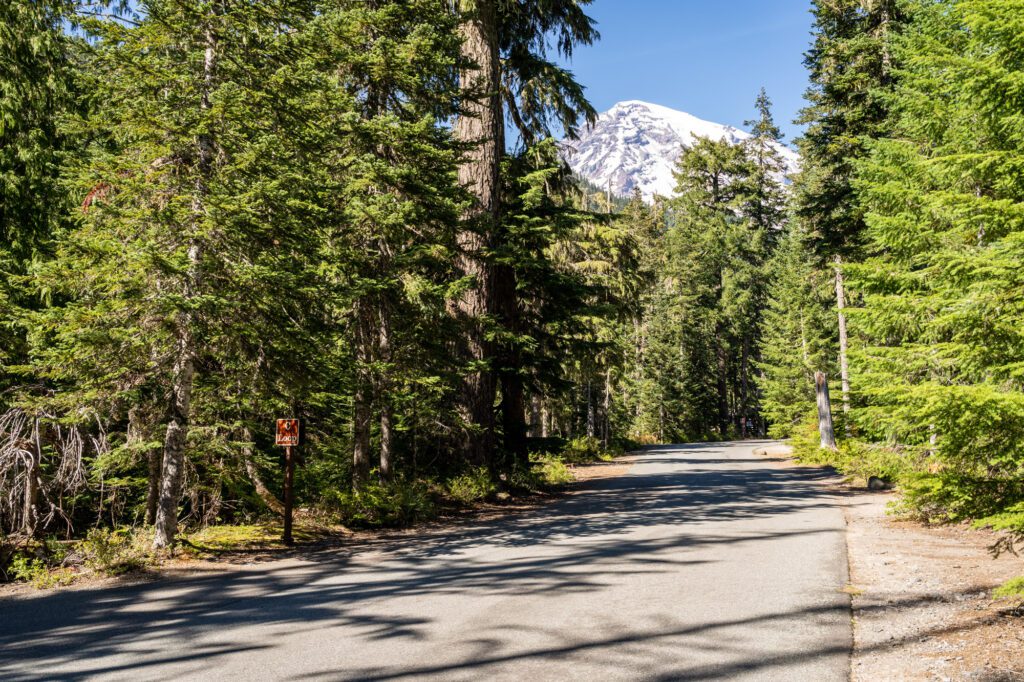
Cougar Rock Campground (Paradise): Located on the southwestern side of Mount Rainier just 10 miles from the Henry M. Jackson Visitor Center, Cougar Rock is a prime camping location for exploring the Paradise area of the Park, and has 173 sites (including some group sites) with drinking water, flush toilets, and tree-covered campsites.
We’ve stayed here a couple of times, and it’s by far the best place to stay for Paradise.
Reservations for Cougar Rock are released in multiple stages.
It’s first-come, first served from May 24 to June 23 AND September 08 – October 13 (or the end of the season).
During peak season (roughly June 24 through September 6th), reservations are released on a rolling basis in three windows; 6 months in advance, 7 days in advance, or one day in advance.
It’s a little confusing, because certain loops and sites are only available in certain windows, but we like that it gives you multiple opportunities to snag a site.
White River Campground (Sunrise): Situated 12 miles from the Sunrise Visitor Center, White River Campground has 88 individual sites – all with access to flush toilets and potable drinking water – although there are no group campsites.
Because of the elevation, the season here is slightly shorter – late June through the month of September.
We’ve also camped here, and it’s a great base for the Sunrise section of the park (we’d argue the BEST base, because it’s the closest place to stay near all of the trailheads).
Reservations for White River are solely first-come, first-served. You need to arrive early in the day (we’d get here around 8am for the best shot), and midweek is going to give you the best chance of getting a site.
There is no guarantee, and the campground is usually full for summer weekends by Thursday night.
Ohanapecosh Campground (Ohanapecosh): Another big campground with 179 sites, all with potable water and flush toilets and a few group sites sprinkled in.
It’s tucked into an old growth forest, and is the best location in terms of access to BOTH Sunrise and Paradise (though it is 45-60 minutes to either one), so if you want to stay in one location for your entire trip to the park, this is your best choice.
Reservations at Ohanapecosh are released in multiple stages. It’s first-come, first served from May 24 to June 23 AND September 07 – October 10 (or the end of the season).
During peak season (roughly June 24 through September 6th), reservations are released on a rolling basis in three windows; 6 months in advance, 7 days in advance, or one day in advance.
Mowich Lake Campground (Mowich Lake): A small, primitive campground with just 13 tent-only walk-in sites and vault toilets with no potable water, this is the best place to stay – BY FAR – to do either Spray Park or Tolmie Peak. Plus, it’s right on Mowich Lake, which is a nice place to relax post-hike.
It’s very limited in terms of amenities, but makes up for it with the proximity to the trailheads for those two hikes.
Reservations for Mowich Lake are solely first-come, first-served. It’s much less popular than the other campgrounds in the park, but that doesn’t mean you should show up at 5pm on a summer Saturday and expect to get a spot.
Again, remember that the access road for Mowich Lake is closed indefinitely, with no plan to fix it (it’s outside the park boundaries, so it falls to the Washington State DOT).
Hotels and Lodges Inside the Park
There are two national park lodges inside the park, and both are near Paradise.
The first is the Paradise Inn, which is a historic lodge right at the Henry M. Jackson Visitor Center.
It’s very rustic and charming, and it’s worth stepping inside even if you’re not staying here to marvel at the architecture.


Like most lodges inside national parks, the Inn probably needs a little bit of TLC, you basically have to eat at the onsite restaurant (or bring food that doesn’t need to be cooked OR refrigerated), and you’re going to pay a premium for the location.
Still, for one night or a special occasion, it might be worth it for the location alone. And the rustic charm is nice, too!
The second is the National Park Inn, which is down in Longmire just inside the Nisqually entrance.
It’s a 25 minute drive up to the visitor center and main trailheads at Paradise, but it has been renovated far more recently (though it’s still nothing to write home about, if we’re being honest).
There are only 25 rooms here, and rooms either have one queen or double or two twin beds (there are also some two-room options). Some rooms have shared bathroom facilities, which make them a little cheaper.
Staying Outside the Park
If you’re not up for camping and don’t want to pay a premium to stay at one of the national park lodges inside the park, you have a few options.
Near Paradise, the best place to stay outside the park is going to be in the small town of Ashford, which is just outside of the Nisqually Entrance.
There are a smattering of hotels in town, along with a grocery store and a few restaurants, and a plethora of cabins in the woods near Ashford that would be our choice if we weren’t camping.
Unfortunately, the options near Sunrise are limited at best if you’re not up for camping.
If you do want to camp, we like Silver Springs Campground, which is just outside the park entrance along Highway 410.
If you don’t want to camp, your best bet is to stay at LOGE Alta Crystal, which is a nice hotel just down the road from Silver Springs. We’ve stayed at LOGE properties before in Leavenworth, and enjoy them (they’re very hip and outdoorsy).
Packwood, which is just outside the Ohanapecosh entrance of the park to the south, is the best-equipped town near the park.
It’s also roughly equidistant between Paradise and Sunrise – about 45-60 minutes to each – which makes it the best option if you want to stay in one spot for your entire trip.
There are a couple of hotels in town, along with a grocery store, a good coffee shop, a few restaurants, and a brewery.
Similar to Ashford, there are also a bunch of cabins in the woods surrounding Packwood that would make for a great place to stay to explore the park and come back to a relaxing, private space at the end of a long day.
We have also stayed at La Wis Wis Campground just outside Packwood, and would recommend it if you can’t snag a site at any of the campgrounds in the park.
It’s right outside the park entrance, and is reservable six months in advance.
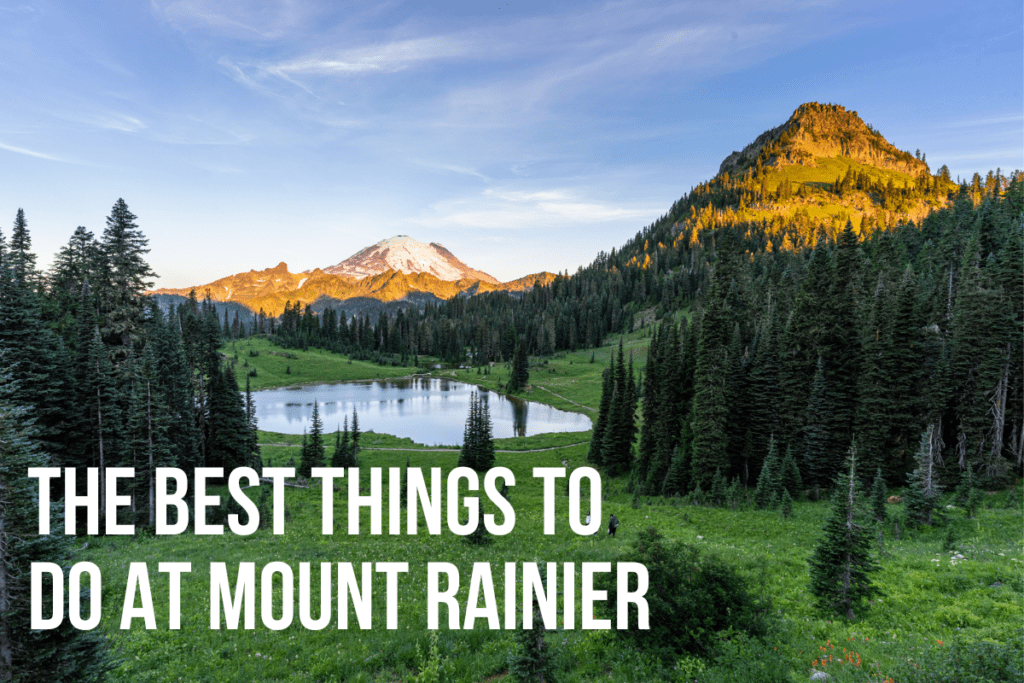
What to Do at Mount Rainier (the Highlights)
Here are the highlights that we think you should prioritize while you’re in Mount Rainier National Park.
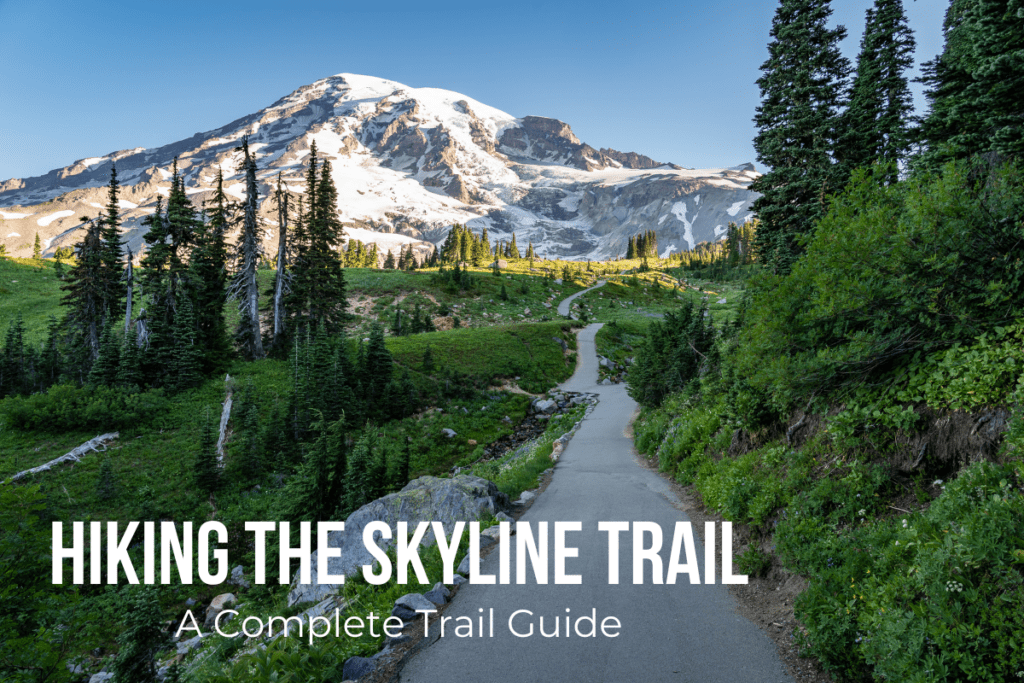
The Skyline Trail. The best hike in the park, we think, and in the top 3 of our favorite hikes in Washington State.
Great wildflowers, spectacular views of Rainier’s face, and sweeping vistas out over the Tatoosh Range, Mount St. Helens, and Mount Adams to the south. All packed into one moderate six mile journey!
It’s also one of the most popular hikes in the state, so get there early and get on the trail as early as you can to avoid wading through hordes of hikers.
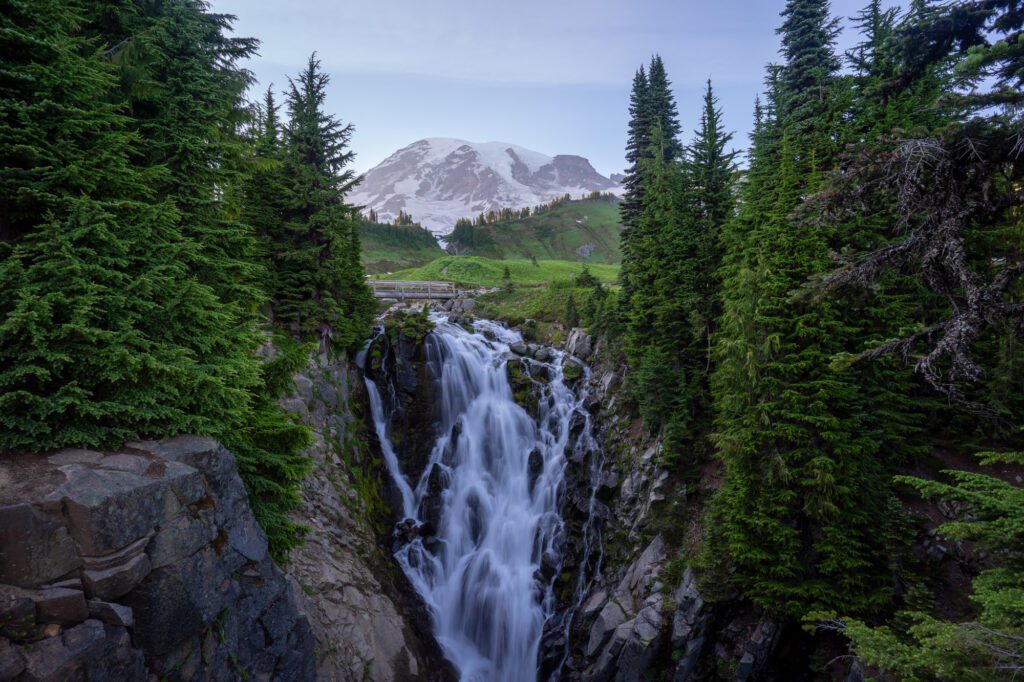
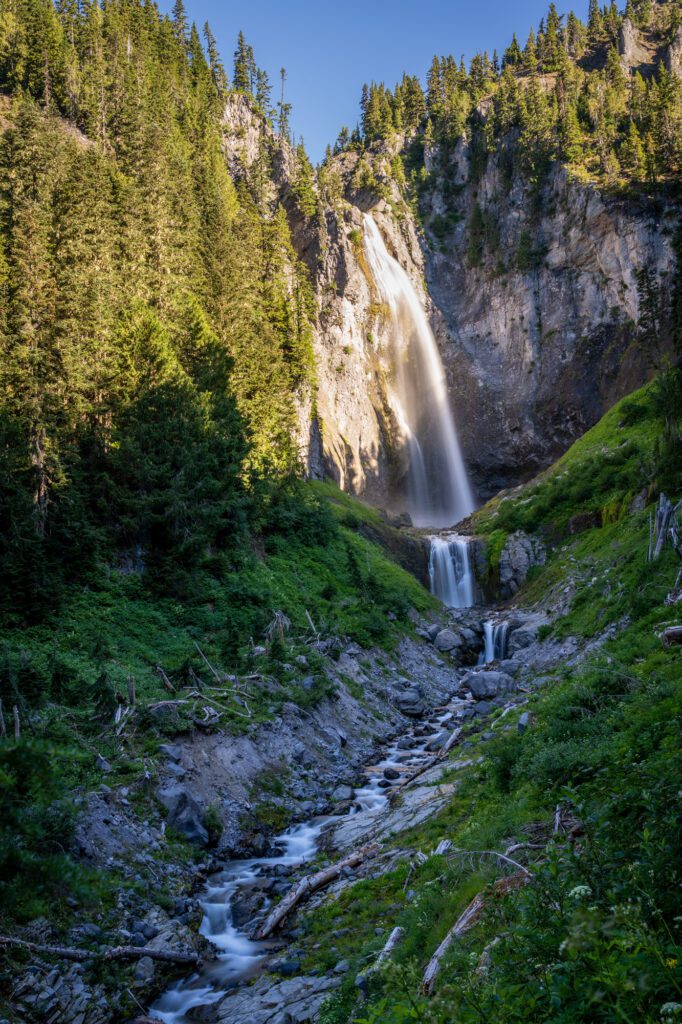
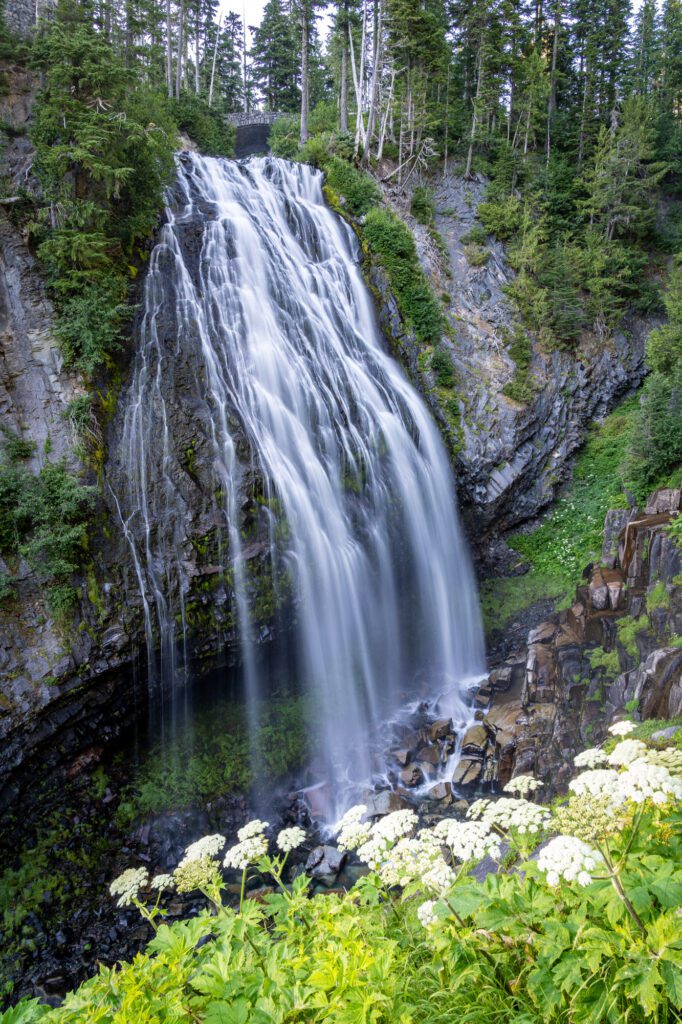
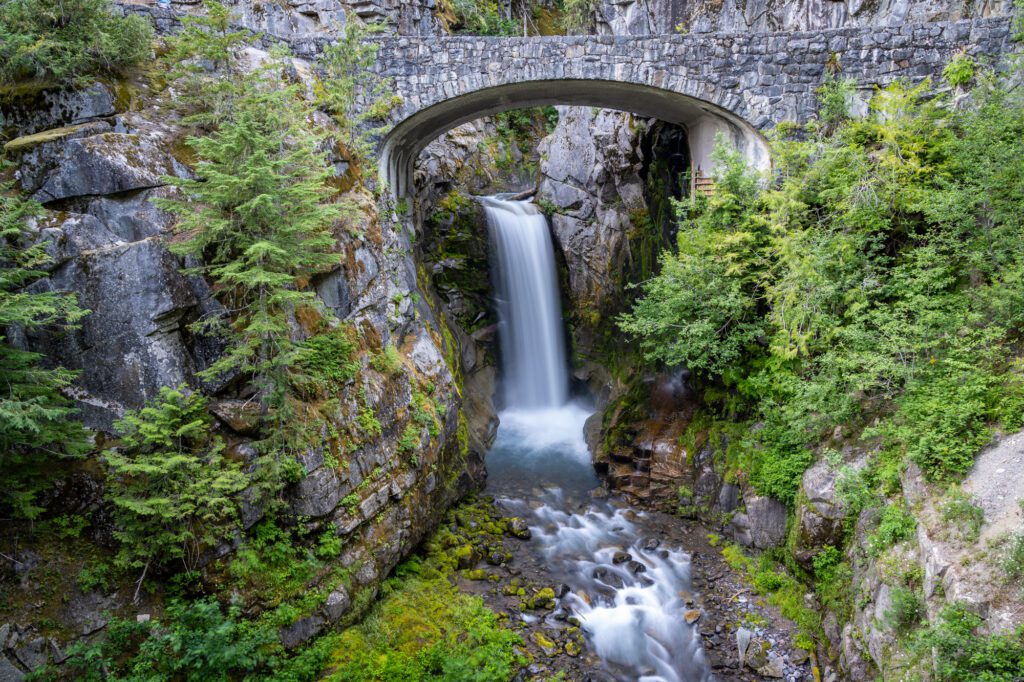
The waterfalls at Paradise. There are four excellent waterfalls at Paradise, and three of them are basically right along the road.
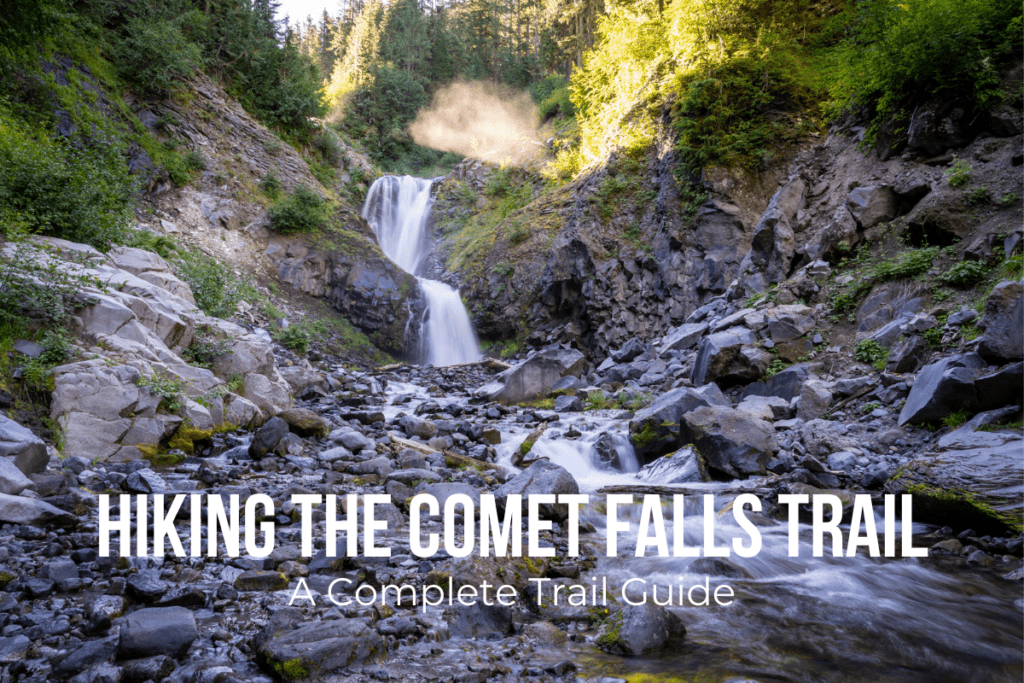
Starting from the Nisqually entrance heading uphill, you’ll pass the trailhead for Comet Falls first, which is the most impressive but requires a moderate six mile hike to reach.
Next is Christine Falls, framed by a nice stone bridge.
Then comes Narada Falls, which is a pull off along the road and a short walk down to the viewpoint.
Last is Myrtle Falls, which you’ll see along the Skyline Trail (and it’s our favorite of the four thanks to Rainier’s glaciated peak in the background).
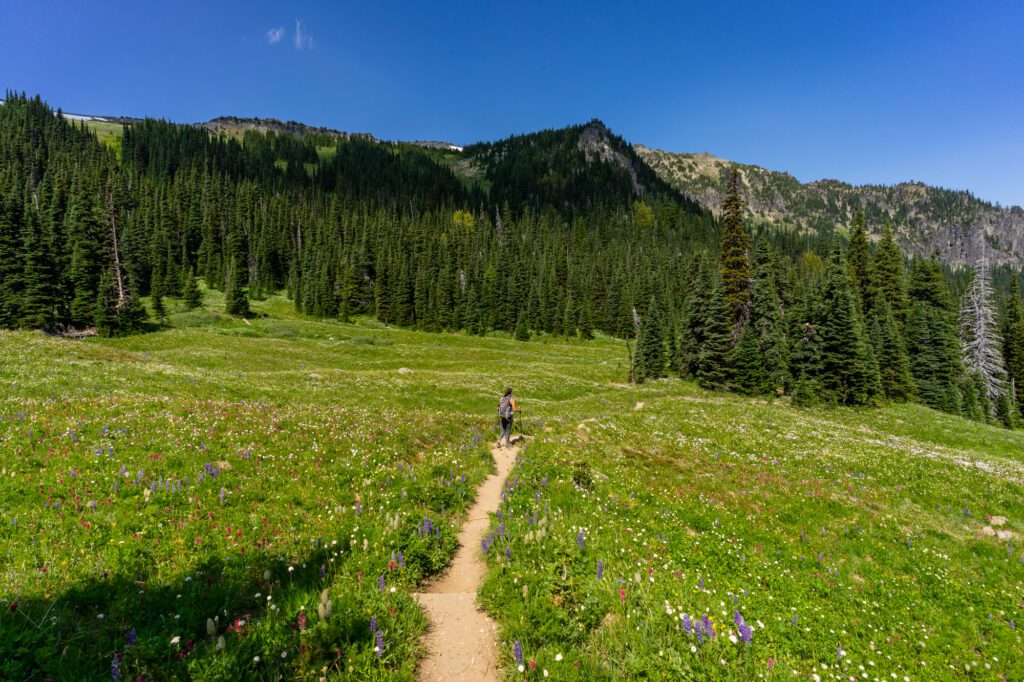
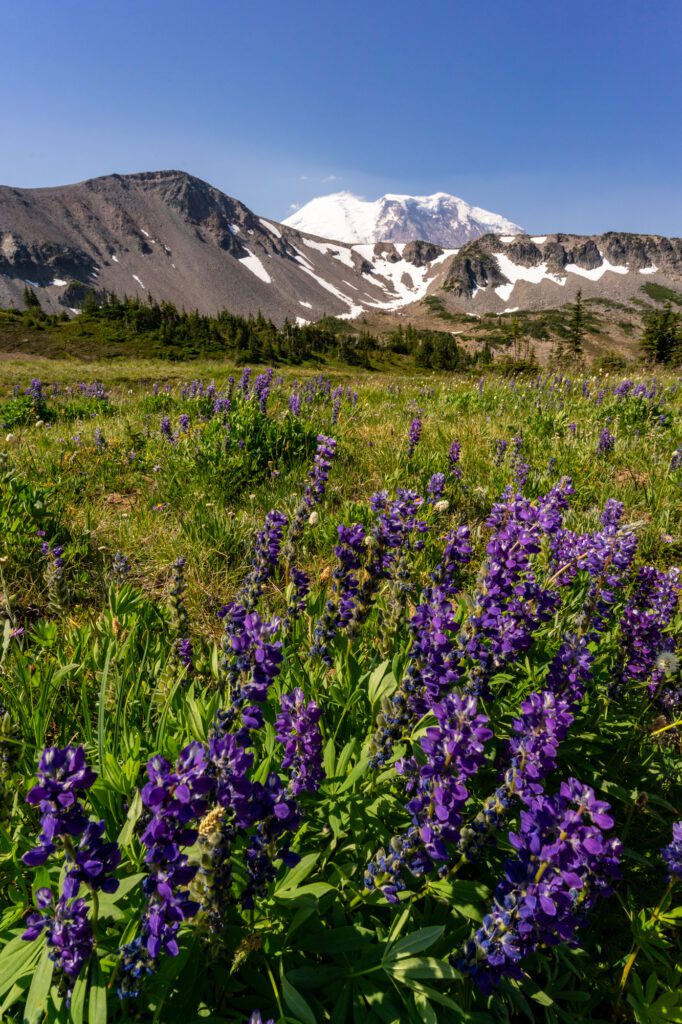
The wildflower meadows. In the early summer – call it the last week of July and the first week of August – the wildflower meadows at Rainier are…something else.
Fun fact: we named our dog, Lupine, several years before we got her while standing in a lupine-covered meadow at Rainier!
Our favorite places to see flowers are the Lakes Loop at Paradise, Berkeley Park at Sunrise, and all around Sourdough Ridge at Sunrise.

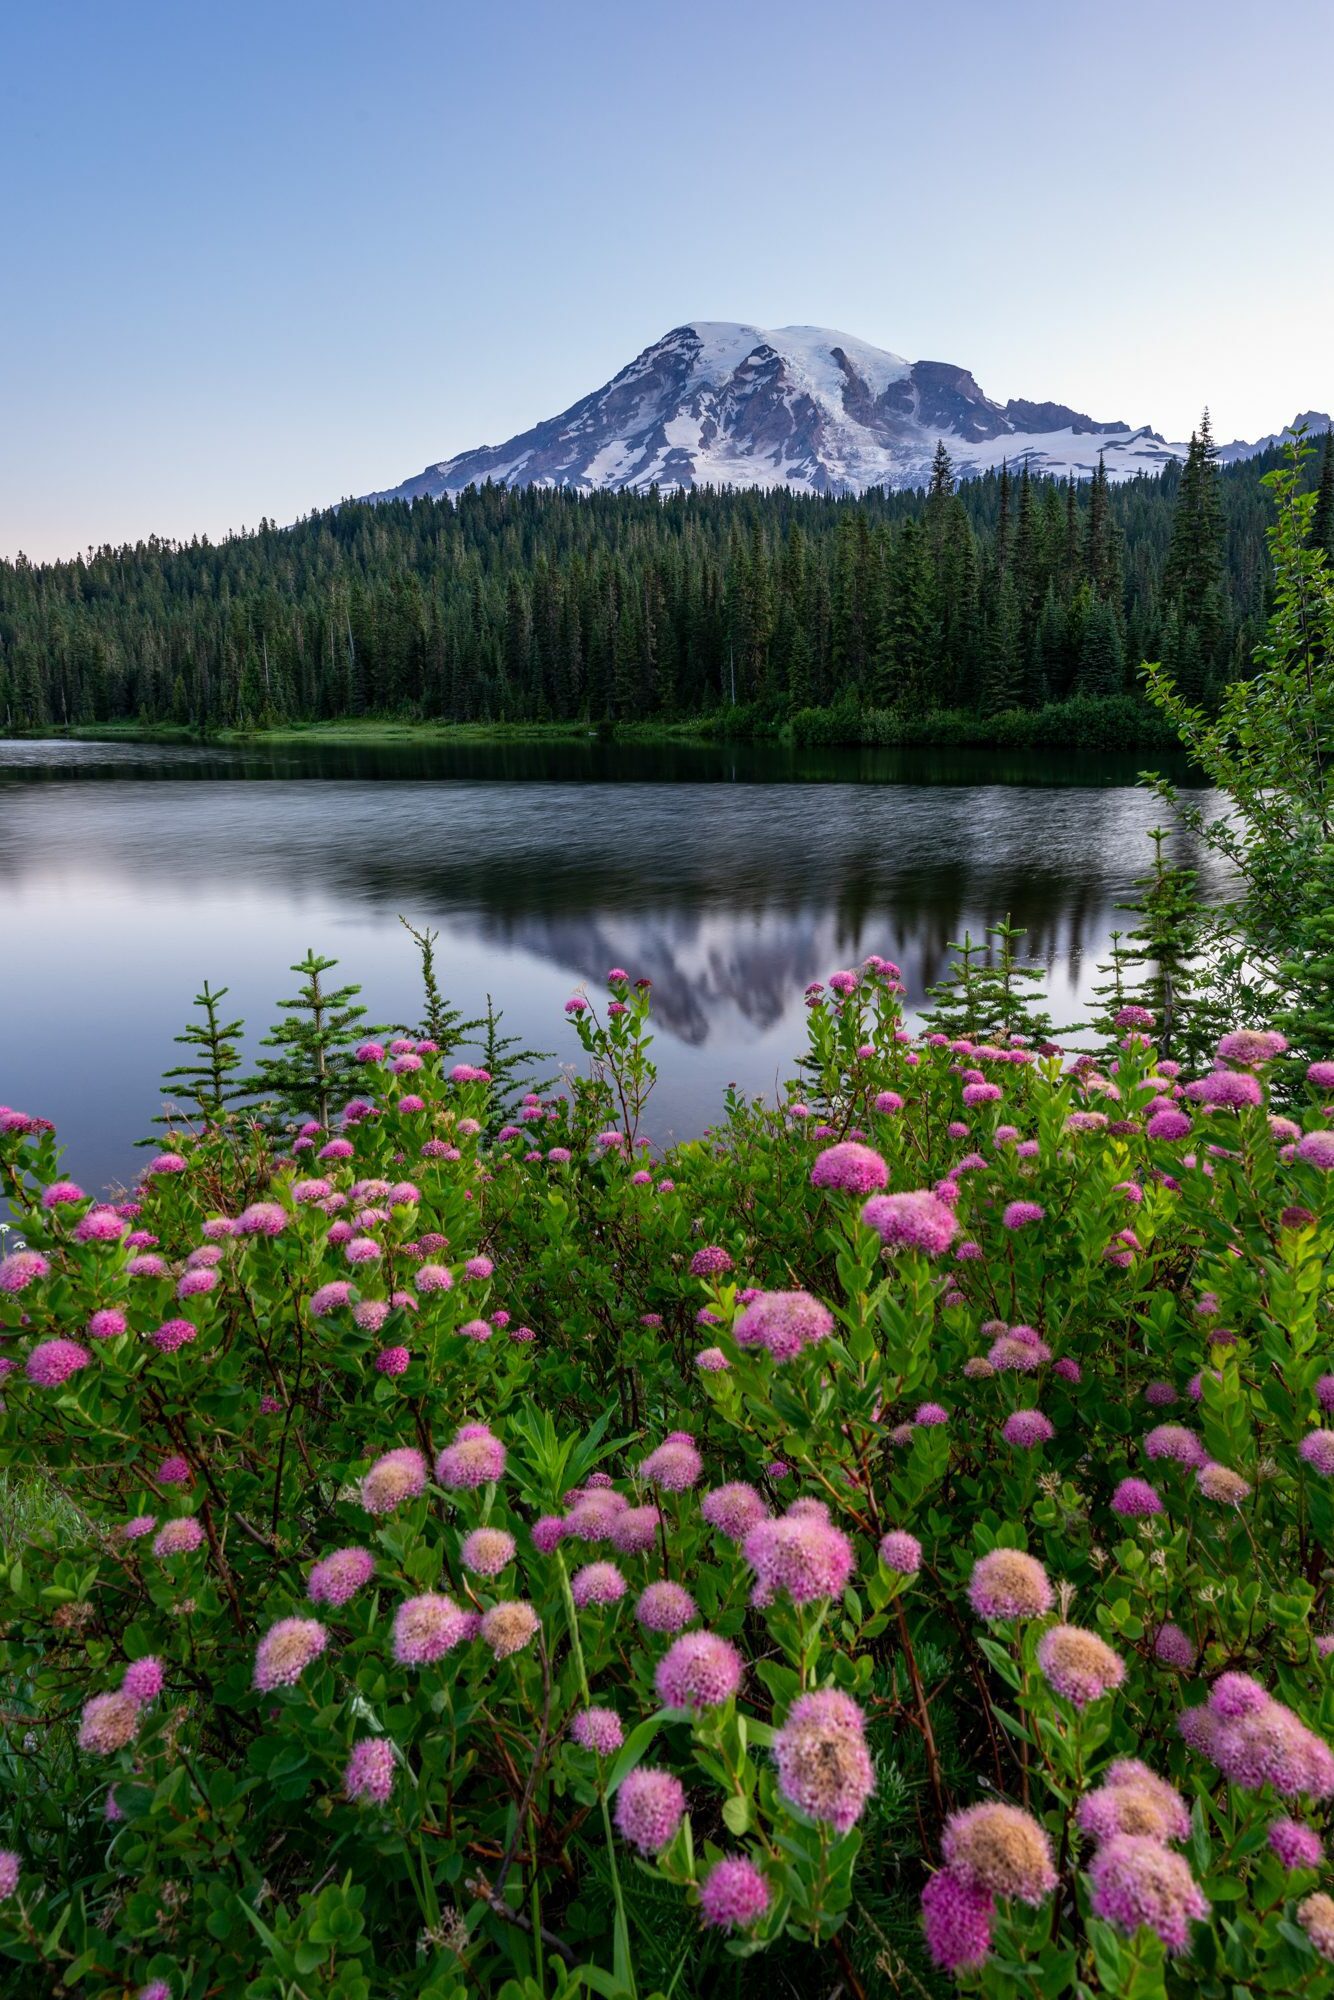
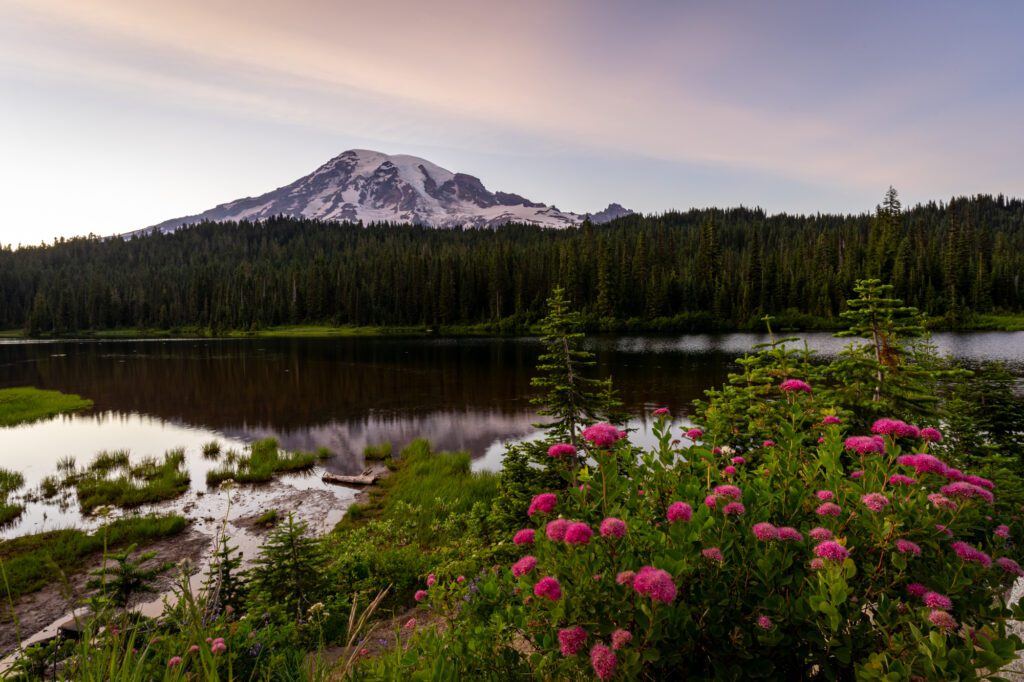
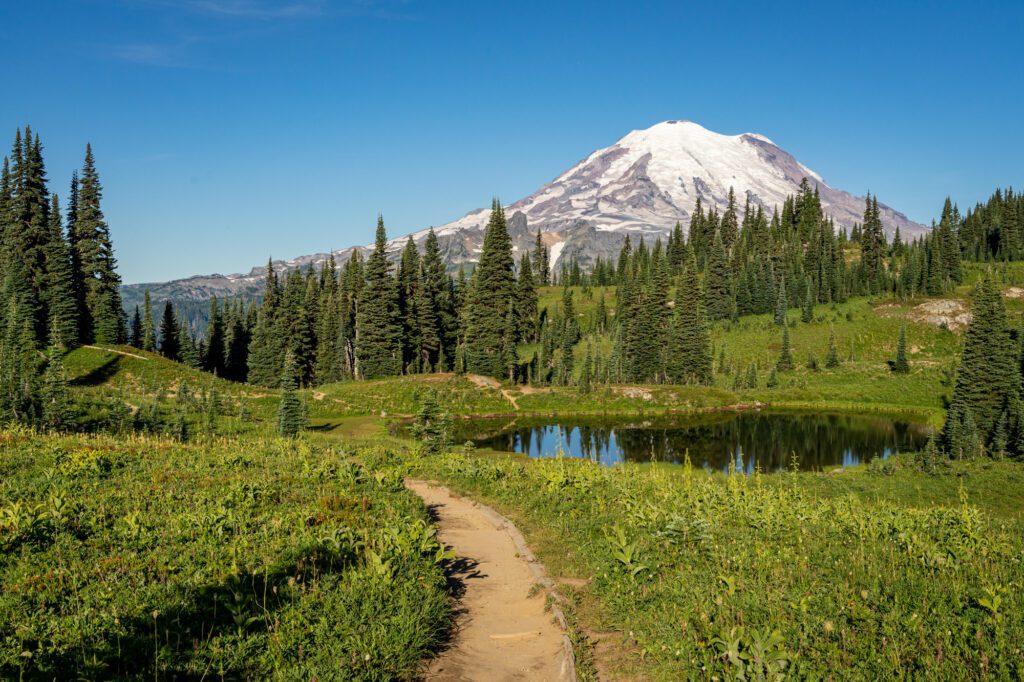
Reflection Lakes. The best sunrise or sunset spot at Paradise, we think. Right off the road, and a nice little lake with a view of Rainier’s peak perfectly reflected in the water (at least on a clear day, which is relatively rare here).
The hiking at Sunrise. While Skyline is our single favorite hike in the park, Sunrise has the best collection of hikes that all leave from one place.
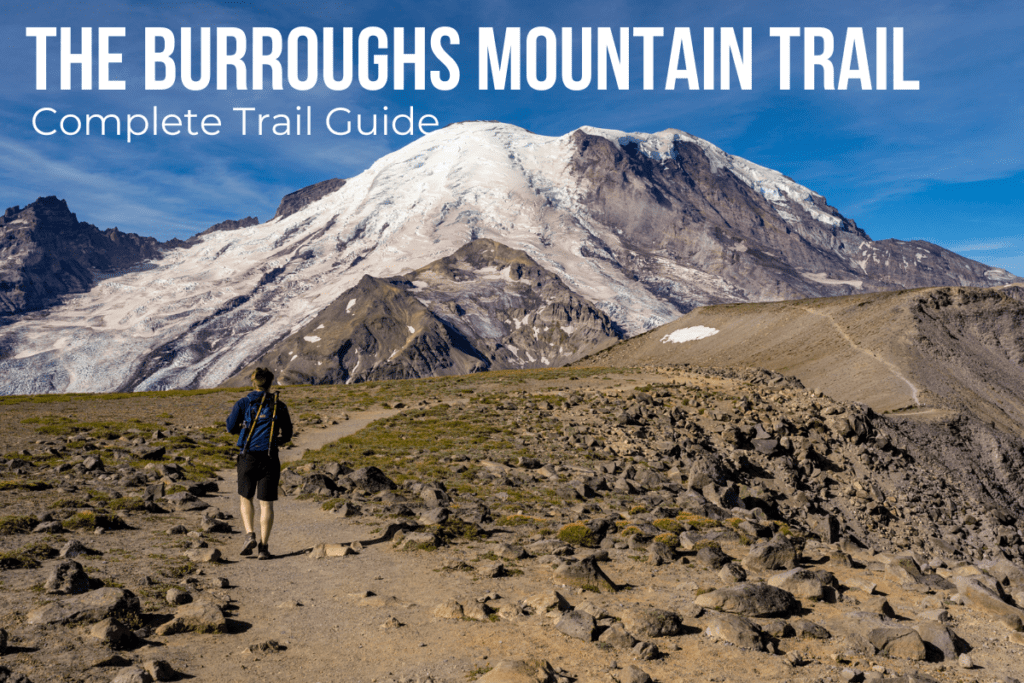
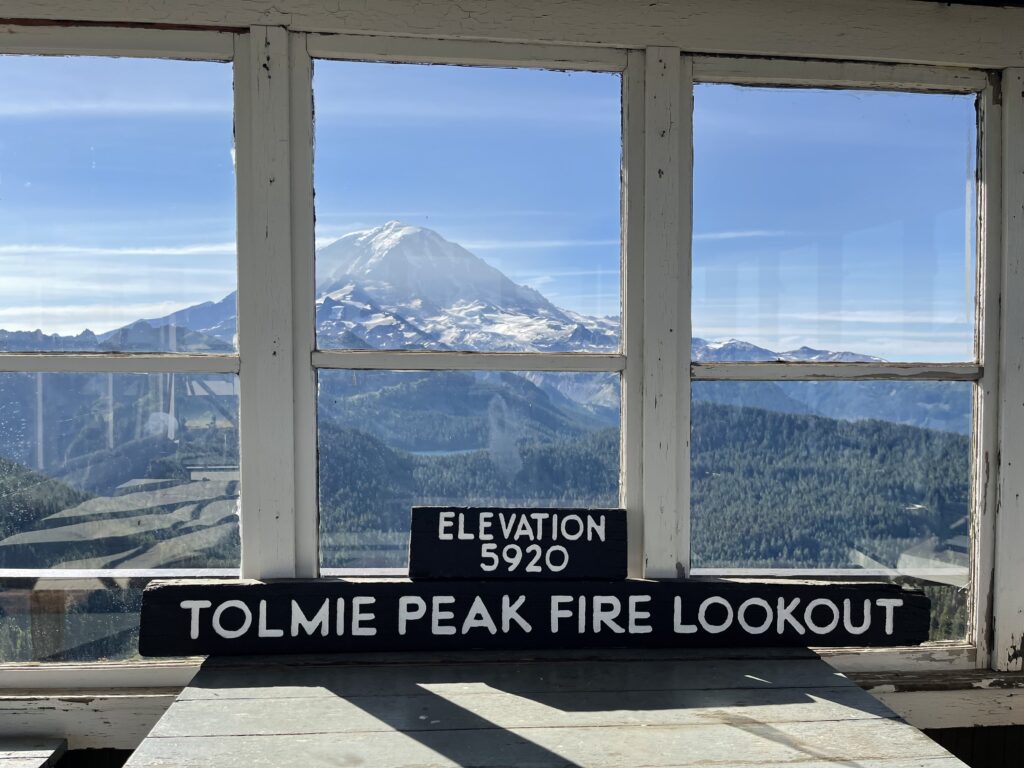
The Burroughs Mountain Trail, Mount Fremont Lookout, and Berkeley Park all follow the spectacular Sourdough Ridge Trail for a few miles before branching off to their own unique viewpoints (close up views of Rainier, sweeping views from a historic fire lookout, and incredible wildflower meadows in the early summer).
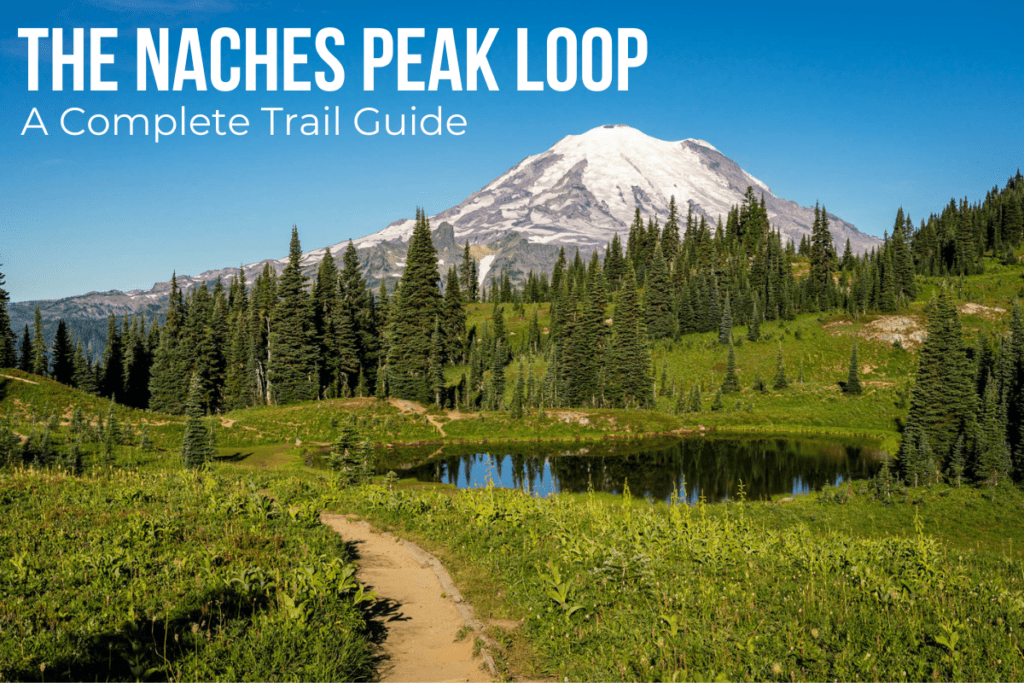
Tipsoo Lake and the Naches Peak Loop (Sunrise). One of our favorite bang-for-your-buck hikes in the state – the Naches Peak Loop – starts at Tipsoo Lake and makes a nice little loop with great views of Rainier through the second half of the loop (if you go clockwise, which you should).
Tipsoo Lake is also a great sunrise location (the sun comes up over your shoulder, illuminating Rainier’s peak) and a slightly less good sunset location, because you’re looking right at the sun.
Mowich Lake and Spray Park / Tolmie Peak. Don’t let the hour-long detour on a washboard gravel road deter you.
If you want to escape the crowds that descend on Paradise and Sunrise, this part of the park is a great option.
Two of the best hikes in Mount Rainier National Park – Spray Park and Tolmie Peak – leave from the shore of Mowich Lake!
In the next section, we’ll cover how to fit it all together.
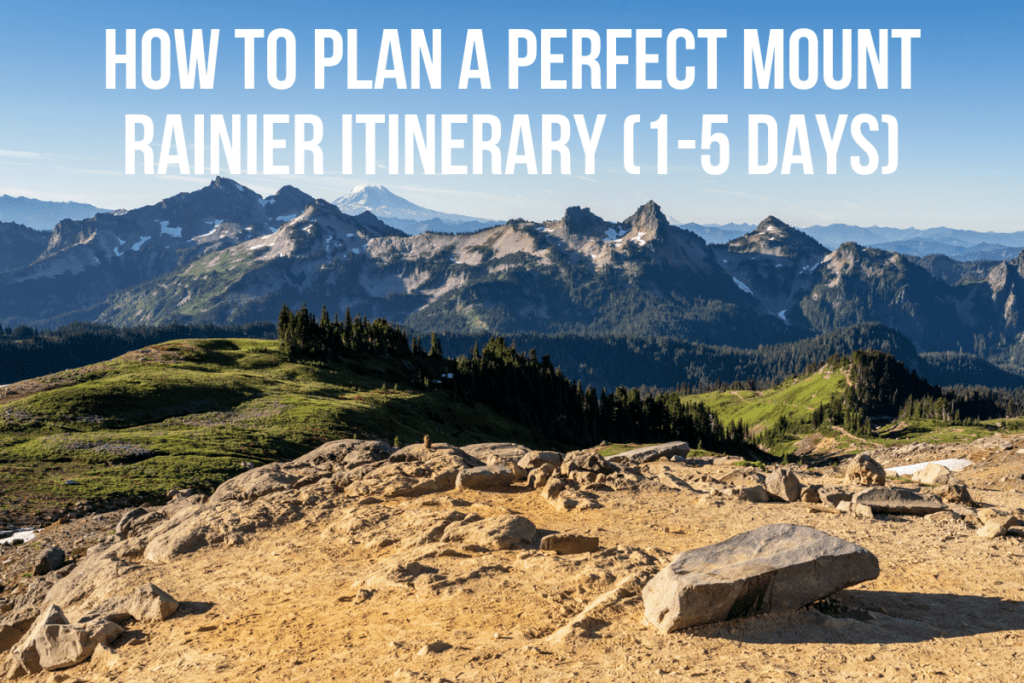
Planning Your Mount Rainier National Park Itinerary
In this section, let’s talk about putting it all together and planning your itinerary for visiting Mount Rainier National Park.
Like we mentioned in the “How Much Time” section above, we think 3 days is the right amount of time to see both Paradise AND Sunrise (along with a short stop at Ohanapecosh in between them, which is all you really need).
If you only have a day or two, focus on one section of the park (we’d choose Paradise for the diversity of things to do and see, but we can also see the argument for Sunrise).
A full five days will allow you to see all four regions of the park, albeit in a bit of a rushed fashion.
Here are a few itinerary ideas for one, two, three, and five (or more) days in the park.
One Day (Paradise)
With one day at Paradise, we’d start your day with an early morning hike on the Skyline Trail, which is both our favorite hike in the entire park. Don’t miss Myrtle Falls along the trail!
It will take you the better part of a morning. Afterwards, pop into the Paradise Inn to check it out, and then hop in the car and drive over to Reflection Lakes for your lunch break.
After lunch (if you’re up for it), tackle the relatively short hike to Bench and Snow Lakes, which is another of our favorites. We love a good hike with a lake that has a reflection of Mount Rainier!
From there, head back down the road towards the Nisqually Entrance and stop at both Narada Falls and Christine Falls along the way.
If you’re sticking around for sunset, head back up to Reflection Lakes, which is our favorite place to catch a sunset in this part of the park.
Two Days (Paradise)
With two days at Paradise, spend your first morning hiking Skyline exactly as written above, then head to Ohanapecosh for the afternoon to check out Silver Falls and the Grove of the Patriarchs, ending with a sunset at Reflection Lakes.
On your second day, tackle the Comet Falls Trail first – the most impressive waterfall at Paradise – and then head to Christine Falls and Narada Falls on your way up to hike Bench and Snow Lakes for a nice afternoon stroll.
Catch the afternoon light on Rainier by walking the short, paved Nisqually Vista Loop to cap it all off.
One Day (Sunrise)
If you’re spending one day at Sunrise, you’re going to want to head straight to the Sunrise Visitor Center to get an early start on your big hike of the day.
There are three great hikes that leave from here, and which you choose depends on what you’re up for and what kind of scenery you’d like.
Choose from the Burroughs Mountain trail (difficult, with up close and personal views of Rainier), the Mount Fremont Lookout (moderate, with sweeping views from a historic fire lookout), or the Berkeley Park Trail (moderate, great wildflower meadows in the early summer).
After your hike, enjoy your lunch at the Sunrise Visitor Center and then do the short stroll out to Shadow Lake, which takes you through some stunning wildflower meadows with some good peek-a-boo views of Rainier and the White River Valley.
End your day down at Tipsoo Lake, which is one of our favorite photo locations in the park (specifically, here on Google Maps where you have a view of the lake with Rainier looming in the background).
Two Days (Sunrise)
At Sunrise, it’s truly all about the hiking.
If you’re adding a second day here, we’d follow the one day version above as written for your first day.
On your second day, add another hike (either one of the ones you didn’t do above, or the equally epic Summerland Trail) in the morning, and an afternoon trip over to Ohanapecosh to see Silver Falls and the Grove of the Patriarchs.
Three Days (Paradise, Ohanapecosh, & Sunrise)
If you’ve got three days to spend exploring the south and eastern sides of the park – Paradise, Ohanapecosh, and Sunrise – here’s how we’d spend it.
Note that you can totally reverse this itinerary to start with Sunrise and end with Paradise if that works better.
Start by following our one day (Paradise) itinerary above for your first day.
That means an early hike on the Skyline Trail, followed by a trip to Reflection Lakes and Bench and Snow Lakes (and back to Reflection Lakes for sunset, if you’d like) before heading back to your hotel or campground.
On your second day, start your day with a hike to Comet Falls, followed by trips to Christine Falls and Narada Falls en route to Ohanapecosh, where you’ll stop for lunch and a quick forested stroll to Silver Falls and Grove of the Patriarchs.
End your second day at Tipsoo Lake, where you can hike the easy (but VERY worthwhile) Naches Peak Loop and catch sunset over the lake.
On your last day, follow our “One Day – Sunrise” itinerary above by heading up to the Sunrise Visitor Center, tackling a hike, checking out the views and wildflowers on the way to Shadow Lake.
Optional: Save Naches Peak and Tipsoo for your third night and head up to Sunrise to do the Mount Fremont Lookout at sunset to close out your second day.
Five Days (All Regions)
With Five Days, we’d essentially follow each of the two day itineraries above (two nights at Paradise, two nights at Sunrise) and use your fifth day to add a trip to Mowich Lake to hike either Tolmie Peak (better views) or Spray Park (longer, but better meadows).
You can either stay overnight at the primitive campground at Mowich Lake, or relax at the lake post-hike before making the long drive around the mountain to Paradise to set yourself up for a good early morning start on your next day.
You could also do Mowich Lake as your last stop at Rainier, which would put you in a good position to get back to the airport or Seattle.
Our Mount Rainier National Park Visitor Guide, Mapped
More on Visiting Mount Rainier National Park