How to Hike the Incredible Skyline Trail at Mt. Rainier
When we think about our favorite hikes we’ve ever done, a few trails immediately spring to mind. One of those trails is the Skyline Trail in Mount Rainier National Park, which we’ve now hiked multiple times spanning across different years.
It is, without a doubt, at the top of our list of the best hikes in Mount Rainier National Park.
When we get back to the car after doing this hike, we’re flabbergasted at how spectacular it is. Every. Single. Time. It never gets old.
What exactly is spectacular about it?
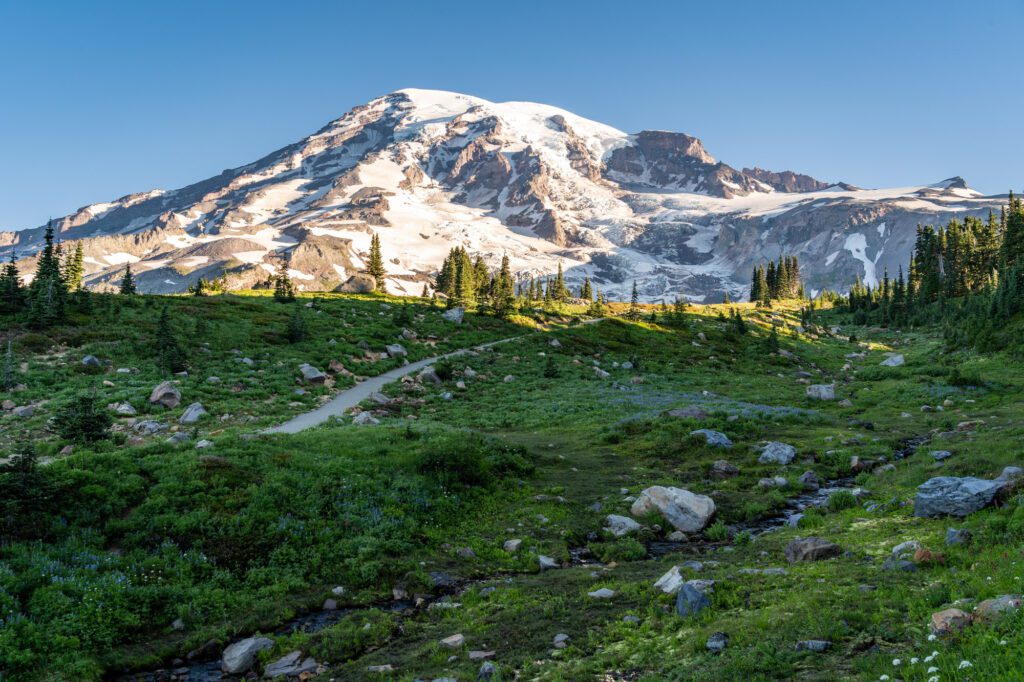
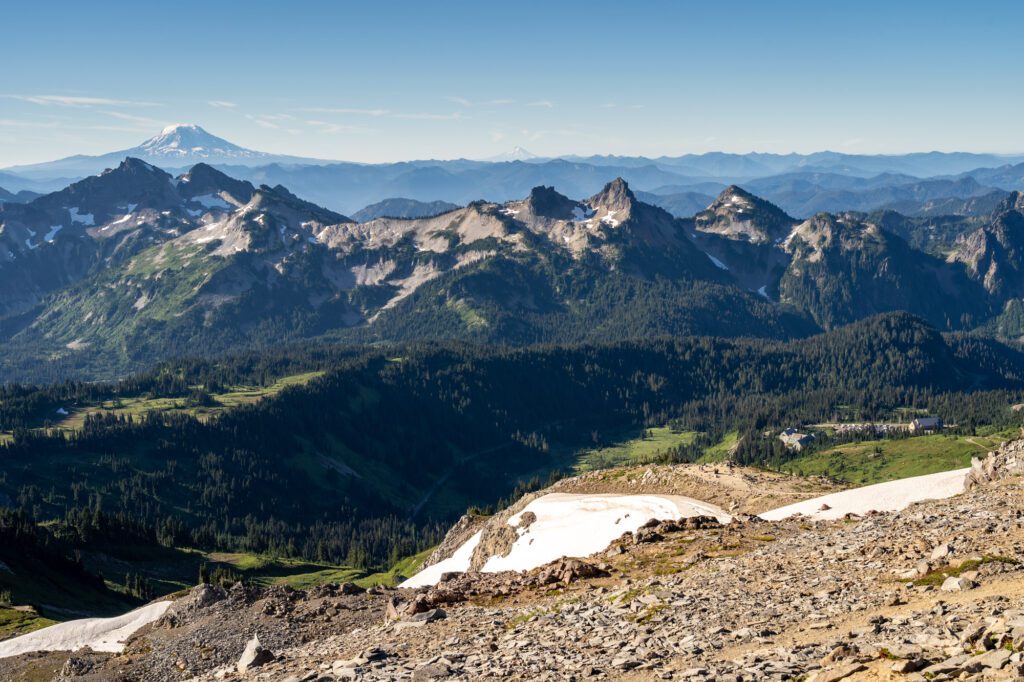
Lush meadows filled with blankets of wildflowers, incredible views of Rainier where you’re so close to the face of the Mountain it almost feels like you can reach out and touch it, and sweeping panoramic views of the surrounding landscape, including Mount Adams, Mount St. Helens, and Mount Hood (on a clear day).
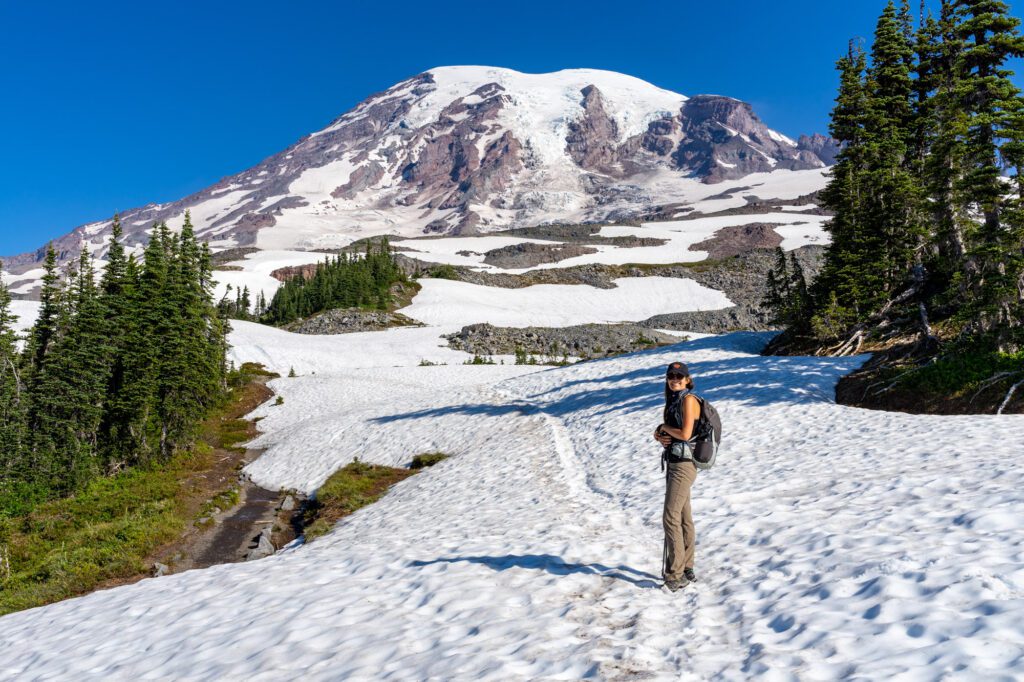
We’ve tackled this trail a few times now, including in late July when there was a thick blanket of snow on the eastern half of the loop, and in mid-August, when 95% of the snow was gone.
Crucially, we’ve also done it in both directions – clockwise and counterclockwise – which means we can help you understand the pros and cons of hiking it in either direction.
In this guide, we’re going to give you all the details you need to be prepared to hike the Skyline Trail in Mount Rainier National Park.
We’ll go through parking, what route to take, which direction to go, and a play-by-play trail guide that is all based on our own personal experience.
By the end of this guide, we think you’ll be prepared to tackle this incredible hike (spoiler alert: we definitely think you should do the loop!) in Mount Rainier National Park, and be ready to hit the trail confidently and safely.
Disclaimer: Some of the links in this post, like hotel links, are affiliate links, meaning at no additional cost to you, we make a little bit of money if you click through and book. That being said, we would never recommend something to you that we don’t stand behind 100%.
Skyline Trail Details (For the Loop)
- Length: 5.5 miles
- Elevation Gain: 1,700 feet
- Season: Mid-July – September/October
- Trail Type: Loop
- Difficulty: Moderate / Hard
- Trailhead Location
- Dog Friendly: No – NO DOGS ALLOWED
- Pass Required: America the Beautiful Interagency Pass or $30 entrance fee
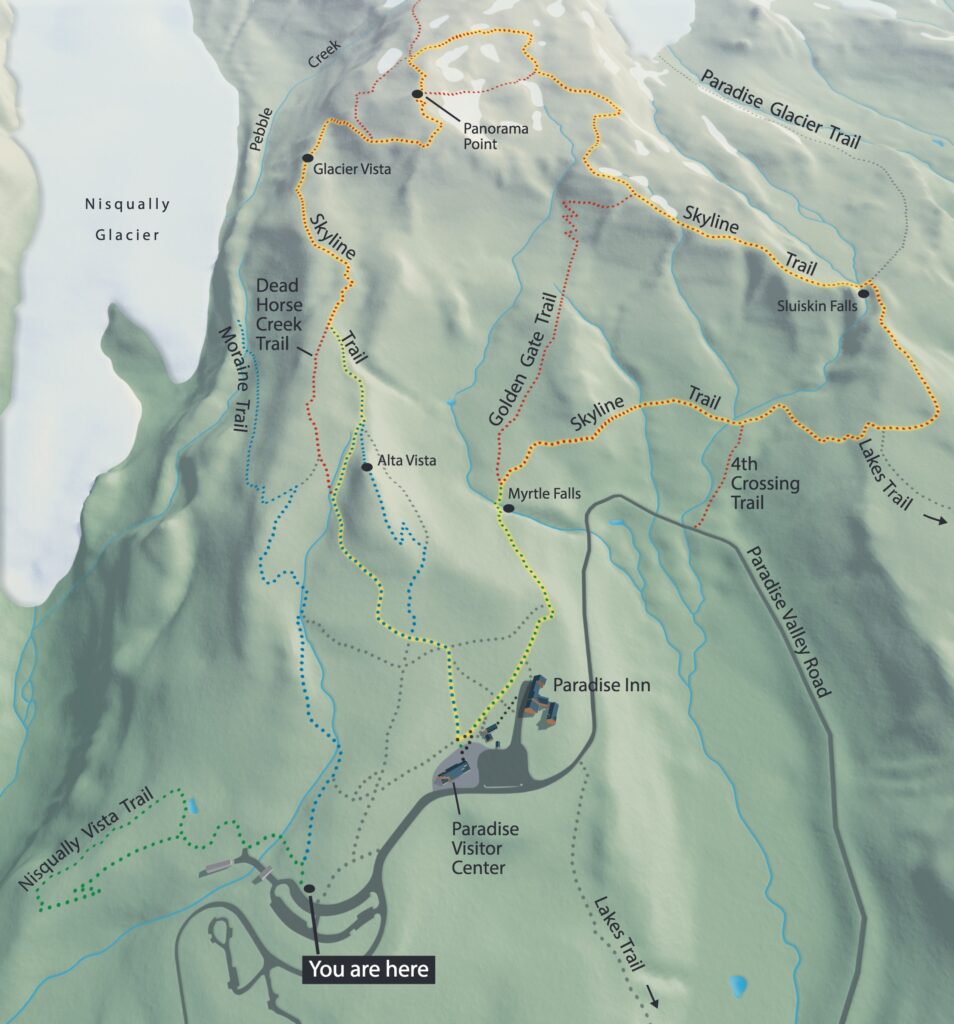
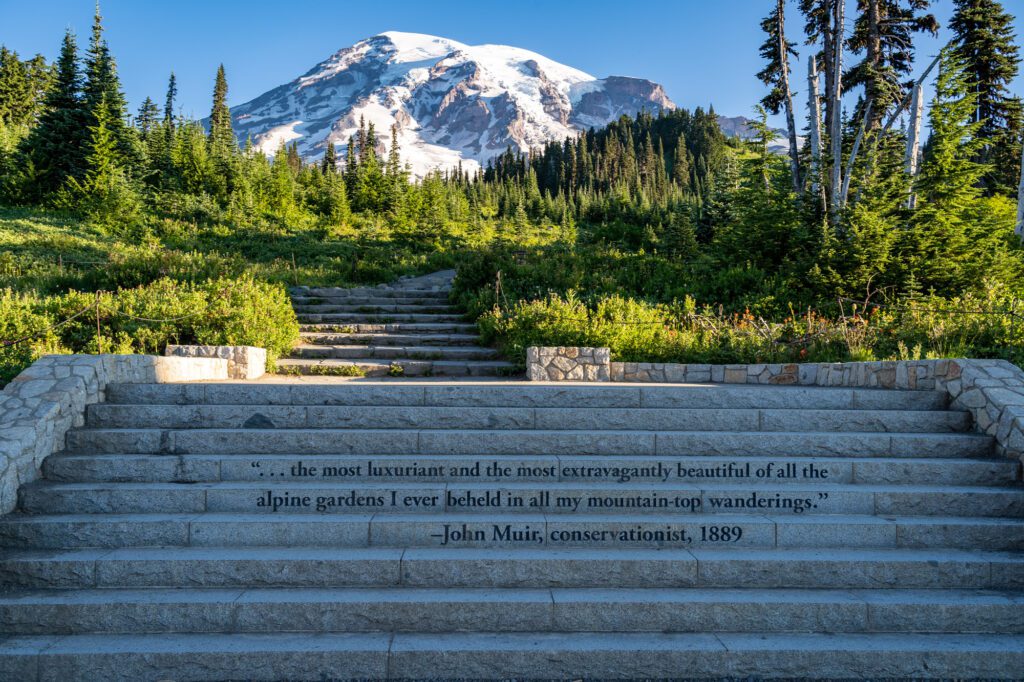
Here’s a trail map, courtesy of the National Park Service.
Is This an Easy Hike?
As you can see from those trail statistics, THIS IS NOT AN EASY HIKE.
We’ve seen countless people underestimate this hike and try to do it without food, water, or in wild outfits.
You need to be prepared for a tough hike with a lot of climbing with limited shade. That means proper footwear (please no sandals), plenty of food and water, and sun protection.
The Route Options
There are a bunch of different routes you could take for this hike, and we’re going to do our best to cover the most common options.
In general, there are two options for most people: the full Skyline Loop, which is about 5.5 miles, and the out-and-back to Panorama Point, which is about 4 miles.
The headline is that we think, if you’re able and the trail conditions on the eastern half of the loop are good, you should hike the full loop.
Why? Because while the views from Panorama Point are phenomenal, we actually think some of the best views of the surrounding mountain ranges are found on the eastern half of the loop.
And, arguably, the best view of the entire trail is from the outcropping above Panorama Point, which you’d completely miss if you just hiked out and back to Panorama Point.
The biggest thing to consider is the condition of the eastern half of the loop trail, which sees snow linger into August most years (you can find conditions on this page).
Until early July, this part of the trail is generally impassable without proper equipment, like microspikes and poles.
The western half of the trail, in general, becomes hikeable a little earlier in the season.
If you’re here in the early summer (think late June and early July), then the out-and-back along the western half of the trail is probably a better bet.
If you’re planning on doing the out-and-back, you can just follow the first section of the trail guide section below, and return the same way you came.
There are a few other route options to consider, some are add-ons, some are shortcuts.
The Golden Gate Trail: The Golden Gate Trail splits off from the main trail on the eastern half of the loop, cutting out a significant chunk of trail (roughly a mile).
The Golden Gate Trail is steeper than the more meandering eastern half of the Skyline Trail. It cuts the loop down to 4.6 miles.
The climb to Camp Muir: The Camp Muir route takes you from Panorama Point up to, you guessed it, Camp Muir, which is a staging area for climbing Mount Rainier.
If this is something you’re interested in, you’ll need to be prepared for a long hike that is very, very likely to include big portions of hiking on snow.
If you do this, you should do it as an out-and-back along the western half of the loop.
It’s 8.4 miles and 4,600 feet of elevation gain, so bring plenty of food, water, and sun protection. This route is only for experienced hikers, and those with a climbing permit. Map and guide here, trail reports here.
Whichever route you choose, make sure to check trail conditions on the National Park Service website before you leave.
Clockwise vs. Counter Clockwise: Which Direction is Best?
Which direction should you hike in if you’re doing the loop? Well, it kind of depends.
In putting together an outline for this guide, we realized that there’s no “right” direction to do this hike in.
However, there are certainly pros and cons of doing it in either direction.
We’ve done it in both directions, so we have personal experience to speak from here.
We’re putting aside the trail conditions issue here – if the entire eastern half of the trail is snow-covered, this question kind of becomes moot because you’ll probably be doing the out-and-back instead.
Looking for a quick summary? Basically, if you can get an early start, go clockwise where you’ll have the view of Rainier straight ahead throughout the steeper climb.
If you’re getting a later start, go counterclockwise so that you’ll have three miles of relative solitude on the eastern half before making your descent on the busiest part of the trail.
Hiking Clockwise
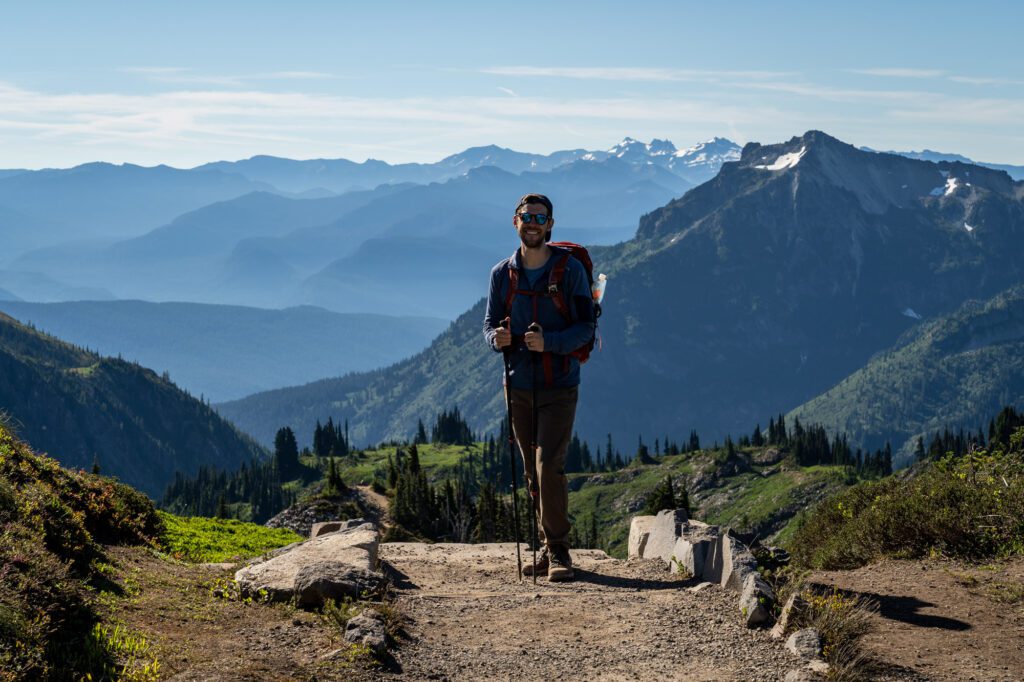
On our most recent trip up to Rainier, we did the loop clockwise, which we actually really enjoyed.
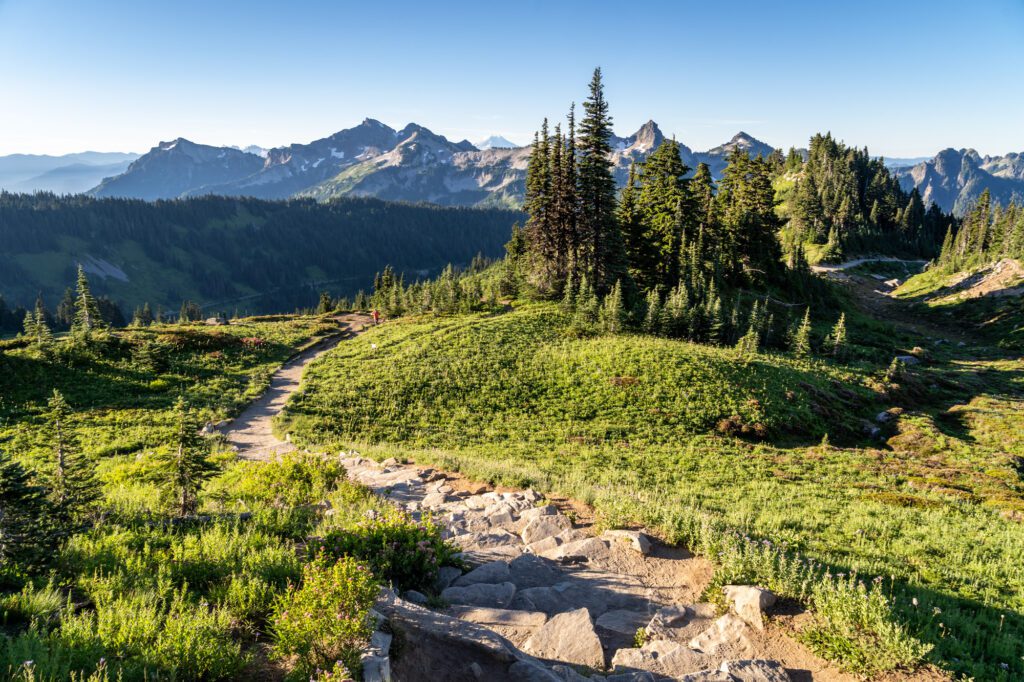
It’s a steeper hike – covering the elevation gain in roughly two miles rather than three – but you hardly notice the gain as you’re meandering through Paradise’s lush meadows full of multicolored wildflowers in the summer.
If you’re getting an early start, go clockwise so you can get up to Panorama Point and the other viewpoints as fast as possible in order to have them mostly to yourself.
Pros of Hiking Clockwise:
Unbeatable Views.While it’s a steeper climb, it’s nice to have the view of Rainier’s face right there in front of you as you’re climbing (if you go the other way, it’s hidden for most of the climbing).
Faster Ascent. You’ll get up to Panorama Point faster if you go clockwise because it’s a shorter – but steeper – climb.
Cons of Hiking Clockwise:
It’s a Tough Climb. You’re covering the same amount of elevation gain over two miles (ish) rather than three.
Tons of People on the Ascent. If you start this hike after about 10:00am, the western half of the loop (the part where you’re heading uphill) is going to be a zoo.
Personally, we’d much rather do the descent dodging other hikers rather than trying to navigate a crowded trail on the way up.
Hiking Counter Clockwise
We’ve also done this hike counter clockwise, and enjoyed the relative solitude that comes on the eastern half of the loop.
It’s a longer, more gradual ascent, which we think is a little bit easier, but the descent down the highly trafficked western side of the loop kind of sucks because it’s a lot of steep stairs that are hard on the knees, and there’s a TON of people.
If you’re getting a relatively late start – after about 9:00am or so – we’d go counterclockwise to avoid dodging other hikers on the ascent (we like to put our heads down and just climb).
Pros of Hiking Counter Clockwise:
Solitude on the Uphill. Heading uphill, you’ll be relatively alone (compared to the other half of the trail).
A More Gradual Climb. It’s a longer, more gradual climb in this direction. That’s not to say there aren’t tough parts of the trail, but it is to say that those hard parts are interspersed with flatter portions (versus the other direction, where it’s straight uphill the whole time).
Cons of Hiking Counter Clockwise:
You’ll Be Swimming Upstream. Coming down, because you’re supposed to be yielding to uphill hikers, you’ll be doing a lot of standing off to the side to let other people pass.
A Steep Descent. If you’re prone to sore knees, we’d probably go the other direction. This descent is steep, and it’s a lot of stairs on the way down.
Getting to the Trailhead for the Skyline Loop Trail
The trailhead for this trail is the big parking lot just outside of the Henry M. Jackson Visitor Center.
Yes, it’s a big parking lot, but don’t let that fool you. It will almost certainly be full by 9:00am on weekend mornings in the summer (and around the same time on weekdays, too, which was surprising to us).
For most people, you’ll be coming from the direction of the Nisqually Entrance (the southwest entrance to the park).
From the Nisqually Entrance, it’s just under 18 miles straight up Paradise Road E.
If you’re coming from either Ohanapecosh or Sunrise, you’ll be coming over on Stevens Canyon Road, which is a beautiful drive. However, it is closed during the winter – check road conditions before your trip.
From the Ohanapecosh Visitor Center, it’s a 45 minute drive (23 miles) along Stevens Canyon Road (at the very end, you’ll take a right on Paradise Road E and follow it for a mile to the parking lot).
A note if you’re coming from Sunrise on the eastern flank of Mount Rainier. It’s quite a trek. From the Sunrise Visitor Center, it’s 1 hour and 25 minutes (50 miles).
The Best Time of Year to Hike This Trail
The Paradise area is gorgeous, but sitting at 5,000 feet above sea level means that there are some timing implications to think about that most visitors from out of state don’t consider when they’re planning their trip.
Like many higher elevation hiking trails in Washington State, there’s a very short season to hike where the trail is snow free and the weather is good.
In this case, that season is basically the middle of July through the middle of September.
If this hike (or any of the high elevation hikes at Rainier, like the Burroughs Mountain Trail at Sunrise) is a must-do on your trip to Rainier, we’d make sure to plan your trip in that window.
Most years, snow lingers on the eastern half of the loop into August, but by mid-July it’s hikeable with proper footwear and care.
If you’re coming in the couple of weeks before or after that short window, there’s a possibility that you can do the hike, or at least a portion of it.
The weather might be more unpredictable (read: colder and wetter), and the trail might be partially covered in snow and impassable without microspikes or crampons.
By mid-June, you’ll probably be able to do the out-and-back up to Panorama Point, but it will likely involve some snow on the trail. Hiking boots with good traction and hiking poles are must-haves, and microspikes are a nice-to-have.
Outside of June to October, this trail is covered in snow. You can do parts of it with snowshoes, and it’s beautiful on a cool, crisp winter day, but it’s really not the same experience as it is in the summer.
Hiking the Skyline Loop Trail: A Play-By-Play Overview
Now, we’ll take you through exactly what to expect on the the trail so that you’re prepared for this hike and can hit the trail confidently and safely.
This trail guide is based on our own personal experience hiking the trail.
For transparency’s sake, we’ve hiked this trail twice now – once in late-July, when the eastern half of the trail was still covered in snow, and once in mid-August, when 95% of the snow had disappeared.
Crucially, we’ve done the trail in both directions, so we have a good understanding of the positives and negatives of going in either direction.
We’re going to take you through the trail clockwise, which is the way we did it on our latest trip, and is our recommendation if you’re getting an early start.
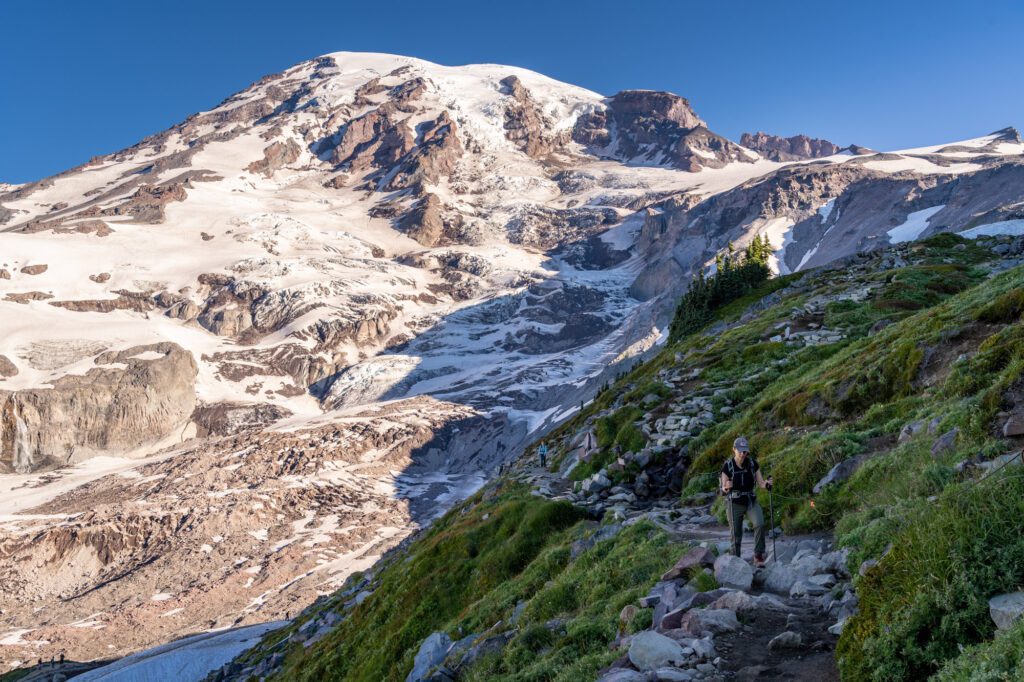
Parking Lot to Panorama Point
Distance: 1.8 miles // Elevation Gain: 1,800 feet
The first half mile or so of this hike, ironically, is two seemingly contradictory things.
It is both a paved trail, and the most difficult part of the ascent.
There are some portions of the initial climb that had Alysha and I looking at each other saying things like “I’m not crazy, this is really steep right?”
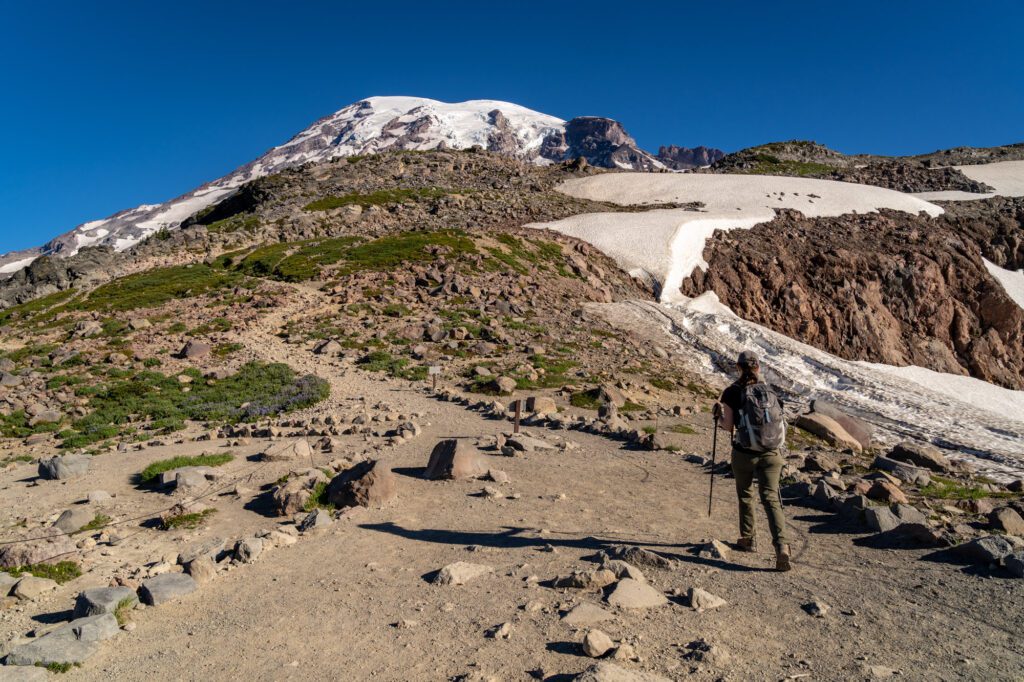
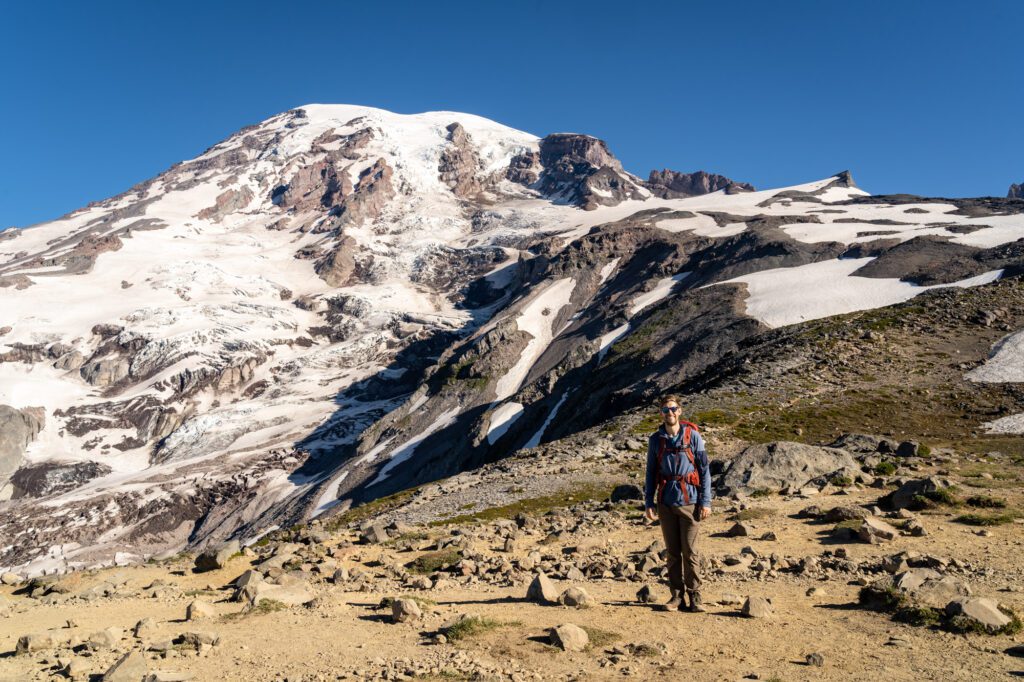
However, from the jump – and this is one of the reasons we like doing it clockwise – you’ll be hiking right at Rainier, with an excellent view of the Mountain throughout your climb.
The lush greenery of Paradise’s meadows, which are full of blooming wildflowers from mid-July on, isn’t half bad either.

Once the hike leaves the paved portion of the trail at just over a half mile into the climb, you’ll start up a spiny ridge on a well maintained trail.
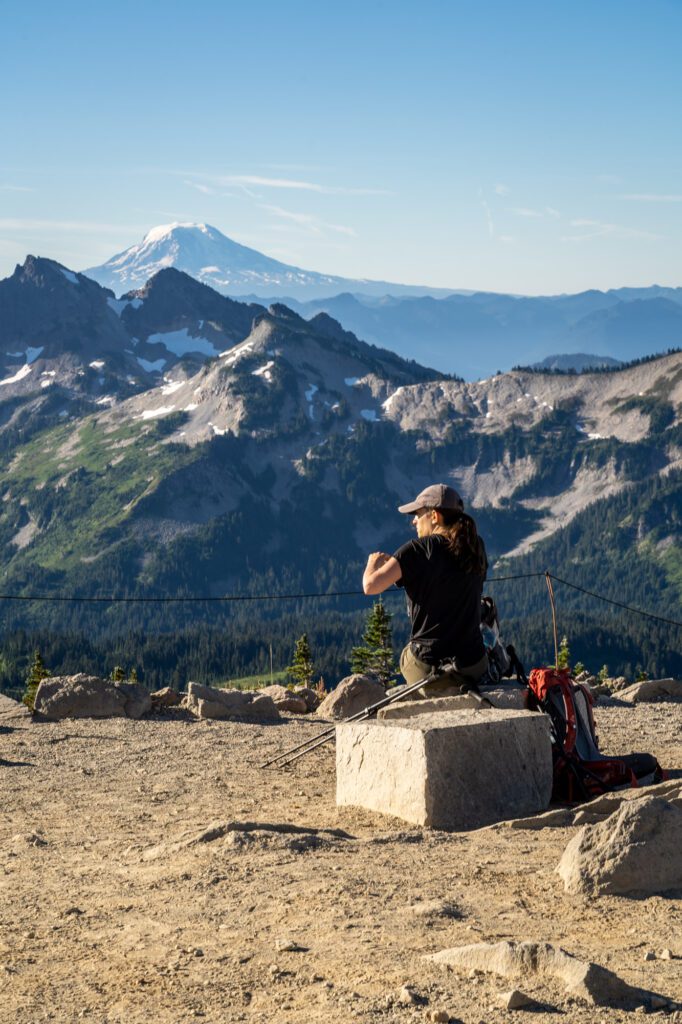
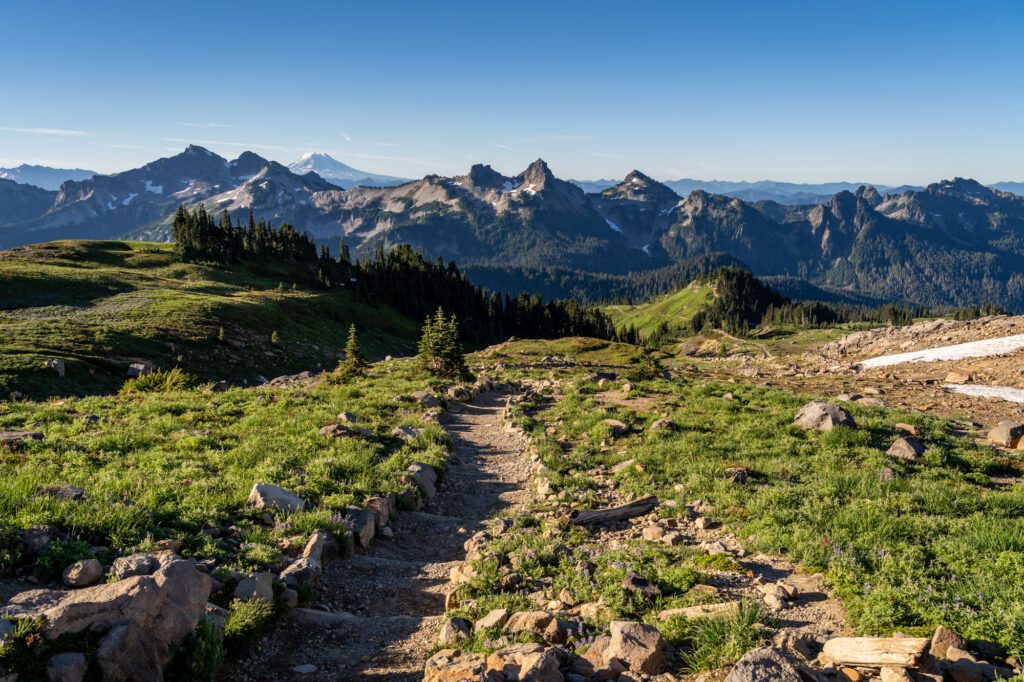
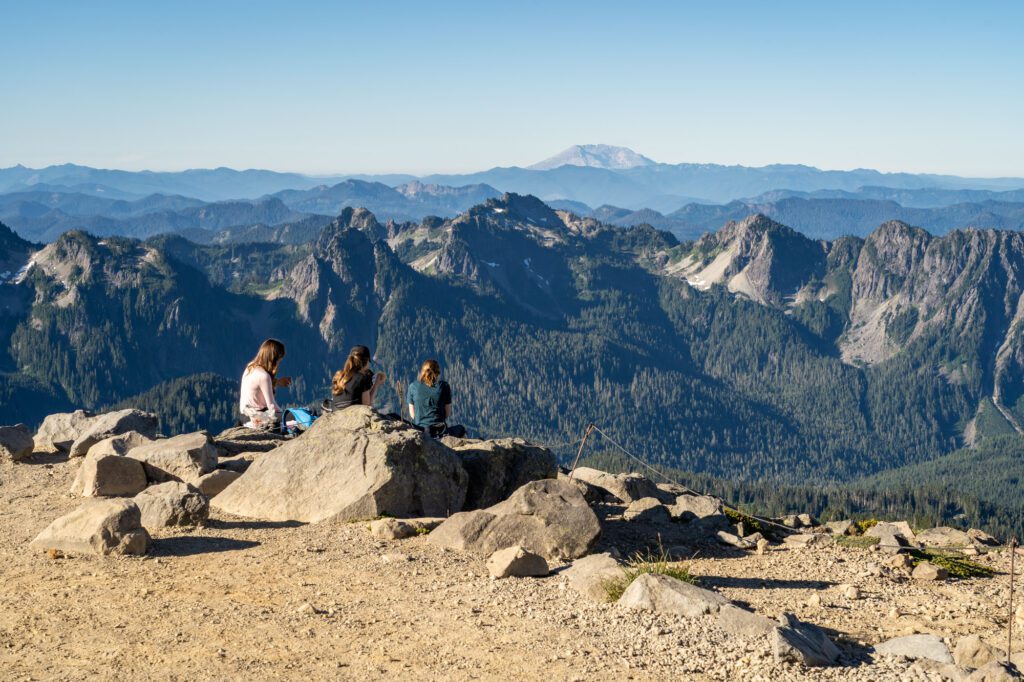
Absolutely, under no circumstances, should you forget to look over your shoulder and check out the vistas back towards the south, where you’ll find a view that includes Mount Adams, Mount St. Helens, and even Mount Hood on a clear day, along with the rocky Tatoosh Range and Pinnacle Peak closer in.
At 1.2 miles or so, there’s a nice little flat area with perfect sitting rocks, where we took a break and had a snack and some water with a view.
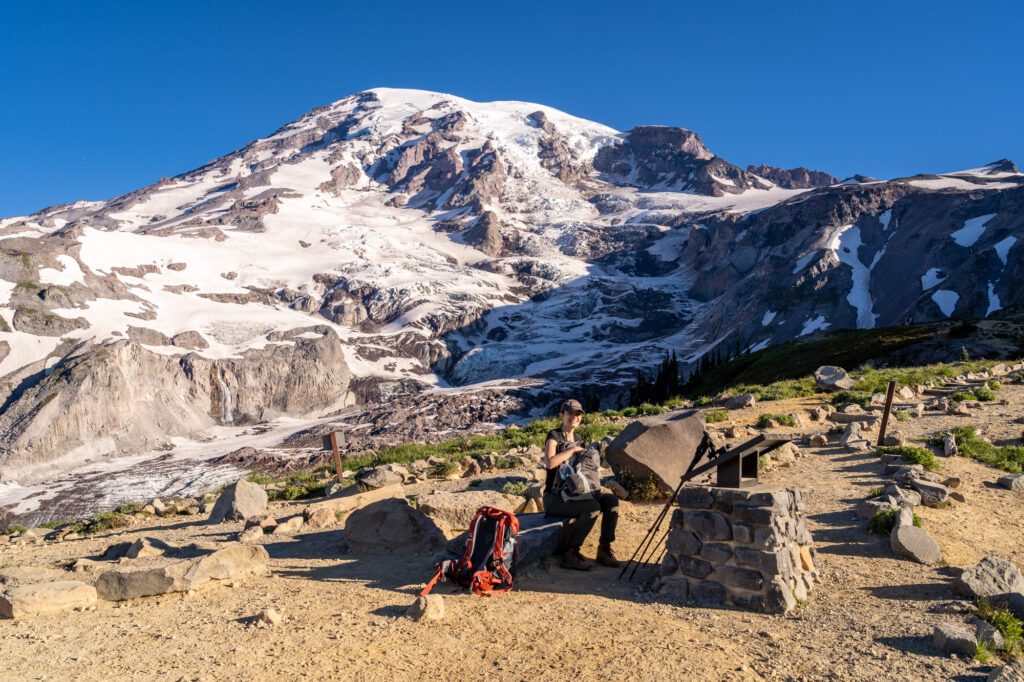
There’s a short detour right there to get a good view of the Nisqually Glacier, which adds a negligible amount of hiking.
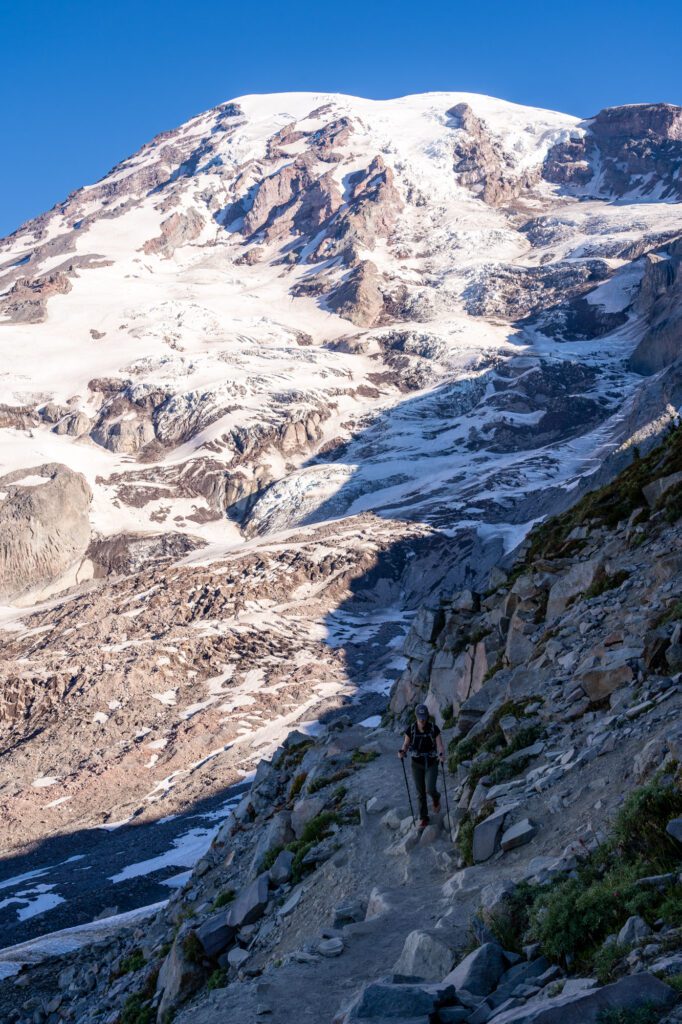
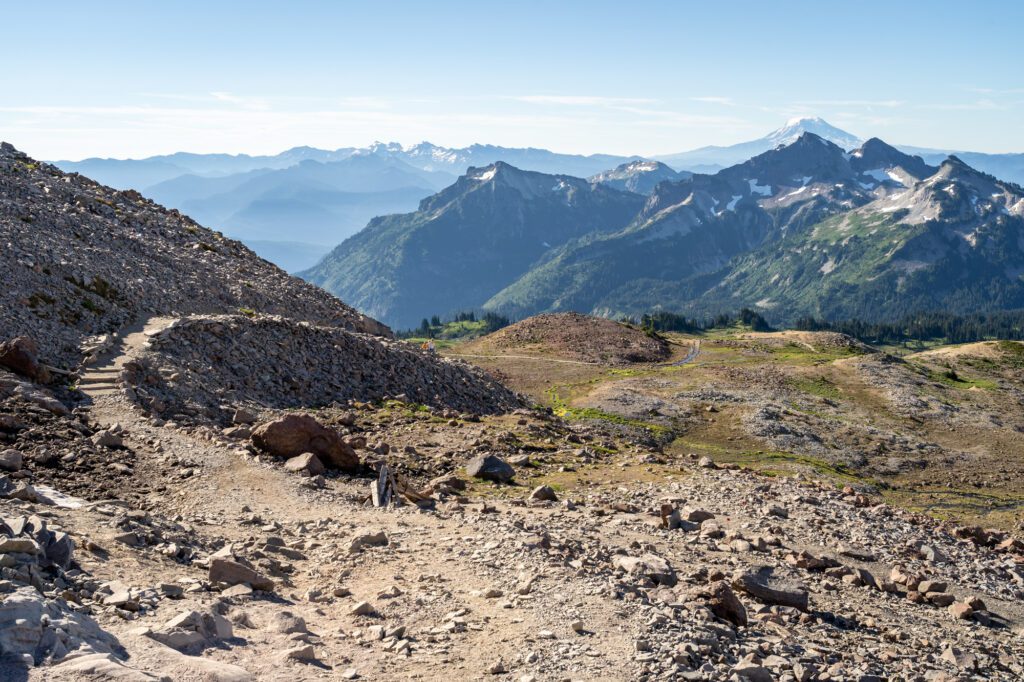
From there, you’ll cover a section that often has snow into August before the trail turns right and starts the final climb to Panorama Point.
You’ll turn away from the views of Rainier, and instead turn your attention to the view to the south, which continues to get better and better the further up you climb.
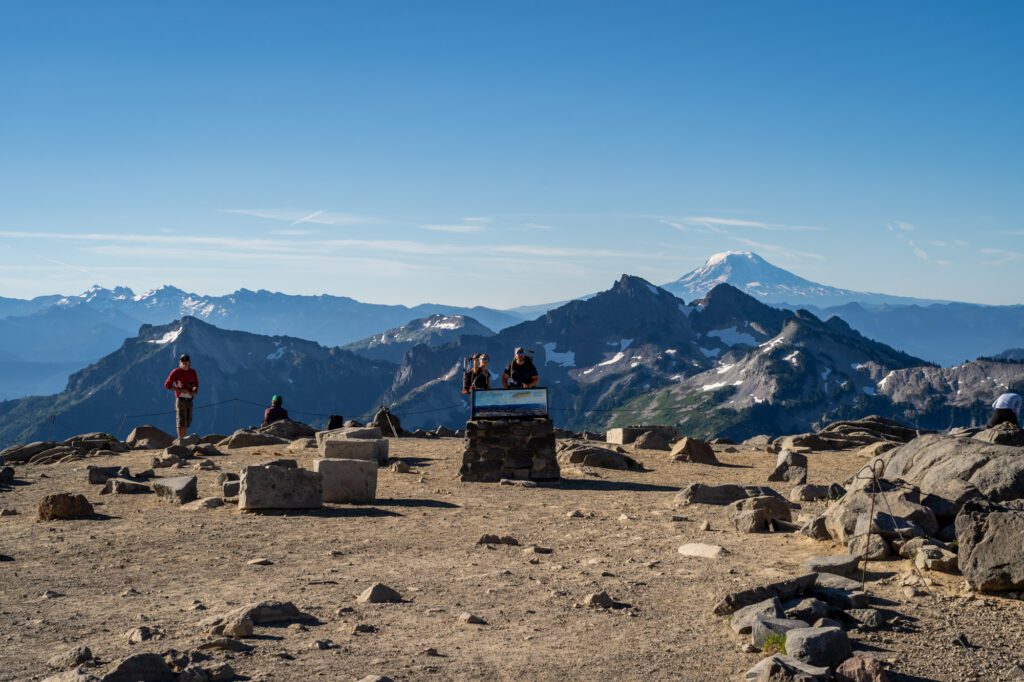
At 1.8 miles, you’ll reach Panorama Point, where you’ll find a pit toilet (summers only) and what most people consider the best view on the hike. We disagree.
Panorama Point to the Wooden Footbridge Over the Paradise River
Distance: 1.9 miles // Elevation Change: 250 feet elevation gain & 1,000 feet of elevation loss
Turn around from the view at Panorama Point and face Rainier. See that big rocky outcropping behind you between you and the Mountain?
The best view on the entire trail, at least in our opinion, awaits you at the top of that climb.
You’ll have a great view to the south – better than Panorama Point – and a truly incredible close up view of Rainier.
From there, it’s all downhill! Well, except for the short climb right before you get back to the trailhead, but you don’t need to think about that just yet.
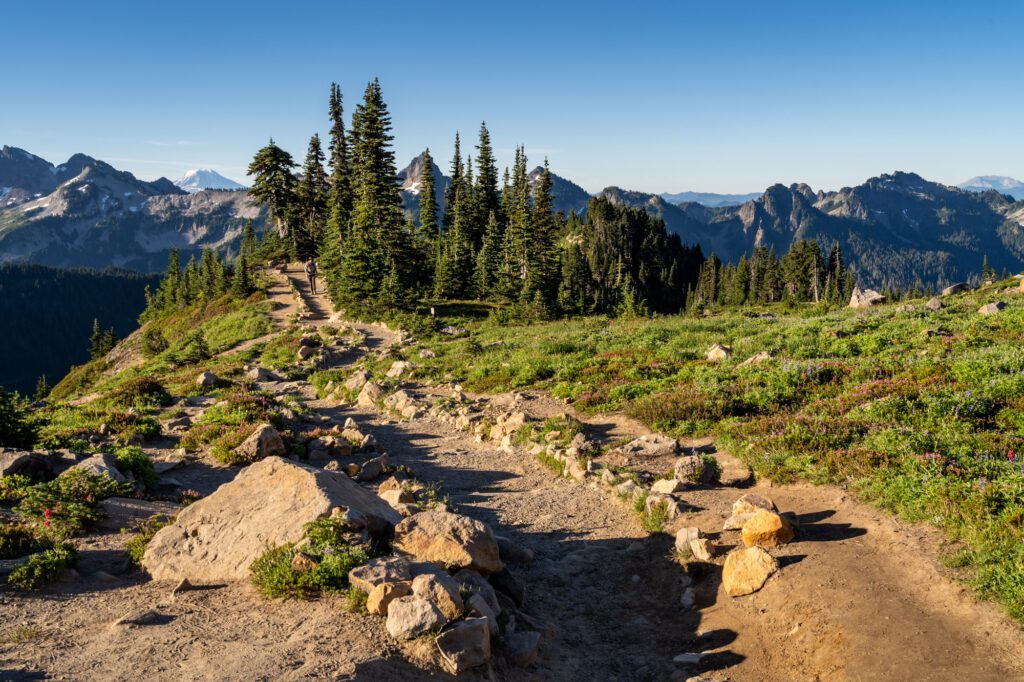
From here, you’ll follow the High Skyline Trail as it winds its way down, passing through rocky high alpine terrain (prime mountain goat territory – keep your eyes peeled because we saw a few lounging in the sun).
The sun will be directly in front of you if you’re doing this section around midday, so sunglasses and a re-application of sunscreen will be your friend here.
You might be wondering why we chose this specific footbridge as a breaking point in our trail report.
It’s because above that footbridge, you’re hiking through the high alpine terrain, which is noticeably more rocky and less lush than the lower elevation trail sections.
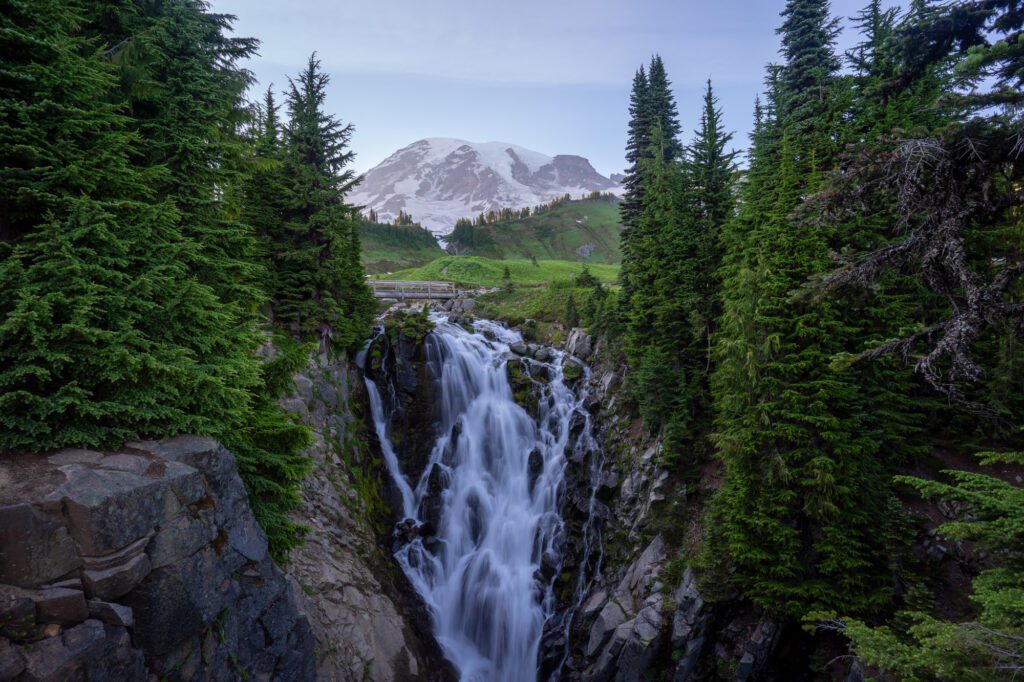
Wooden Footbridge to the Trailhead (and Myrtle Falls)
Distance: 1.9 miles // Elevation Change: 200 feet elevation gain & 500 feet of elevation loss
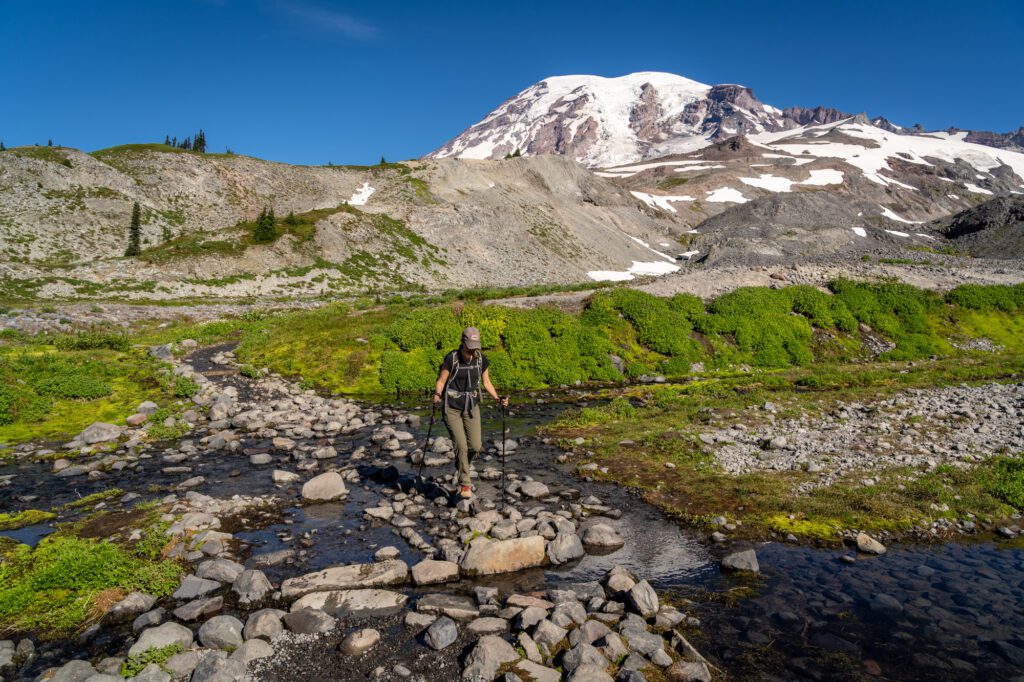
As soon as you cross the river and continue the descent, it gets noticeably more lush, and it feels like a whole new trail.
This section of trail is defined by a steep descent down a quick set of switchbacks, and then a short, gradual climb back up to the trailhead. Who doesn’t love to hike down just to hike right back up again?
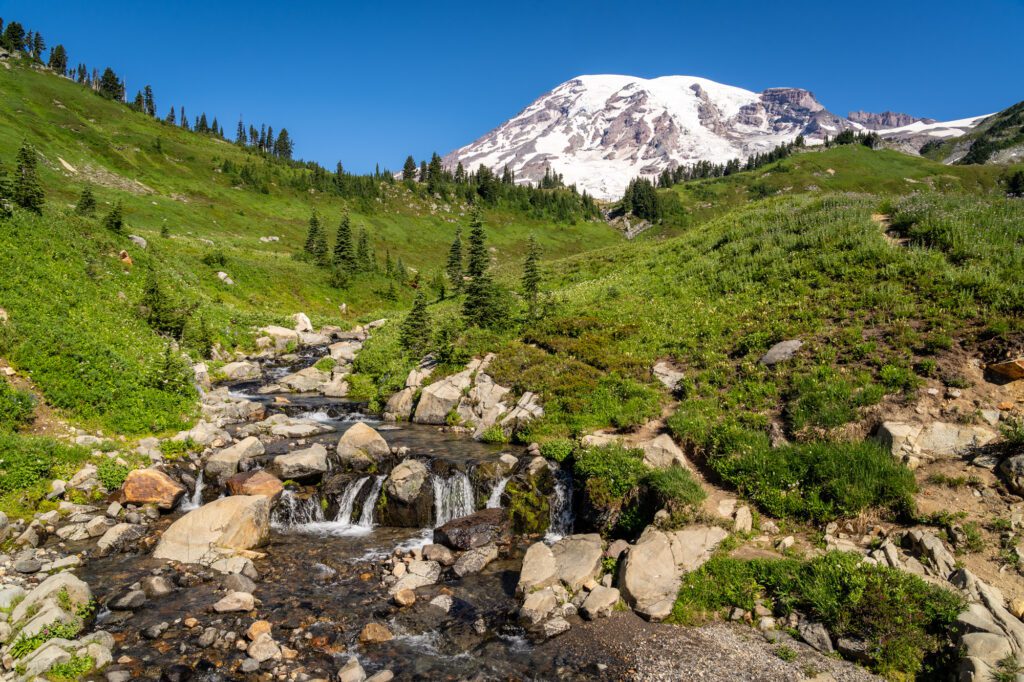
As you make your way towards the parking lot, you’ll cross a footbridge with an excellent view of Rainier, and then Myrtle Falls, which is a great picture with the waterfall in the foreground, and the snow capped peak of Mount Rainier looming in the background.
Planning a Trip to Mount Rainier National Park? You won’t want to miss our detailed guides to visiting Mount Rainier that are all based on our own personal experience exploring the park.
- All of Our Favorite Things to Do in Mount Rainier National Park
- How to Plan an Unforgettable Day Trip to Mount Rainier From Seattle
- Where to Stay near Mount Rainier National Park: A Complete Guide
- The Best Hikes in Mount Rainier National Park: A Helpful Hiking Guide
- Hiking the Skyline Trail: Is This the Best Hike in the Entire State?
- Hiking the Jaw-Dropping Burroughs Mountain Trail at Mount Rainier
- Hiking to Towering Comet Falls in Mount Rainier National Park
- The Naches Peak Loop: The Best Bang-for-your-Buck in Washington
Hello, I’m planning a trip to Washington in mid-October. I’m 62 and in decent shape. Would you recommend Mt. Rainier? Have you been to Olympic? I was thinking about Hurricane Ridge there, but we only have like a day or two at each then have to be in Oregon. What would be your recommendations?
we are flying in from NC
Hey Todd! We love Mount Rainier- we were just up there a few weeks ago and it was magical, as usual. We also love Olympic, which is a much more diverse, sprawling landscape where you’ll find everything from alpine to coastal to rainforest. If I’m reading correctly, it sounds like you have ~3-4 days between the two. With that amount of time, I’d STRONGLY recommend focusing on just one of the parks, because they’re 3-4 hours apart, and each have plenty to do and see for that amount of time. For both, we’d recommend breaking up your time in half and spending a couple nights in different regions of the park (which can take 60-90 minutes to get between) – it will save you a ton of driving.
Here are our Rainier guides for you to peruse, and our Olympic guides (we love both, and it commes down to what you’re into!).
Hope that helps!
Matt