An Amazing 4 Day Banff Itinerary for First Timers
A trip to Banff is a once-in-a-lifetime adventure, with its rocky peaks, abundant wildlife from moose and grizzly bears to adorable marmots, and, of course, the plethora of turquoise glacial lakes that call the Canadian Rockies home.
We’re lucky to have done this once-in-a-lifetime adventure multiple times at this point, and our intention in this guide is to use our experience to put together a detailed guide that will help you plan your own trip.
In this guide, we’re going to go through ALL the information we think you need to plan an incredible 4 day Banff itinerary, with ideas on what to do with more time at the end of the guide.
We’ll start with the important logistics – like where to fly in and out of, how to structure your trip to maximize your time, etc. – and then move on to a day-by-day itinerary that you can copy and paste for your own trip (in this case, we’re okay with plagiarism!).
It’s all based on our own personal experience over multiple trips to the Banff and the Canadian Rockies, and we’ll give you the lowdown on what’s worth it, what’s not (looking at you Columbia Icefield Skywalk!), and what we wish we’d done differently.
Sound good to you? Let’s get into it.
Disclaimer: Some of the links in this post, like hotel links, are affiliate links, meaning at no additional cost to you, we make a little bit of money if you click through and book. That being said, we would never recommend something to you that we don’t stand behind 100%.
How Many Days Should You Spend in Banff?
Over the course of two separate trips to Banff, we’ve come to the conclusion that you need AT LEAST four days in Banff (or at least the Banff area) to do Banff, Lake Louise + Moraine Lake, and the Icefields Parkway.
Years and years ago, we wrote a guide for three days, and we decided to completely rewrite this entire guide to recommend a four day trip to Banff because three days is just not enough time.
We think four days is the best balance, taking into account the plethora of amazing things to do in Banff and the vacation time limitation.
If Banff is a part of a broader trip to the Canadian Rockies for you, we have two entire guides dedicated to planning an itinerary that takes you to see more of this beautiful slice of alpine paradise.
First is our Canadian Rockies itinerary, which includes Banff, Jasper, and Yoho over 10 days.
Second is our 7 day Banff and Jasper itinerary (coming soon!), which is a whirlwind trip from Banff, up the Icefields Parkway to Jasper, and back again.
Do You Need to Rent a Car for Your Trip to Banff?
In short, we strongly believe that the best way to experience Banff is going to be with your own wheels.
The easiest way to do that (if you’re flying in) is to rent a car on arrival at Calgary International Airport, and drop it off when you’re heading home.
However, I will say that, unlike our trip more than five years ago, Banff has come a long way in terms of public transportation, and it is now possible to piece together an itinerary using a combination of public transportation and guided tours.
There are public buses (via Roam Transit) between Banff and Lake Louise, Moraine Lake, Sunshine Meadows, and Johnston Canyon.
However, the thing to know here is that you’re going to be sacrificing A LOT of flexibility.
While they exist, the routes don’t always come terribly often, and the first bus of the day is often later than we’d recommend getting the day started.
The other major downside is that you basically can’t drive the Icefields Parkway, which would be a shame.
There are tours that tackle it, but they’re not going to make as many stops as we think you should.
So, the long answer is that yes, you should definitely plan on renting a car, but it’s possible to put together an itinerary without driving.
Where to Stay in Banff
This is a place where we have a fairly strong opinion based on our own personal experience.
As you’ll see in the itinerary below, we have you spending two full days near Lake Louise – one for Lake Louise and the hikes there, one for Moraine Lake and the hikes there.
Given the 45-60 minute drive or shuttle ride between Banff and Lake Louise (Moraine Lake is next to Lake Louise), we think you should split up where you stay on your trip, spending half of your trip in Banff itself, and half of your time out near Lake Louise.
On our first trip, we did just that, and the 7 minute drive from Paradise Lodge and Bungalows (where we stayed) to the shore of Lake Louise was magical, and allowed us to beat the crowds and sleep in a little bit.
On our last trip, we had our dog with us (who, we found out midway through going to bed in a tent, DOES NOT like being trapped in a tent), and we ended up staying in Banff, taking separate trips out to Lake Louise.
And we HATED driving two hours a day for a few days to get out there.
It’s not the end of the world if you aren’t able to make that work – lodging near Lake Louise IS very limited and competitive – but we firmly believe it will make your life easier (after not doing it on our latest trip to Banff).
Following the itinerary below, that means spending two nights in Banff (or Canmore, more on that in a second) and two nights near Lake Louise if you can swing it.
Now that we’ve covered the high level strategy we’d recommend for lodging in Banff, let’s talk more specifically about where to stay within each of those places.
P.S. We have an entire guide dedicated to choosing the perfect place to stay in Banff. Read that for far more detail than we’ve included here!
Staying in Banff vs. Canmore
On the front end of your trip, you have a little bit of a choice to make in terms of where you want to stay.
Most people stay in Banff, which is perhaps the most famous mountain town in North America, and it is charming and central, but very busy and very expensive.
Canmore is another great mountain town just outside of the eastern border of Banff National Park, and it’s arguably a better mountain town because normal people actually live there (unlike Banff, which is essentially all tourists).
It has a more laid back vibe, better food and drinks, and more affordable prices.
However, it’s an extra 15-20 minutes of driving in each direction, and doesn’t have as many places to stay as Banff does.
For what it’s worth, we’ll probably never stay in Banff again, and will exclusively use Canmore as our home base for future trips.
In Banff, we stayed at Tunnel Mountain Resort and it was…fine. Good location, decent prices for a place in Banff that is dog-friendly with a kitchen, but our room was basically a windowless basement.
In the future, we’d stay at Basecamp Suites after an excellent experience in Revelstoke at a Basecamp property.
In Canmore, we’d look at another Basecamp property – Basecamp Suites Canmore.
We had a great experience with Basecamp elsewhere in the Canadian Rockies, and we wish we’d chosen to stay here versus in Banff.
If you’re looking to camp, you should do everything in your power to get a site at Two jack Lake (tent camping only, RVs should probably look at Tunnel Mountain Campground instead).
Staying near Lake Louise
You don’t have nearly as many choices in terms of lodging near Lake Louise, unfortunately.
And the options you do have are going to be pricey and book up well in advance. You should book your place here as far in advance as humanly possible!
We stayed at Paradise Lodge and Bungalows, where you’ll find a nice mixture of room types from lodge rooms to cabins, all within a seven minute drive of the Lake Louise Lakeshore.
This one we’d highly, highly recommend for the location and the facilities.
There are a couple of other options available here at either end of the budget spectrum.
On the cheaper end of the spectrum is the HI Lake Louise Alpine Centre, which is a hostel with both shared and private rooms. It’s in Lake Louise Village, which is 10 minutes or so from Lake Louise.
On the pricier side, there’s the Basecamp Baker Creek, which is a rustic little resort out on the Bow Valley Highway, about 15 minutes from Lake Louise.
They have rooms with and without kitchens, and have a similar mix of rooms to Paradise Lodge and Bungalows.
On the priciest end of the spectrum is the Fairmont Chateau Lake Louise, which is a gorgeous hotel right on the shore of the lake.
You’ll pay for both the Fairmont name and the unbelievable location, but it will be a stay you won’t forget anytime soon.
Plus, you don’t have to deal with parking at Lake Louise at all (though, they do charge for parking, which is a little bit infuriating)!
Things to Know Before Your Trip to Banff
Here are a few things you need to know before your trip to Banff.
You need a Parks Canada Pass While You’re in Banff National Park
You have two options – buy a pass for the number of days you need it for, or buy a Discovery Pass, which gives you access to all national parks in Canada for a full year.
At a high level, the math on the Discovery Pass works out if you’re spending 7 days or more in the parks, though there are some permutations around family passes that might make the math change in your particular instance.
You can buy both versions at the park entrance stations, or online in advance.
Book Your Shuttles for Lake Louise and Moraine Lake in Advance
We have entire sections dedicated to this below, but here’s a quick overview. Lake Louise is accessible with private passenger vehicles, BUT the parking is incredibly competitive and fills up at 6:30am in the summer.
If that’s too early for you, take the Parks Canada Shuttle or Roam Transit Bus. The road to Moraine Lake is completely closed to passenger vehicles
, so shuttles are your only option. Again, you have two main options – the Parks Canada Shuttle or using Roam Transit.
Far more detailed information is down below in their respective sections.
Prepare Yourself for Early Mornings and Late Evenings
There’s no getting around it – Banff is crowded. However, most people aren’t up for super early wakeup calls, which is why we highly recommend getting out early to beat the crowds.
We often started hikes between 7:00am and 7:30am, and were among the first few groups on the trail, whereas on the way down the trails were packed.
The other good time to be out and about is around sunset, when most people are eating dinner or winding down for the night.
The Weather Apps Are Not to Be Trusted
I’m writing this on a day when the weather apps – both Apple weather and Accuweather (I generally prefer the latter) – said it would be sunny or partly sunny all day.
Turns out, it has been alternating thunderstorms and torrential rain for the vast majority of the day.
Don’t trust the weather apps, be prepared for all kinds of weather when you head out in the morning. It is the Rocky Mountains, after all. Anything can happen!
Be Prepared to Experience All Seasons…in a Day
This is at least somewhat related to the note on weather apps above, but you should expect to start a hike hot and sweaty, and end it drenched in a thunderstorm.
Which happened to us on both of our trips. Multiple times.
A rain jacket (Matt loves his Outdoor Research rain jacket – a Seattle company!), a pair of waterproof hiking boots (Alysha has these waterproof hiking boots, which are a great first pair of hiking boots), and layers (we like the fleece and puffy jacket combo) are going to be your best friends in the mountains.
You’re in Bear Country
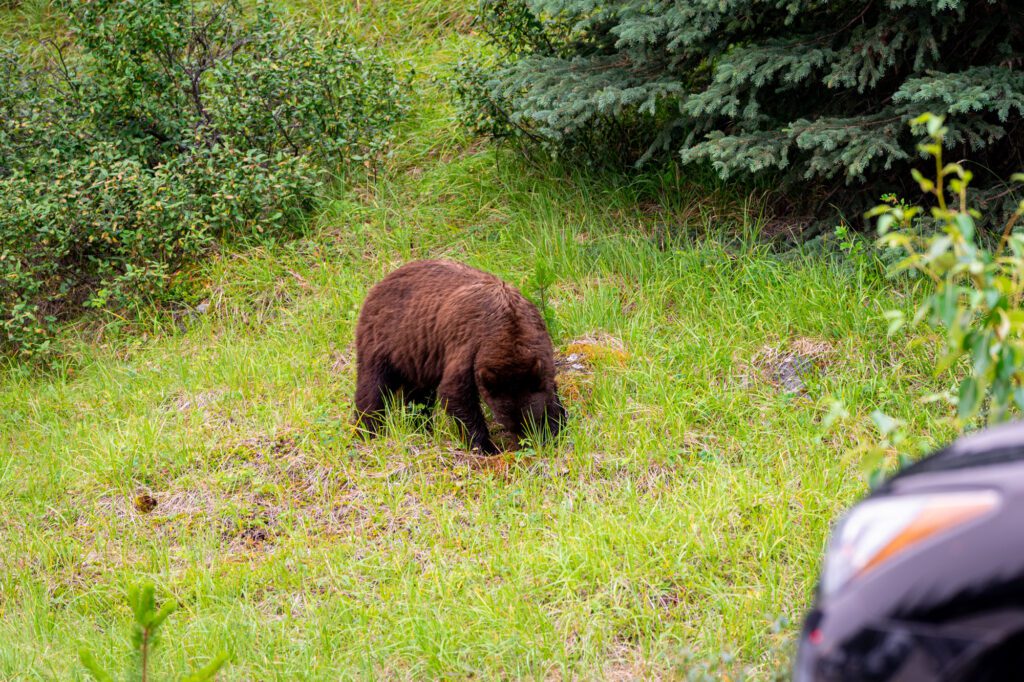
Both black and Grizzly bears live in the Rockies, and we saw both (though never up close on a hiking trail, thankfully).
Our biggest tip is to make plenty of noise on the trail – Matt is known for freestyle singing as we hike – so that you avoid any surprise encounters.
You’ll also want to have bear spray, which you can get in town if you’re flying in (you can’t bring bear spray on a plane).
You should check with your hotel or lodge because many of the best places to stay in Banff will lend it to you.
You’re at Elevation in the Rockies
Remember that you’re at elevation in the Canadian Rockies (Banff is at 4,500 feet above sea level, and Lake Louise is closer to 6,500 feet), so if you’re coming from sea level, hikes are going to feel a little harder than you’re used to.
This is why we recommend starting with an easier hike first to get acclimated, and tackling the more difficult hikes later in your trip.
Keep Wildlife Wild
You’re more likely to see other types of wildlife other than bears on your trip to Banff.
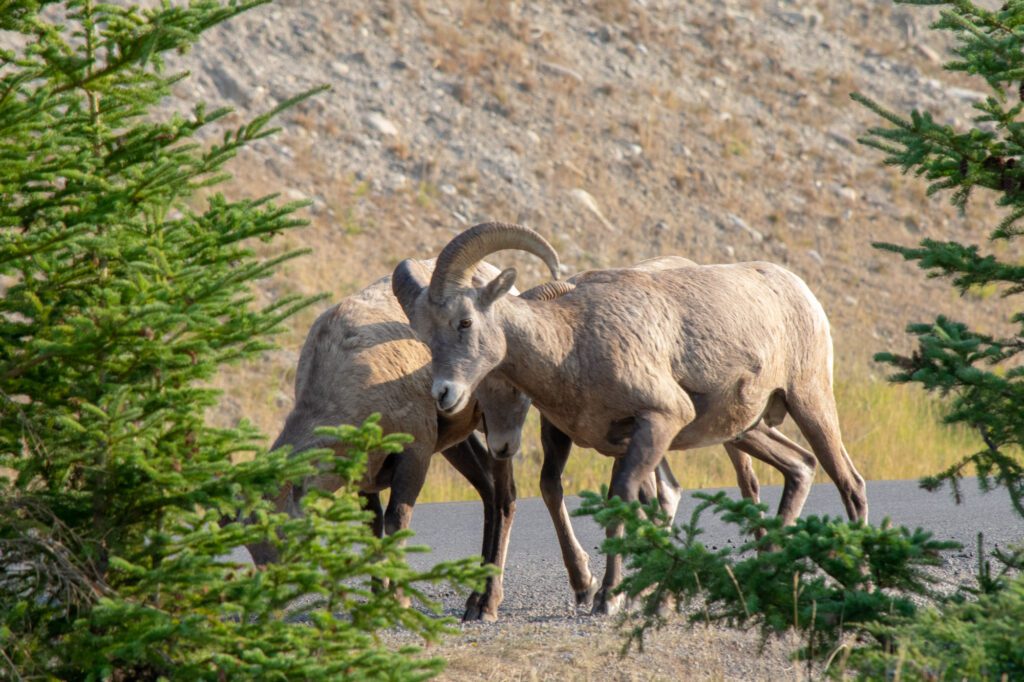
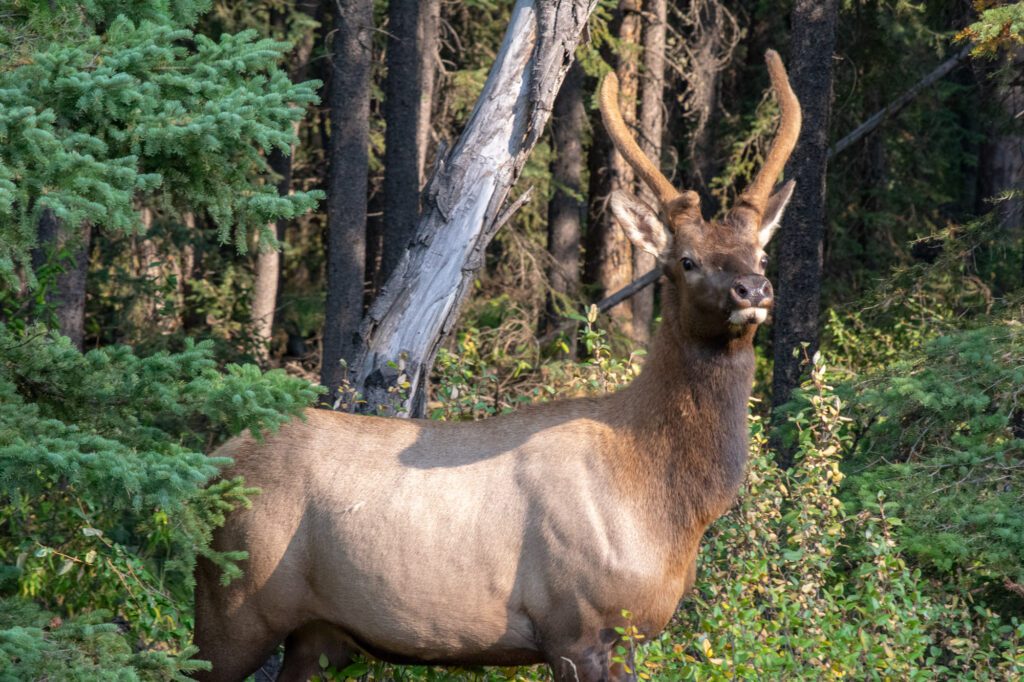
We saw moose, tons of elk, bighorn sheep, a family of mountain goats (including babies!), plenty of marmots, a family of grouse (at least that’s what we think they were).
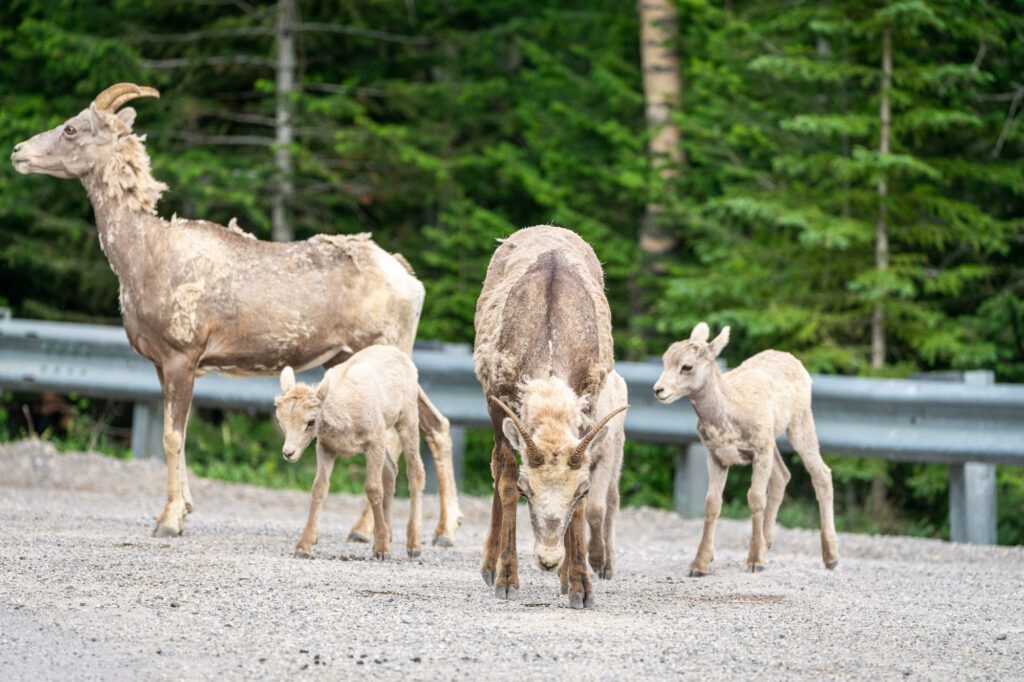
Remember to give them plenty of space (if they’re on the trail, stop and let them meander past with plenty of room) because, despite not being natural predators, they’re still wild animals.
Keep dogs on a leash to minimize surprises and avoid disturbing them as much as possible.
Dogs are Allowed on Trails in Banff
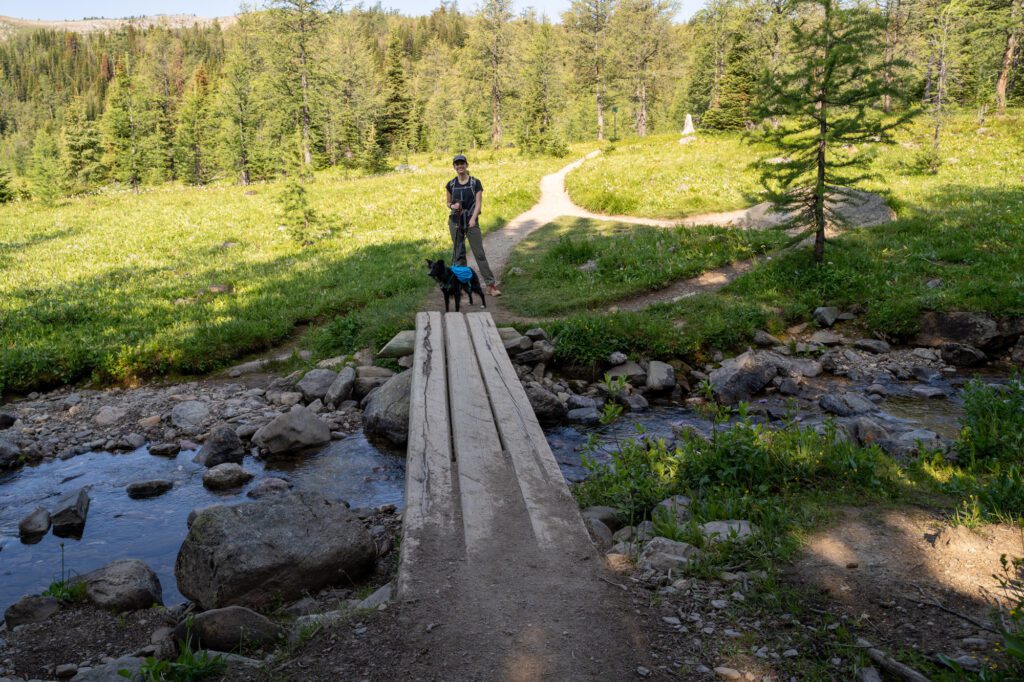
But – and this is very, very important – they need to be on a leash at all times to protect fragile ecosystems and avoid unpleasant encounters with local wildlife.
Yes, that means even your dog.
Yes, I know they’re a good dog.
No, that doesn’t matter.
Put them on a leash!
4 Days in Banff: A Perfect Itinerary for First Timers
And now, on to the main event that you’re here for: the itinerary that will help you figure out exactly how to spend your time in Banff.
One thing to know – we’ve designed this itinerary for people who have four full days in the park, which means arriving the night before the itinerary starts.
To make this happen, we’d strongly recommend booking a late flight out on your last day so that you have time to hit Moraine Lake on that last day.
Here’s what that itinerary looks like, written out:
- Day 0: Arrive (stay in Banff or Canmore)
- Day 1: Johnston Canyon, Downtown Canmore, and Sunset Drive (stay in Banff or Canmore)
- Day 2: Vermillion Lakes at Sunrise and the Icefields Parkway (stay at Lake Louise)
- Day 3: Lake Louise (stay at Lake Louise)
- Day 4: Moraine Lake and Drive Back to Calgary (fly home)
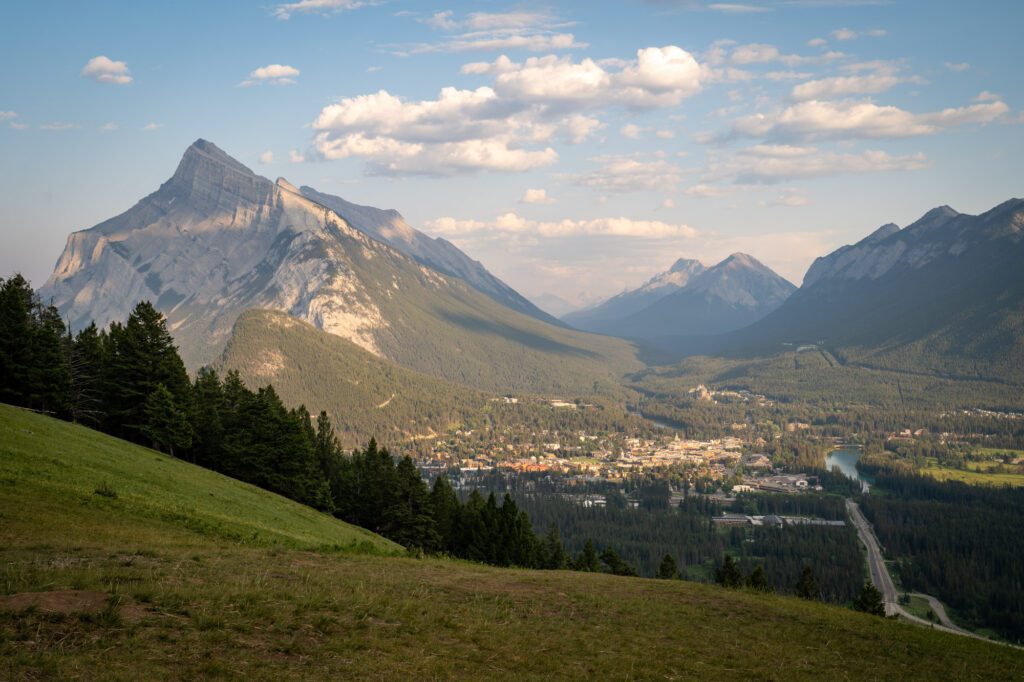
Day 1: Johnston Canyon, Downtown Banff, and Sunset Views
On your first day in Banff, start off with a relatively easy hike through a canyon with multiple waterfalls to marvel at, then explore downtown Banff before heading out on an evening drive in search of some of Banff’s best views (and wildlife).
Johnston Canyon (and the Inkpots?)

Start your time in Banff National Park off with a relatively easy hike (with a moderate add-on if you’re feeling spicy).
It’s also one of the more unique hikes in the park, taking you up through a canyon formed by thousands of years of erosion rather than to yet another gorgeous alpine lake (SO BORING AM I RIGHT?).
This is a popular spot, and the fact that most of the trail is along a narrow boardwalk means that it’s sort of miserable around midday, when you’ll be stuck in a long line of people trying to navigate the trail and stopping for countless pictures.
GET THERE EARLY. Seriously. Plan on starting your hike before 8:00am. You will be able to experience at least a slice of solitude in the canyon. Thank us later.
The main hike through Johnston Canyon includes two waterfalls (the lower falls first, then the upper falls), and we’d categorize it as easy.
It’s 3.3 miles, with 850 feet of elevation gain, most of the hiking is along a well-maintained boardwalk. More trail information here.
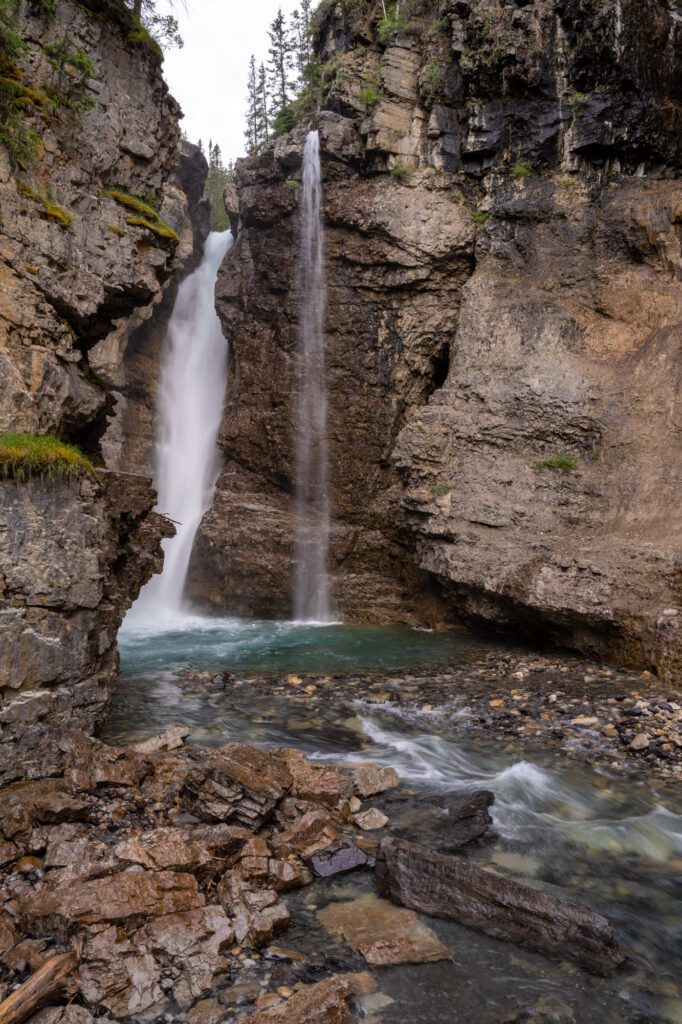
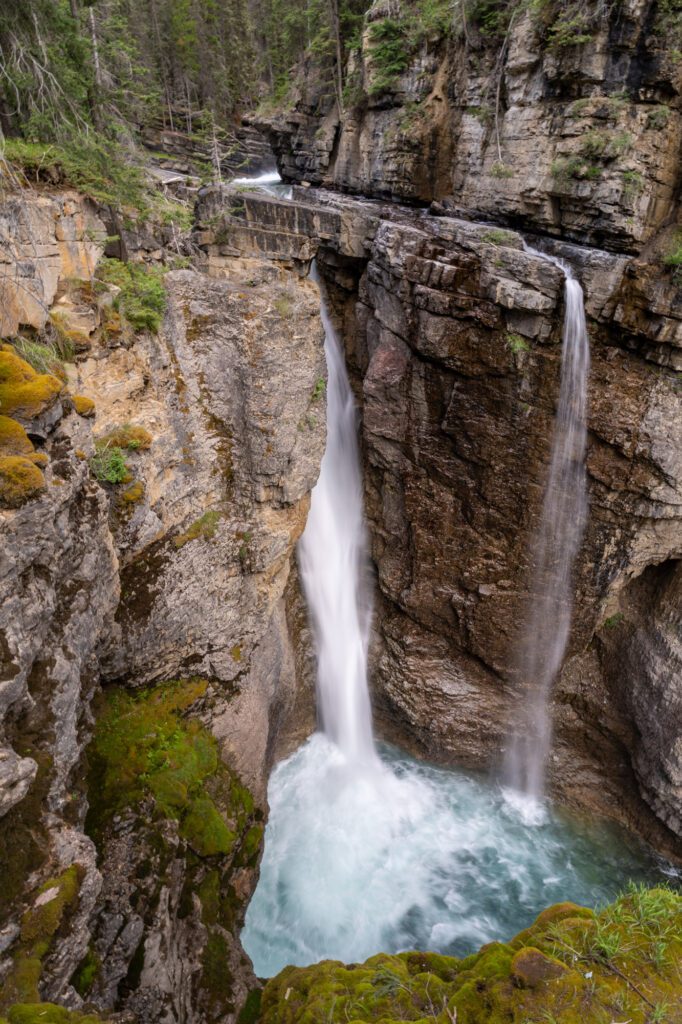
There is some climbing after the Lower Falls, so if you’re feeling like that’s too difficult for you, you can cut out roughly half of the trail by stopping at the Lower Falls.
If, on the other hand, you have some gas left in the tank, it’s worth venturing out to the Ink Pots, a group of colorful cold thermal pools (as opposed to hot springs) that are set in a nice valley.
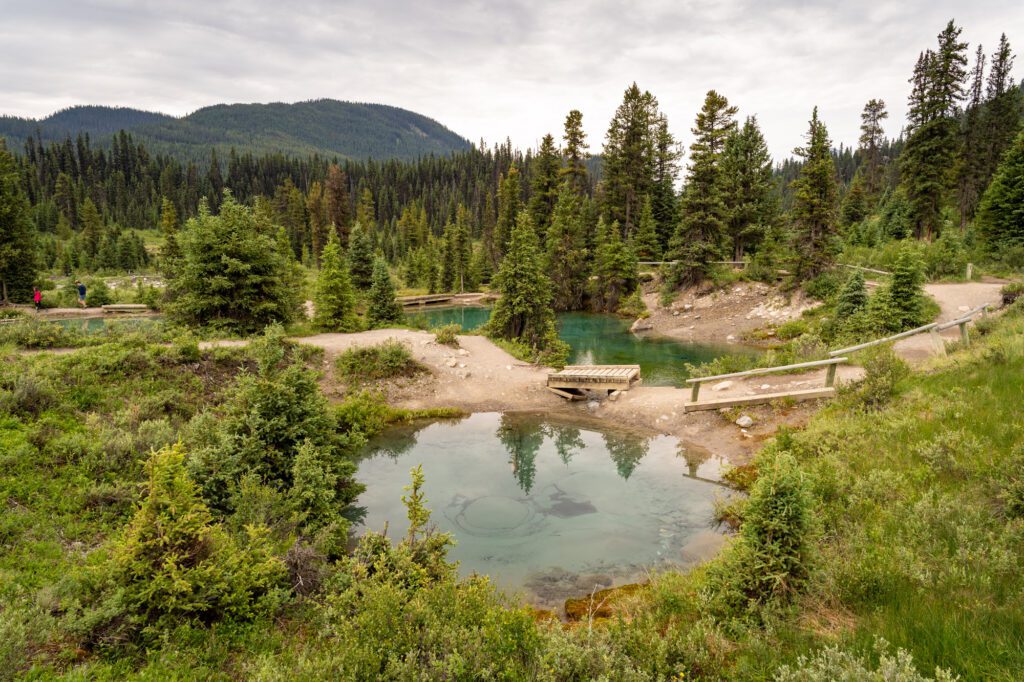
It’s a 7 mile hike to get out there and back, and the stretch from the Upper Falls to the Ink Pots is a moderate, fairly boring climb through the forest. More trail information here.
Exploring Downtown Banff
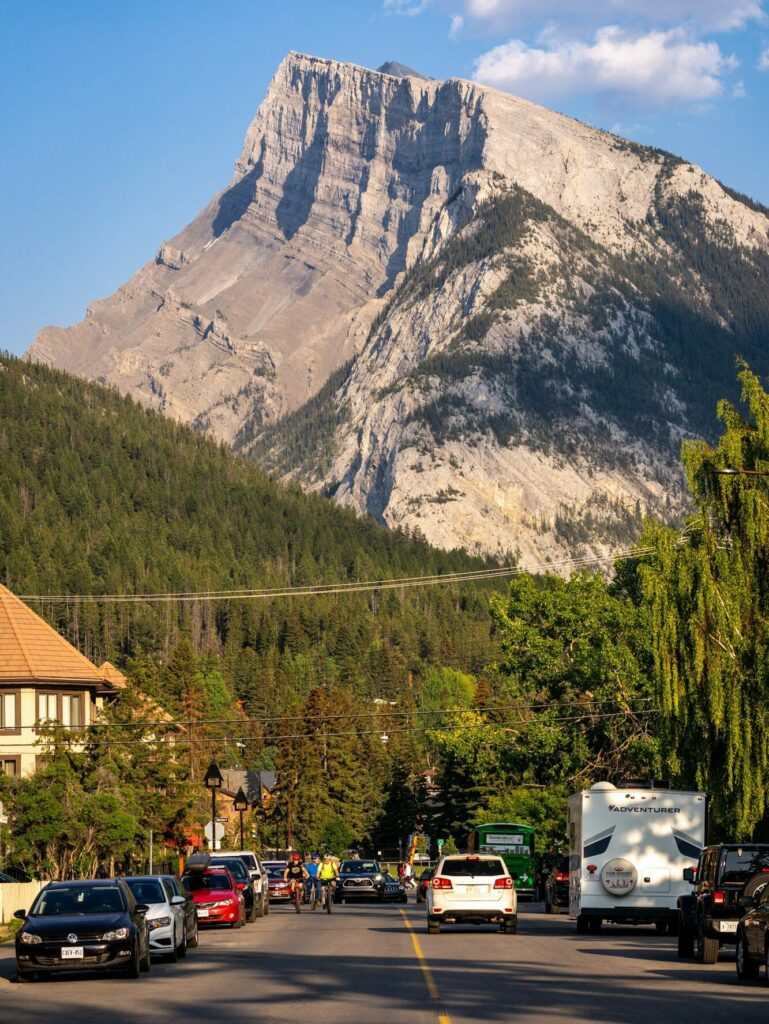
After your hike, spend some time in and around the town of Banff, which is on the one hand very “touristy” in the sense that nearly everyone you’ll encounter outside of service workers is a tourist, but also has some pretty cool spots to check out.
The main drag in town is (unsurprisingly) called Banff Avenue, and it’s where you’ll find the vast majority of restaurants, shops, and other places of interest in that vein.
However, there are also a couple of walkable/driveable places with nice views that are worth seeking out.
Here are a few of our favorites.
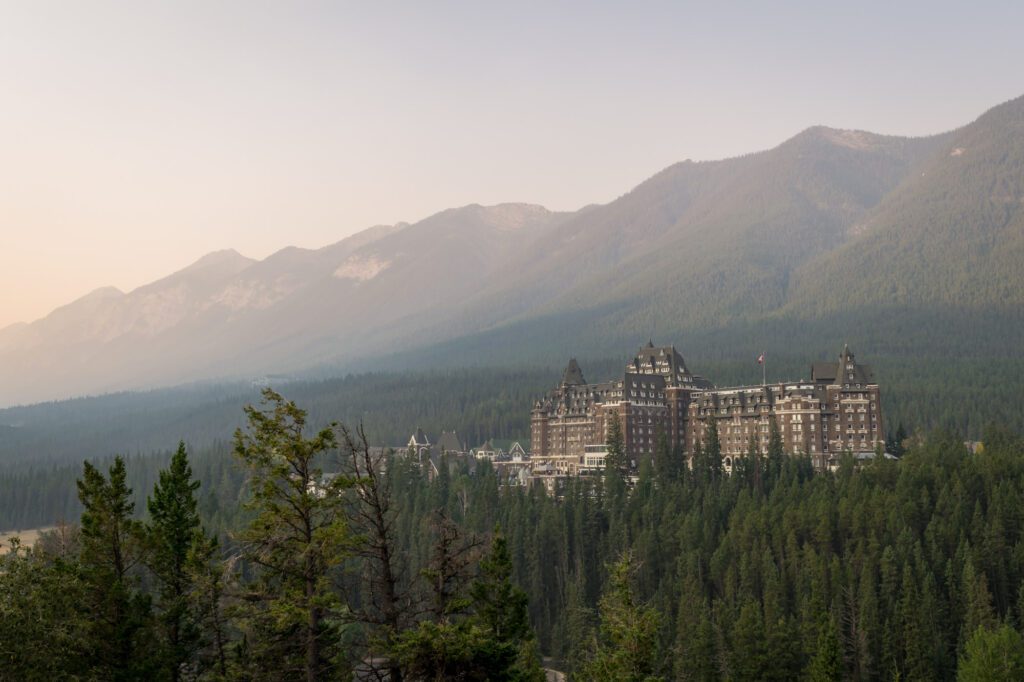
Surprise Viewpoint: This is the classic view of the Fairmont Banff Springs Hotel backed by the mountains. You can walk there from town, but it is uphill along a busy road.
However, that’s probably preferable to navigating the parking situation, which is usually full of tour buses.
Bow Falls: Probably not the most impressive waterfall you’ll see on this trip (especially if you make it over to Yoho National Park), but definitely the most accessible from downtown Banff thanks to the short flat riverside trail.
Arguably the best views are actually not of the falls, but of the mountains towering over town (Norquay and Rundle).
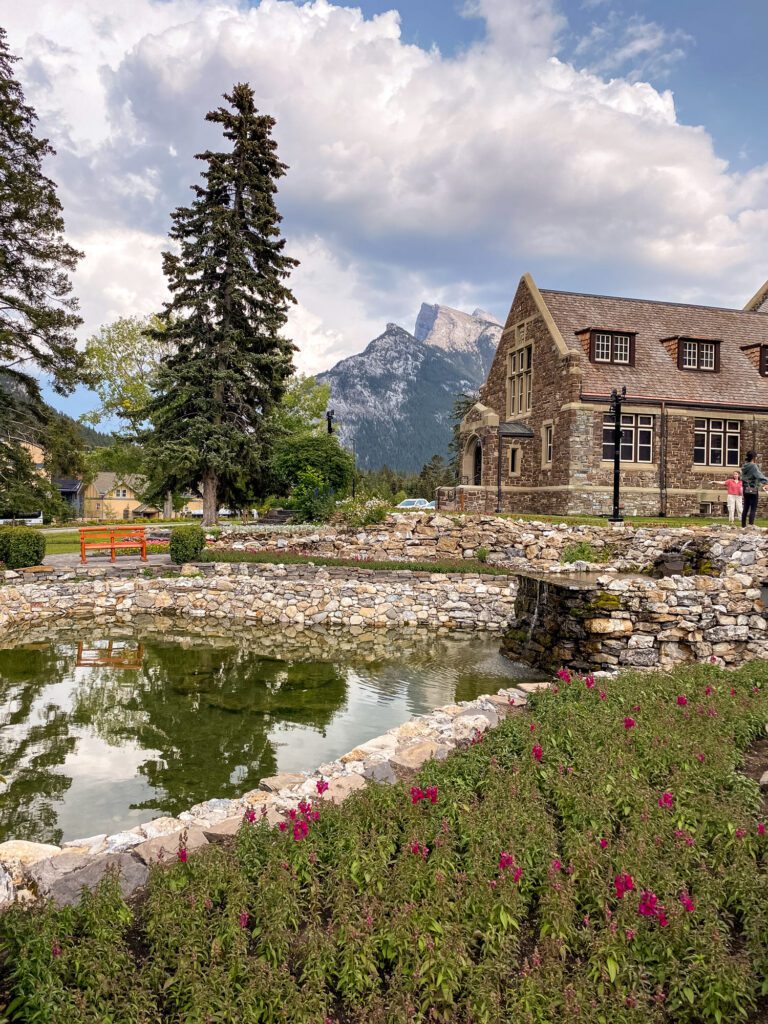
Cascade of Time Garden: This was Alysha’s discovery, and it’s worth walking through on your way back to town. It’s a little oasis with nice views of downtown Banff and some fun landscaping.
If you’re up for a little more walking, you can do all three of them as a fun little loop from town.
Here’s a map of what that looks like.
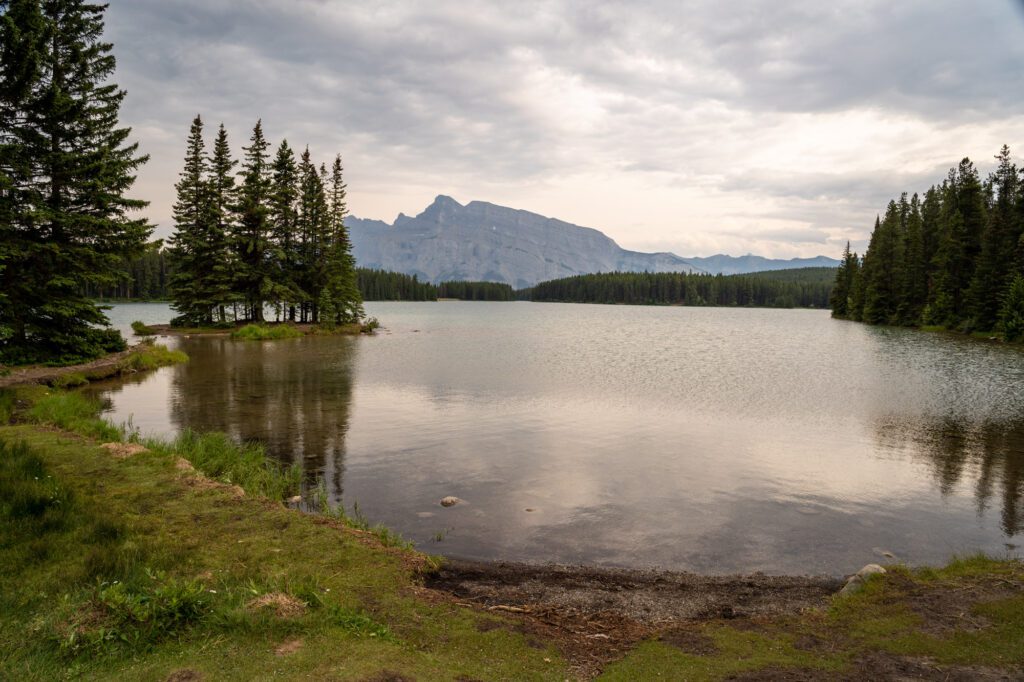
Lake Minnewanka + Two Jack Lake
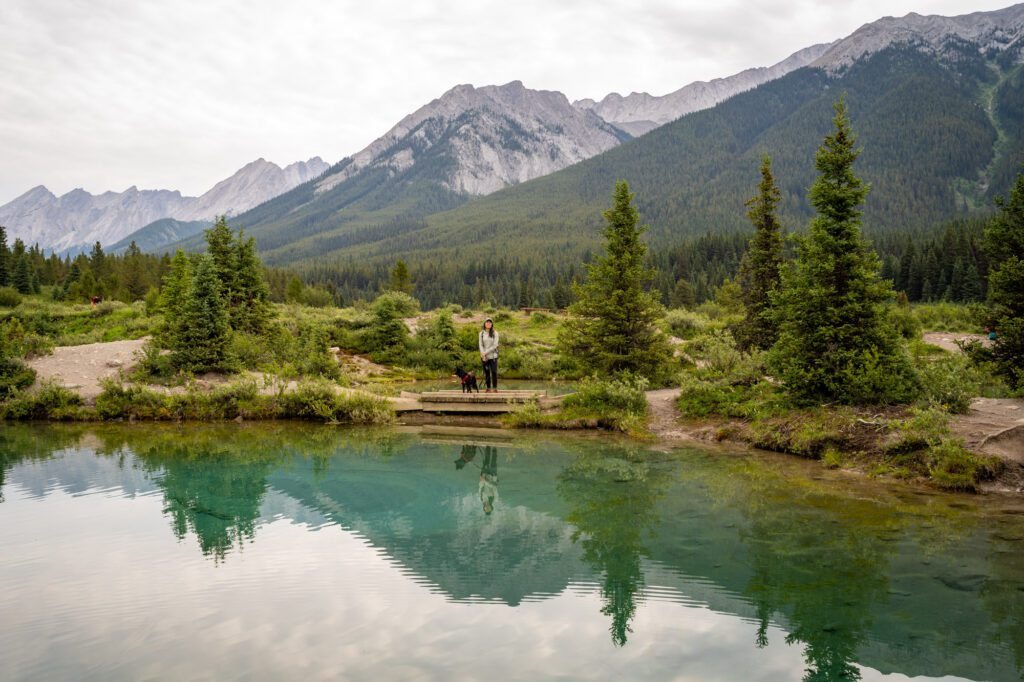
After some rest and relaxation, head out of town to the north to hit two of our favorite destinations near Banff; Lake Minnewanka and Two Jack Lake.
There’s a nice scenic drive that connects the two, and this is an excellent place to spot both elk and bighorn sheep (we’ve seen one or both every time we’ve done this drive).
Head clockwise, first driving out to Lake Minnewanka, which is a massive lake near Banff.
The best way to see the lake is to get out on a boat – either on a guided boat cruise, or by renting a kayak and exploring yourself.
You can also hike along the lakeshore, and if you’re not up for getting out on the water, it’s worth venturing along the lakeshore.
Just a little ways into the hike it feels like you’re in the middle of nowhere despite being roughly 15 minutes away from the town of Banff, which is decidedly not “nowhere.”
Once you’ve admired the lake, hop back in the car and continue the mini loop over to Two Jack Lake, which is much smaller but arguably more beautiful thanks to the towering form of Mount Rundle directly south.
There’s two parking areas – upper and lower – and it’s better to park at the lower one because that’s where all the action (and by action, we mean views) is.
The view from the inlet right at the parking area is nice, with the Parks Canada red chairs, but we liked heading out to the mini peninsula here for the views out to the south of the aforementioned mountain.
Sunset Views at Mount Norquay
Mount Norquay was a pleasant surprise for us.
It was a spur of the moment decision to head up there around sunset one night, and we were blown away by how good the views were from the grassy field near the top of the road, just below the ski resort (here on Google Maps).
It’s a windy road up, following switchback after switchback on your way to the viewpoint.
Be sure to keep your eye out for Bighorn Sheep along the way – we saw a group of them with some babies on the way up.
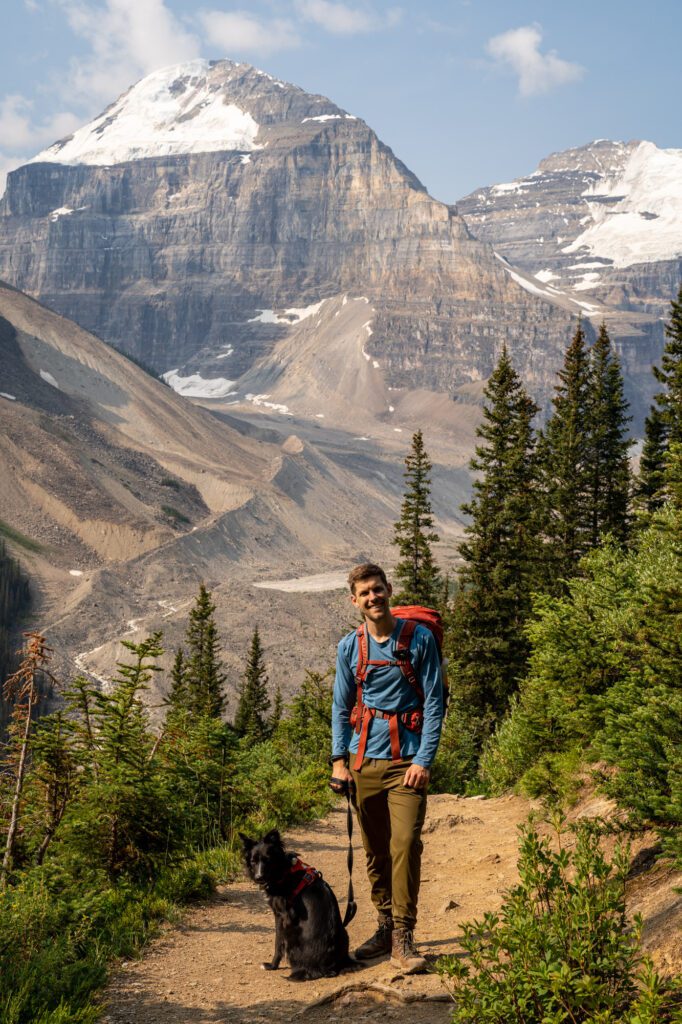
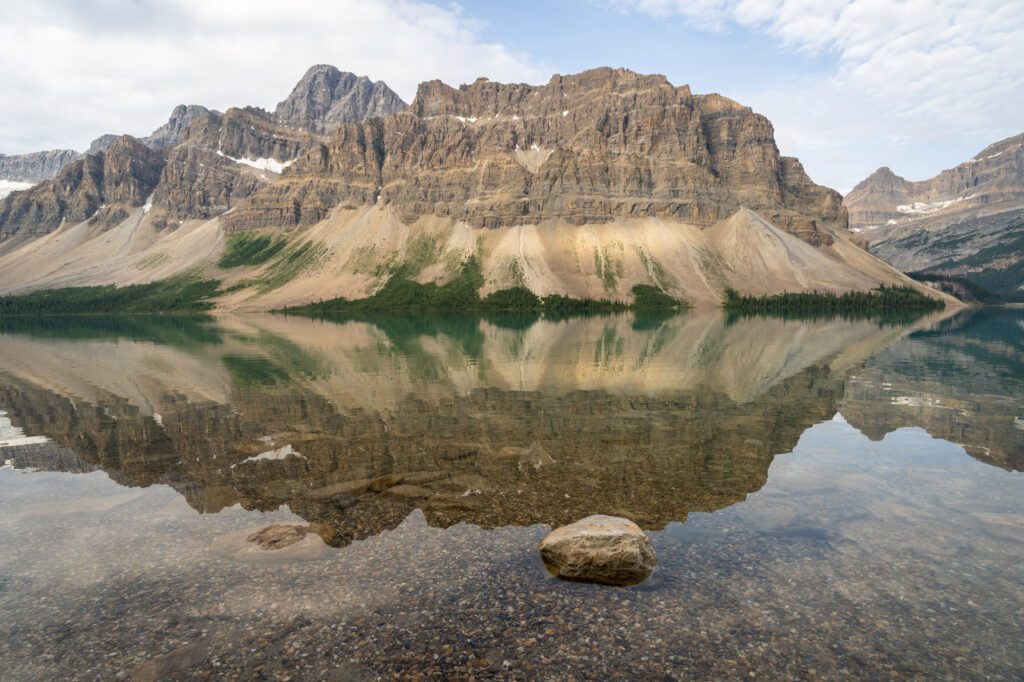
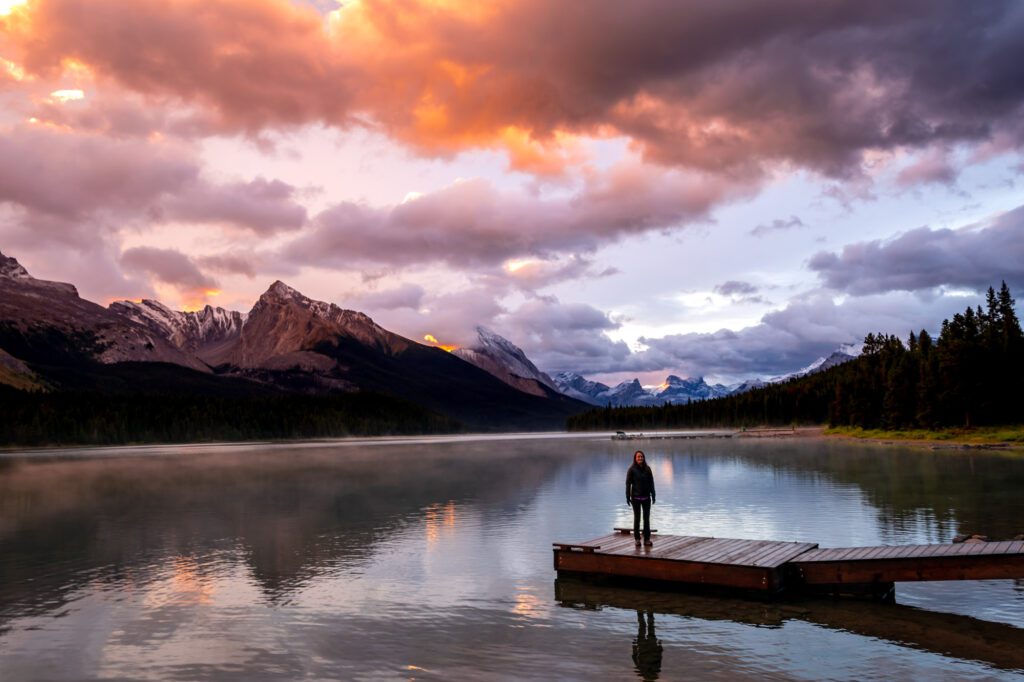
Day 2: Vermillion Lakes at Sunrise and the Icefields Parkway
On your second day in Banff, spend the morning on the shores of Vermillion Lakes, one of the premier sunrise locations in Banff, and then head out for a drive along the Icefields Parkway, one of the most scenic drives in all of North America.
At the end of the day, you’ll check into your hotel near Lake Louise (if you’ve been able to snag a room there) to set yourself up for the next two days and, as a bonus, experience the lake near sunset.
Vermillion Lakes at Sunrise
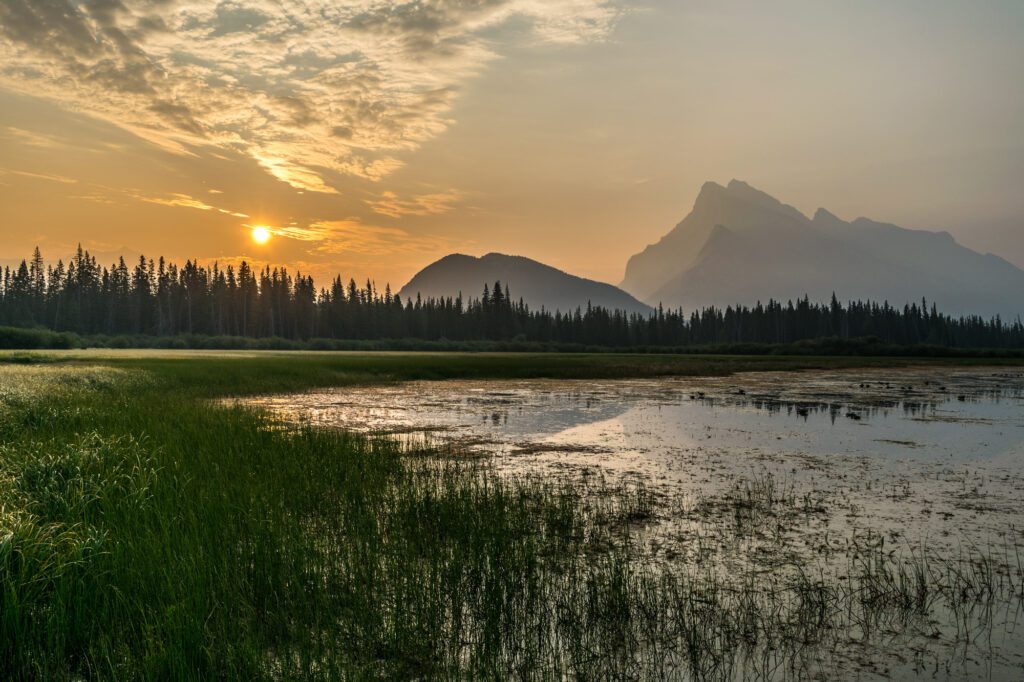
Vermillion Lakes is one of our favorite sunrise locations in Banff (we’ve also been there at sunset, which is also spectacular).
The reason? You get to watch the sunrise over the lake with Mount Rundle’s iconic silhouette basking in its golden glow.
Our favorite place to take in the view is along Vermillion Lakes Road on the northern lakeshore (here it is on Google Maps).
Bring coffee, breakfast, and keep an eye out for wildlife who might be having their own picnic breakfast and/or bath on the lakeshore.
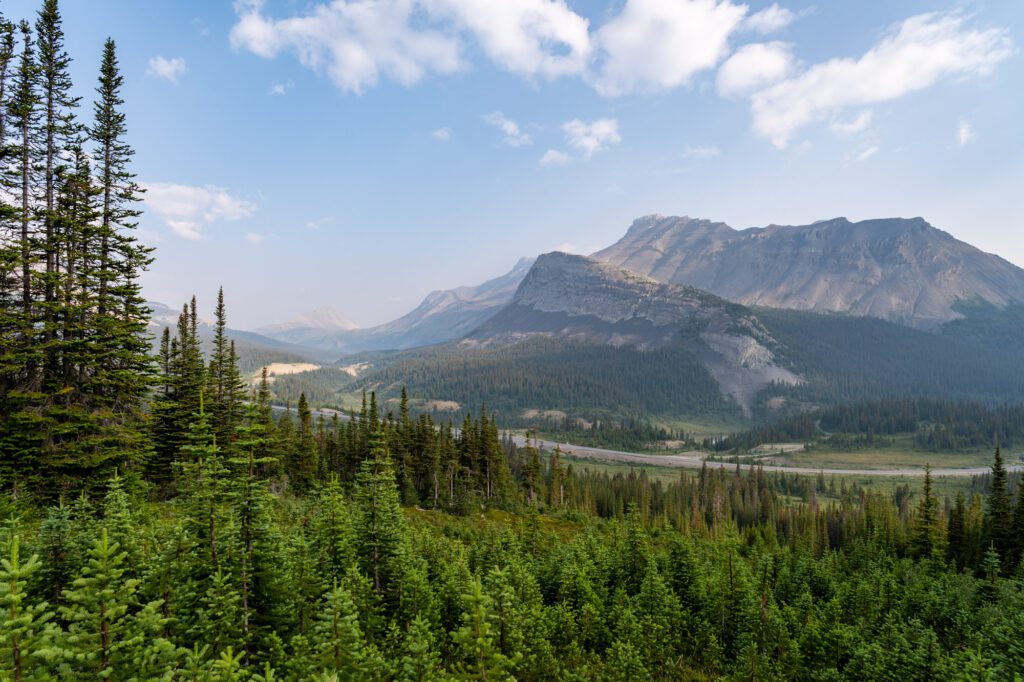
The Icefields Parkway
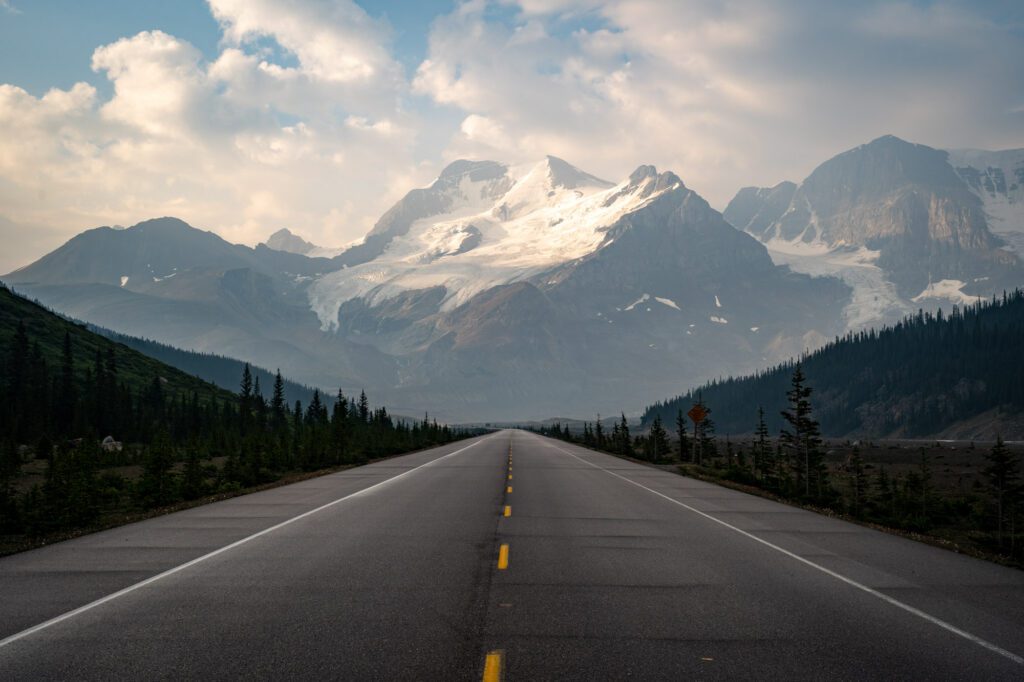
The majority of this day is dedicated to driving what might be the most scenic drive in North America – the Icefields Parkway.
This scenic stretch covers the 140-ish miles between Lake Louise and the town of Jasper up in Jasper National Park, and takes about two and a half hours to drive if you head straight through with no stops (which we wouldn’t recommend).
If you’re sticking around Banff and not making your way up to Jasper, we think it makes the most sense to drive the first half of the route, which takes you up to the Columbia Icefields Discovery Center and the foot of the Athabasca Glacier.
There are a nearly unlimited number of stops to make along that drive, along with a few of our favorite hikes in Banff, so it will take most of the day.
One thing to know – there’s basically nowhere to eat or drink on this drive (except for the Bow Lake Lodge), so we’d recommend packing your own picnic lunch to enjoy on the road.
Choose Your Own Adventure: Hikes on the Icefields Parkway
First, let’s talk about hiking along the Icefields Parkway. There are three hikes along this stretch of road that we’d highly recommend, and we’ll give you a brief overview of all three in this section, along with where to slot them in on your mini road trip.
Here are those three hikes in order of our preference.
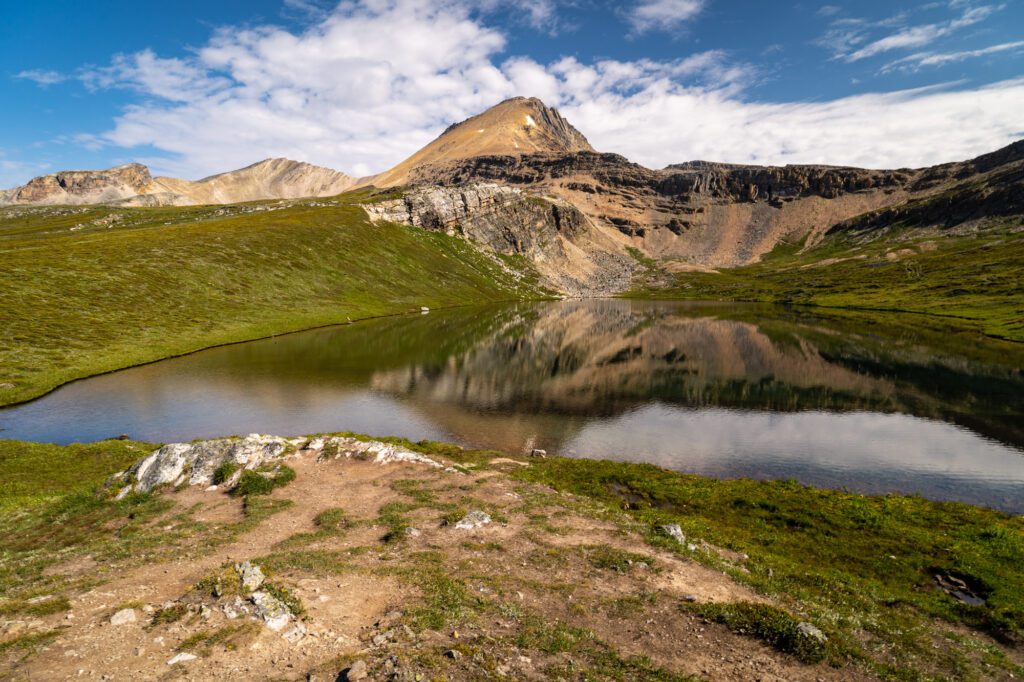
Wilcox Pass (5.8 Miles / 1,700 feet elevation gain): This is in our top three when it comes to the best hikes in Banff. Though, technically, we cheated, because it’s just across the border in Jasper National Park.
And we did it on a pretty smoky day, so the views weren’t even as good as they could be on a clear day. That’s how much we like it!
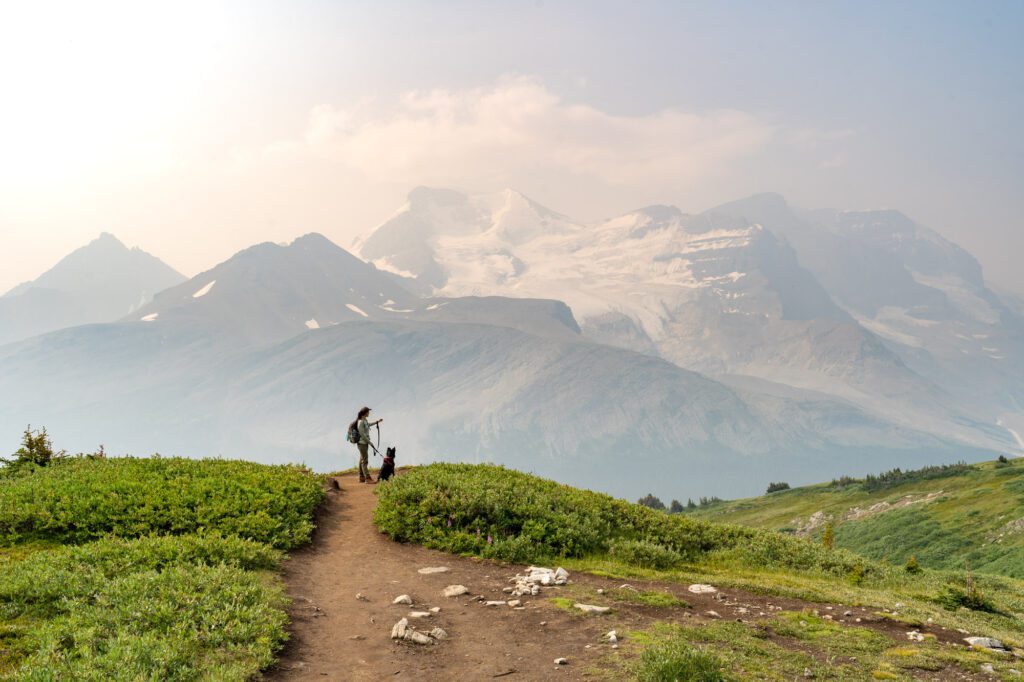
It’s a quick climb up to the ridge, and then it’s nonstop bangers in terms of views, culminating in an incredible view of the Athabasca Glacier.
We have an entire guide to hiking to Wilcox Pass, which you can read for more details.
Helen Lake (7.2 Miles / 1,600 feet elevation gain): Another great hike, this one is right across from Bow Lake, so you’ll do it early on in your drive.
The trail spends the first half of the climb in the forest, alternating between steep climbs and flat stretches.
Then, the real fun begins when you burst out of the treeline and into a spectacular set of alpine meadows, with views in all directions.
Eventually, you’ll get to Helen Lake, where you’ll have great views across the lake to looming Cirque Peak.
We have an entire guide to hiking to Helen Lake, along with the potential extensions to Cirque Peak and Dolomite Pass.
Parker Ridge (4 Miles / 1,108 feet elevation gain): This hike is right before you cross over into Jasper National Park, which means it’ll be your last stop before the Icefields Discovery Center.
The trail basically climbs straight up a set of switchbacks to get up to the top of the ridge, and then forks. To the right are some great 360 degree views of the valley and surrounding peaks, head left to follow the ridge and get some unbelievable views back towards the Saskatchewan Glacier.
More trail information on Alltrails here.
Herbert Lake
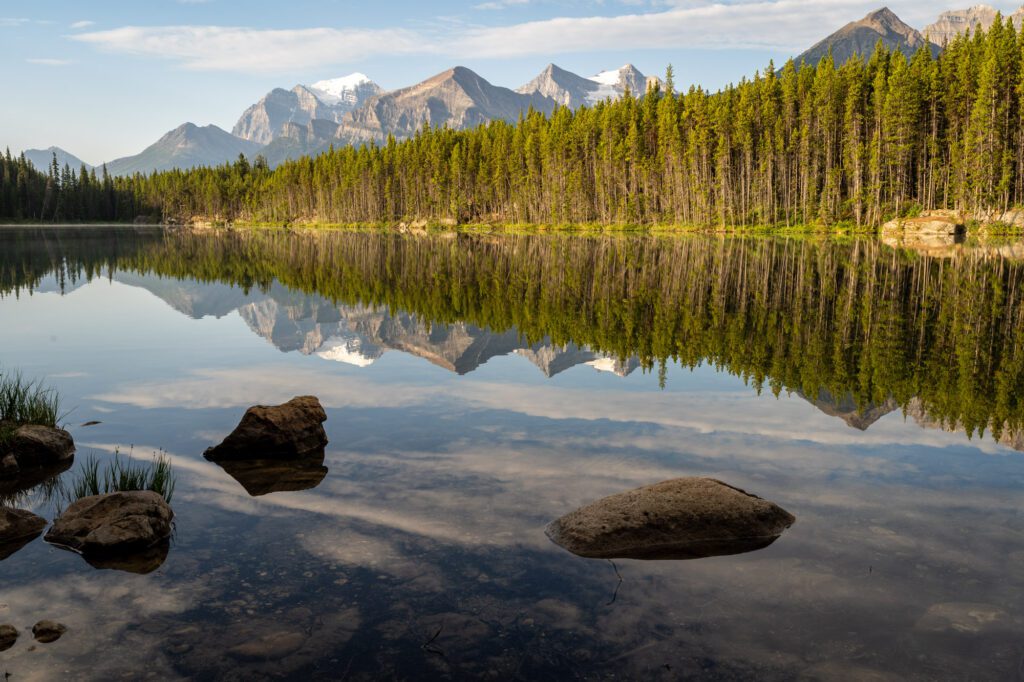
This is a quick (and underrated) stop just for the view across the lake. That’s it! It’s a small gravel parking lot, and we were alone when we were here for the picture-perfect reflections on the surface of the lake.
Later in the day, this would be a great place to bring a picnic and your personal watercraft (kayaks or paddle boards).
There’s also a pit toilet at the parking lot, if you need to use the restroom.
Bow Lake
Bow Lake is one of the bigger lakes along the Icefields Parkway, and there’s a multitude of things to do here.
Depending on which hike you chose, this would be a perfect lunch stop, either to enjoy a packed lunch on the shore of the lake, or to get a quick bite to eat at the historic Lodge at Bow Lake (which is one of the only places to eat on the Icefields Parkway).
It’s also worth walking along the lakeshore, particularly heading out to the west from the lodge towards Bow Glacier Falls, which you can see from the near side of the lake across the turquoise water.
We didn’t walk all the way there, but we walked the section of the trail that follows the lake (before it turns away from the lake to climb to the falls) and the views were excellent, and the crowds were basically nonexistent once you got a few hundred feet down the trail.
Peyto Lake
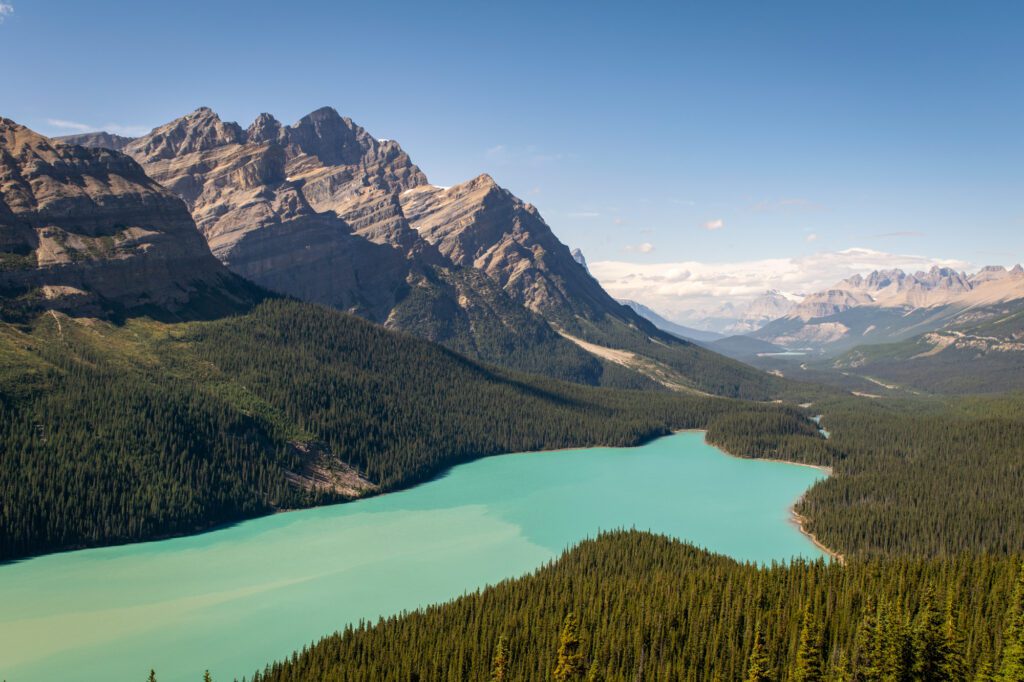
Peyto Lake is another of those lakes you’ve likely seen on Instagram. Rather than being right at the lakeshore, like Bow Lake, You’ll view Peyto from above.
It’s a busy stop, so don’t be surprised if you have to wait for a second for a parking spot, which is likely to have multiple tour buses parked.
From the parking lot, it’s a short walk out to the first viewpoint.
There are now multiple viewpoints at Peyto Lake, and a short 1.5 mile trail (round trip) connects them all.
With the crowds, it can be difficult to get pictures, but the further you go, the thinner the crowds.
If you really want to escape the crowds and get a stellar view of the lake, you can head up to Bow Summit, a 4.5 mile trail that takes you up to a ridge with a panoramic view out over the valley.
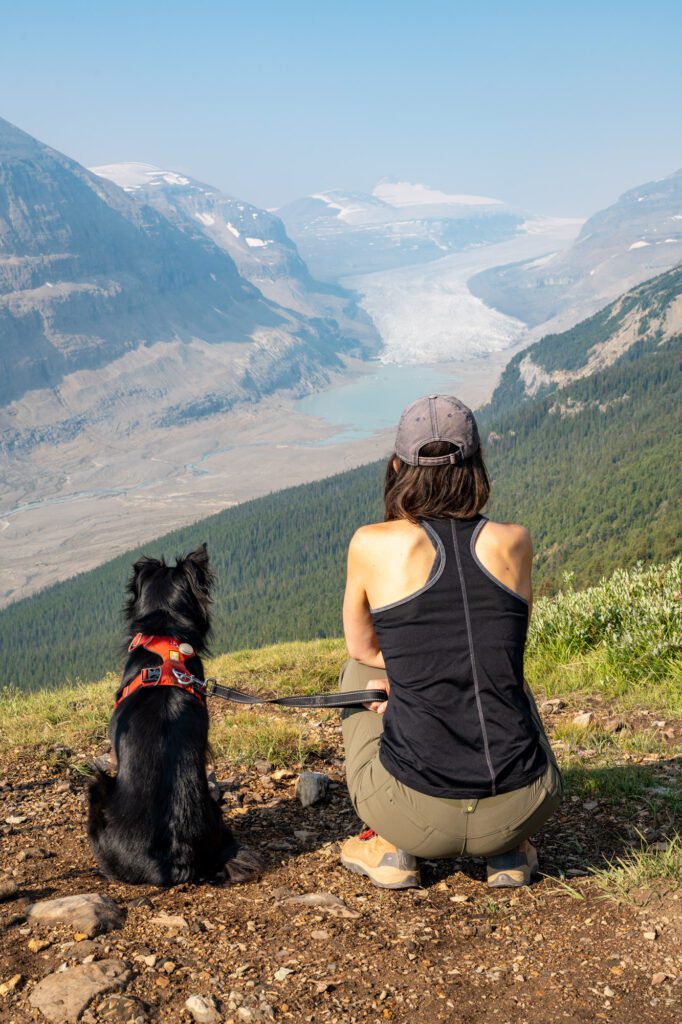
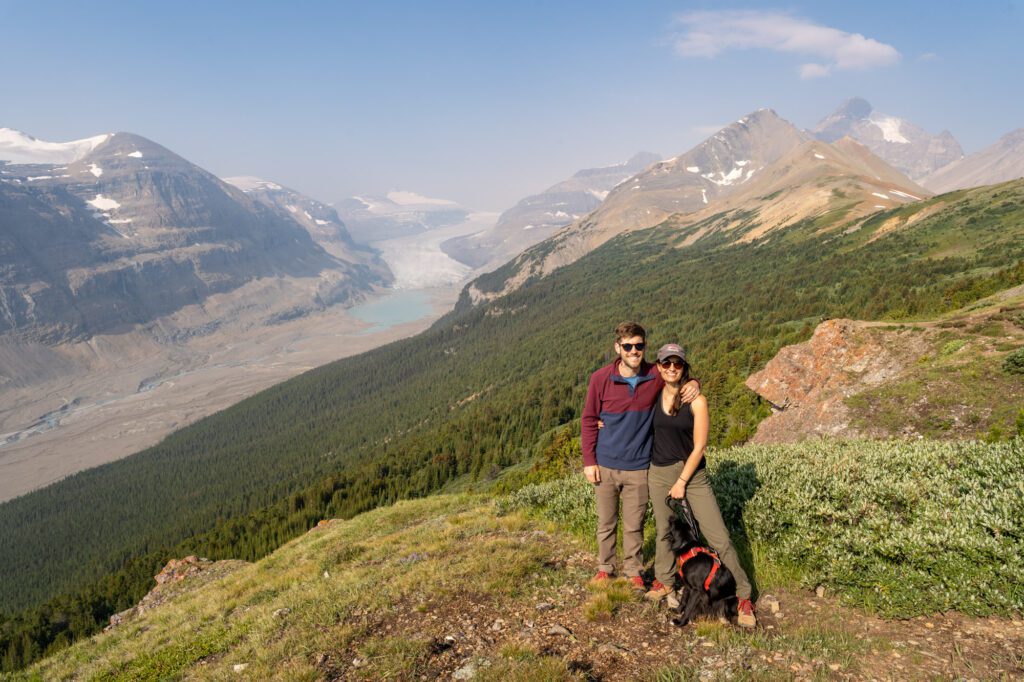
The Columbia River Icefields Discovery Center
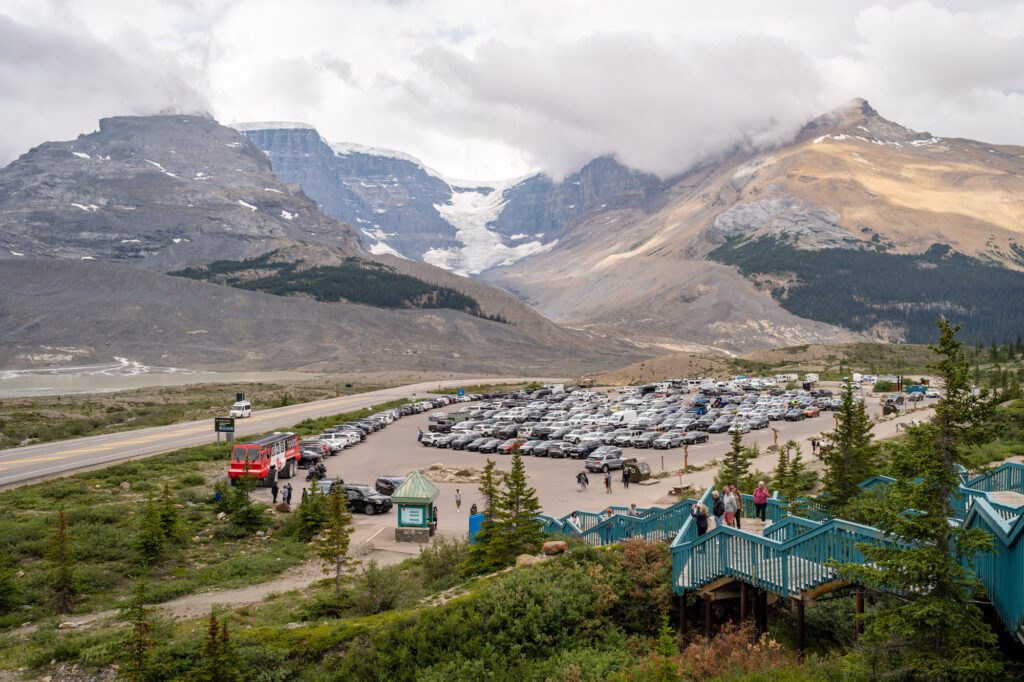
The final stop of your day out on the Icefields Parkway, the Columbia Icefield Discovery Center is in Jasper National Park and sits at the base of the mighty Athabasca Glacier and the Columbia Icefield, the largest icefield in the Rockies.
The Discovery Center is worth venturing into especially the lower level with its displays talking about the geography and geology of the icefield and broader Alberta.
If your vision of a trip to the Rockies includes seeing a glacier up close, this is the place to do it.
The best way to do it is on a guided ice walk that takes you out to the glacier, which is the only way to actually walk on a glacier (as far as we know).
You can also do a short hike out to see the glacier up close, but you can’t actually get all the way onto it.
One important note here – we definitely would not recommend doing the Columbia Icefield Glacier Skywalk. We truly can’t figure out why they built a viewing platform here (we think maybe it was before the glaciers had substantially receded?), but there are certainly better views to be had – especially from the Wilcox Pass Trail.
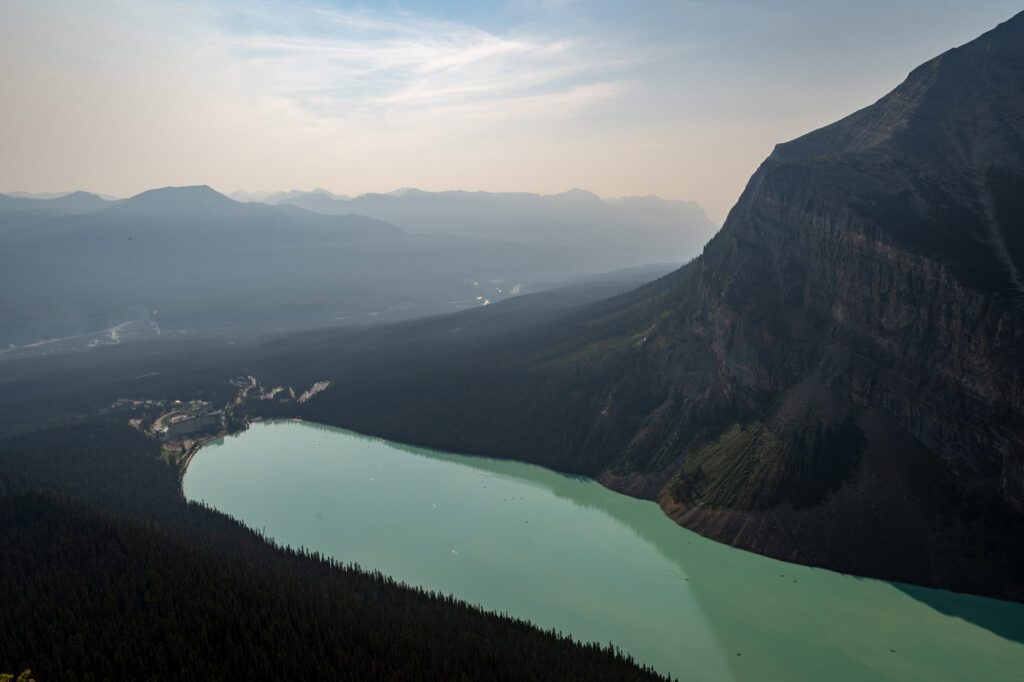
Lake Louise at Sunset
The Icefields Parkway connects Lake Louise to the town of Jasper, which means as you’re coming back south towards Banff, you’re perfectly situated for a stop at Lake Louise.
Which is perfect if you took our advice and booked a place to stay near Lake Louise for the last two days of this itinerary.
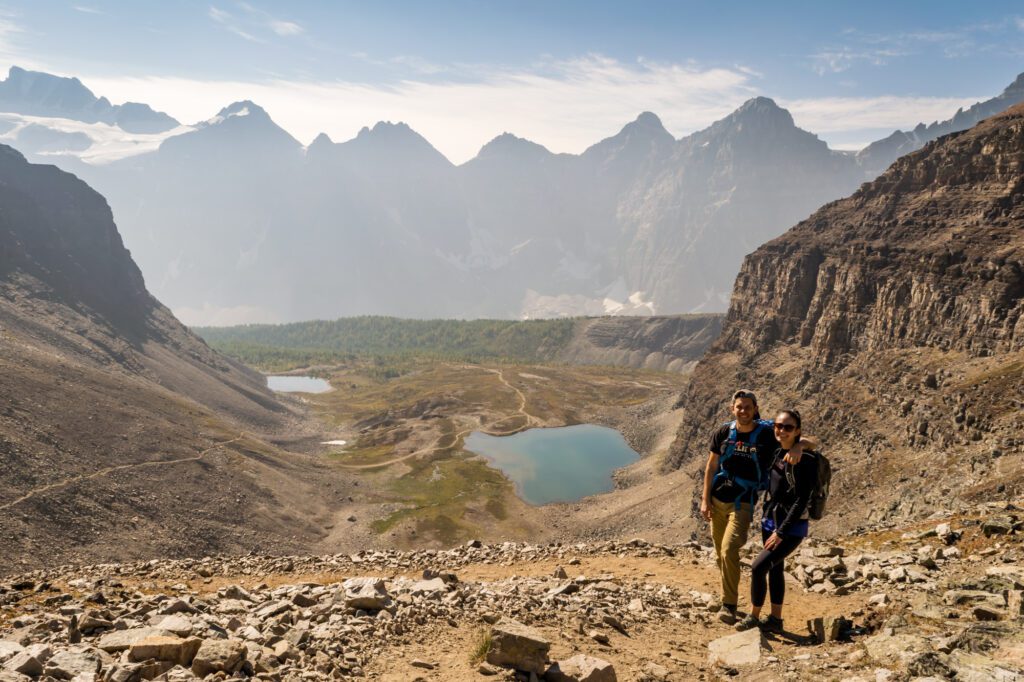
Day 3: Lake Louise and Choose Your Own Hiking Adventure, Part 1
On your third day in Banff, you’ll be starting your explorations of the area around Lake Louise with an epic day at one of the most famous destinations in all of Canada; Lake Louise.
Getting to Lake Louise
Of the two lakes here, Lake Louise is slightly easier to get to. But only slightly.
As of 2024, you can still drive to the parking lot at Lake Louise, while the parking lot at Moraine Lake is only accessible via shuttle or bus (more on that in the section on Moraine Lake).
You have three options when it comes to getting to Lake Louise: drive yourself and arrive super early, or take the shuttle or bus to the lake.
Each of the three options has its own pros and cons, which we’ll go through here.
Option 1: Driving Yourself to Lake Louise
The first option is to drive yourself, which gives you more flexibility and allows for an earlier start on the trail (unless you’re on the first shuttle). However, the cons arguably outweigh the pros here.
The first con is that you need to arrive super early, which is partially why we recommend staying nearby so that it’s a 10 minute drive, not an hour.
There are two big lots at Lake Louise, and by 7:00am or so on summer days, they are both full. You need to arrive by 7:00am at the latest to get a spot.
From our own personal experience, we were there at around 6:15am, and they were almost full by the time we had strapped on our hiking boots and headed to the trail.
The second con is that it costs $21 to park for the day, between 7:00am and 7:00pm.
However, this might actually work out to be cheaper than the shuttle if you have a full car of people, so this is probably less of a con and more something to know going in.
Option 2: Taking the Parks Canada Shuttle
Your second option is taking the Parks Canada Shuttle, which starts and ends at Lake Louise Ski Resort, just across the highway from Lake Louise (here on Google Maps).
This is a good option if you don’t want to get up super early to deal with the nightmarish parking situation at the lake, or if you want to do both Lake Louise and Moraine Lake in the same day using the Connector shuttle that runs between Lake Louise and Moraine Lake.
However, there are two downsides to this option.
First is less flexibility – you’re beholden to shuttles on the way there and back, and the tickets are very competitive, so you might not be able to snag an early morning seat unless you book months in advance…when you won’t know what the weather is going to look like that day.
The second is that it’s not super convenient if you’re staying in Banff or Canmore.
Keep in mind that this option does mean that you have to drive out to Lake Louise, which is 45-60 minutes from the town of Banff. If you’re staying in Banff, we have a better option next.
Shuttles run every 20 minutes from 6:30am to 7:30pm, and you should make advance reservations as soon as possible. More information here.
Roam Transit Bus 8x from Banff
The third option is to take Roam Transit bus 8x – the Lake Louise Express – from Banff High School in downtown Banff out to Lake Louise.
This is the best option if you’re coming from Banff because it means you don’t have to drive 45-60 minutes to catch the Parks Canada shuttles.
There is an option here to connect with the Parks Canada Moraine Lake Shuttle, and you’ll need to buy the “Superpass” to do that (for the record, we recommend doing the two lakes on separate days).
This is the most convenient option if you’re coming from Banff, but it’s also the most expensive, costing $10 each way per adult (seniors are $8 each way, kids 17 and under are free).
Reservations should, again, be made as far in advance as you can. More information here.
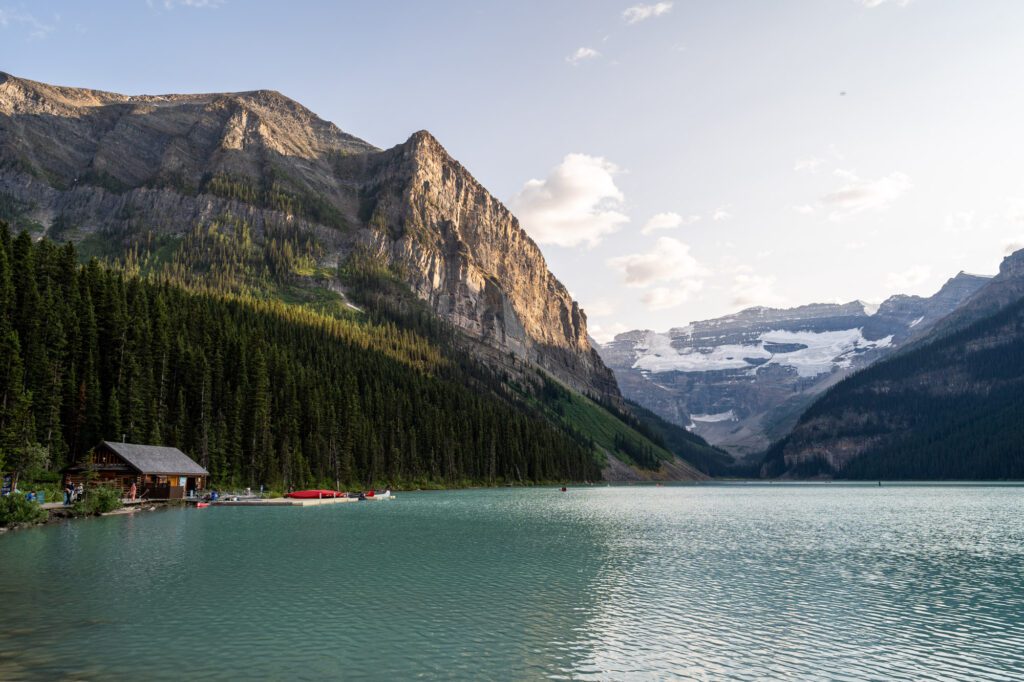
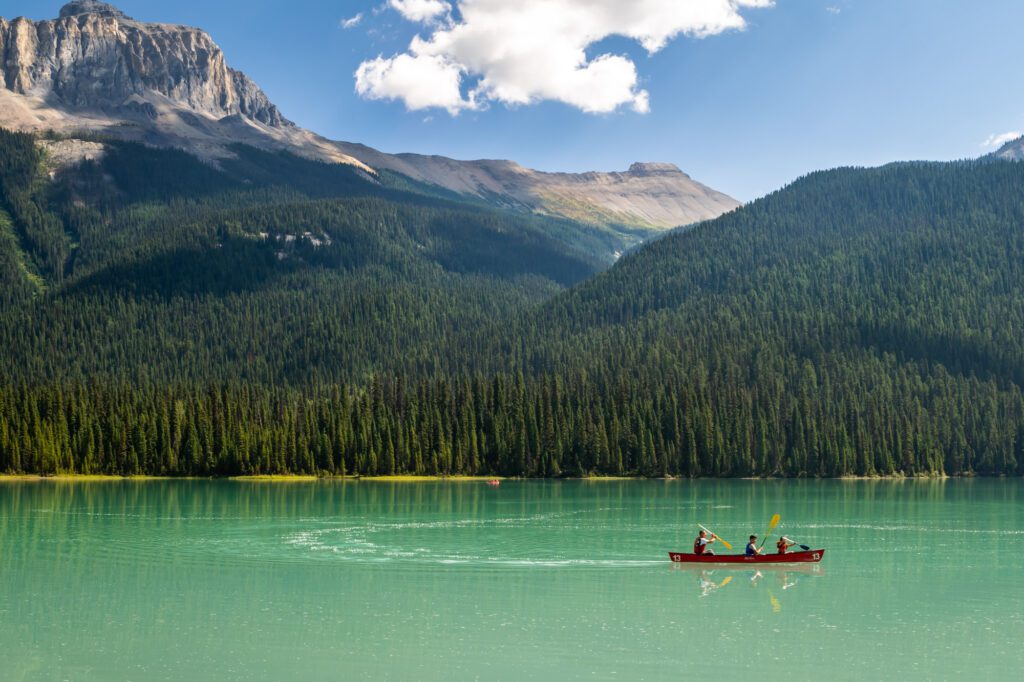
The Shores of Lake Louise
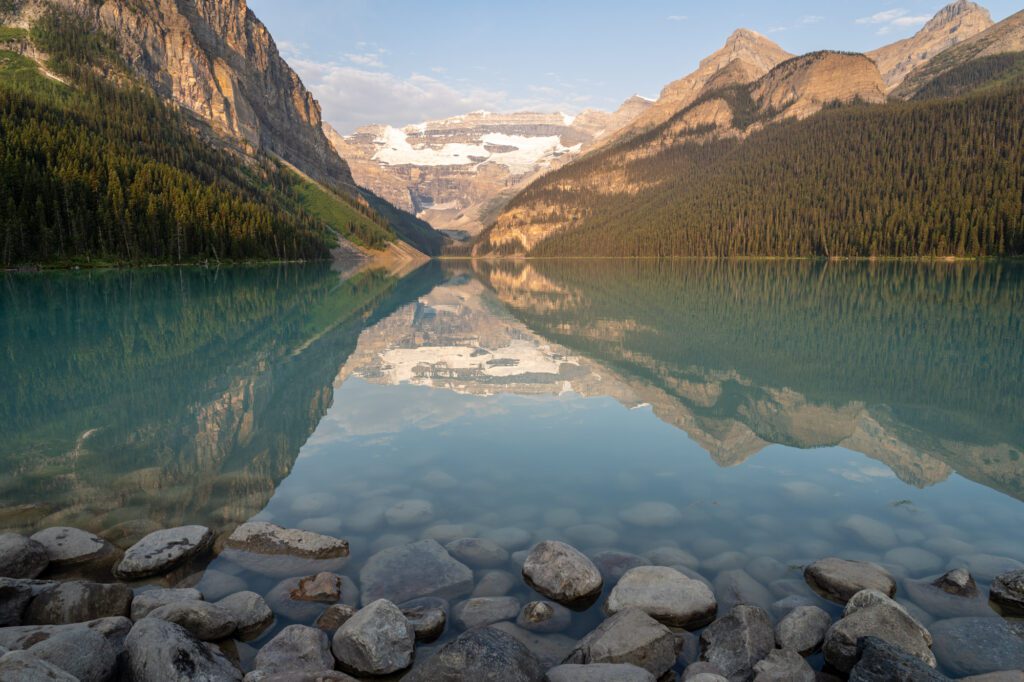
Whichever way you decide to arrive at the lake, your first stop should be the shore of the lake. Don’t plan on finding solitude here – or anywhere around Lake Louise, really – but you should plan on finding some pretty spectacular views.
The main viewpoint is at the near end of the lake, which is where the vast majority of people are crowded to get the perfect picture. We also like the view over to the left with the canoe rental hut in the frame.
There are also some great views of Fairview Mountain as you walk along the right hand shore of the lake.
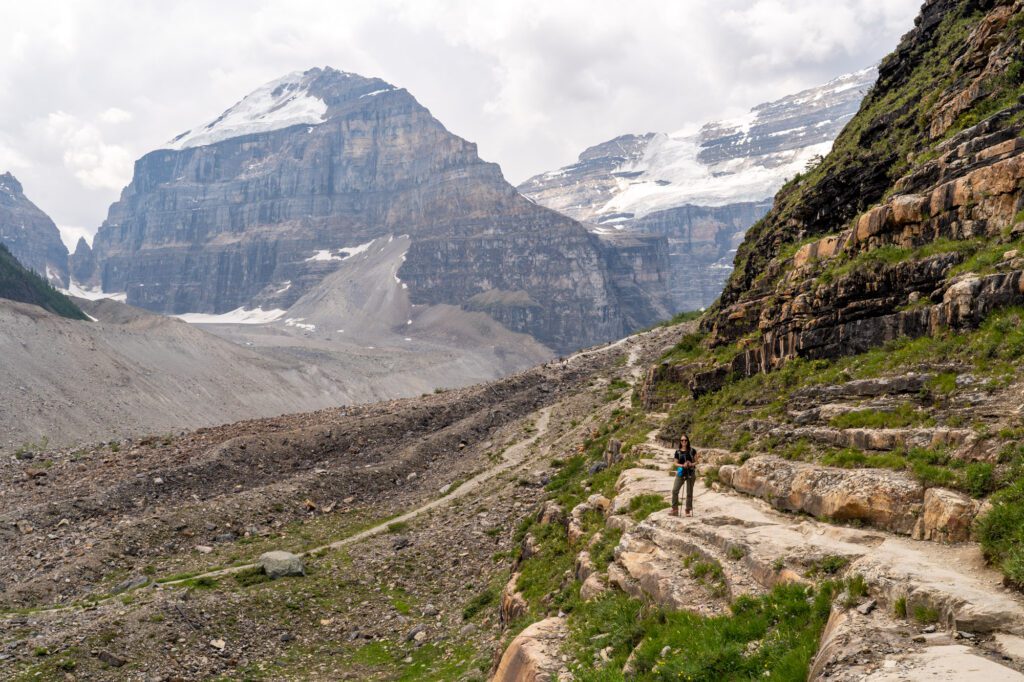
Choose Your Own Hiking Adventure: Plain of Six Glaciers vs. Lake Agnes + Big Beehive
For the main event of the day, there are two excellent hikes that leave from the shores of Lake Louise.
In this section, we’ll cover both of them (including an option for combining them into one epic day) and help you decide which would be best for you.
The two main routes here are the Plain of Six Glaciers, which heads out along the lakeshore and up a valley on the far end of the lake, and Lake Agnes and the Beehives, which heads up the mountain on the north side of the lake and features some great views out over the lake and valley.
For what it’s worth, if we can only have one, we’re doing the Plain of Six Glaciers because it’s a more unique landscape if you’re coming from sea level.
Here’s a little bit of a deeper dive into each of those two trails.
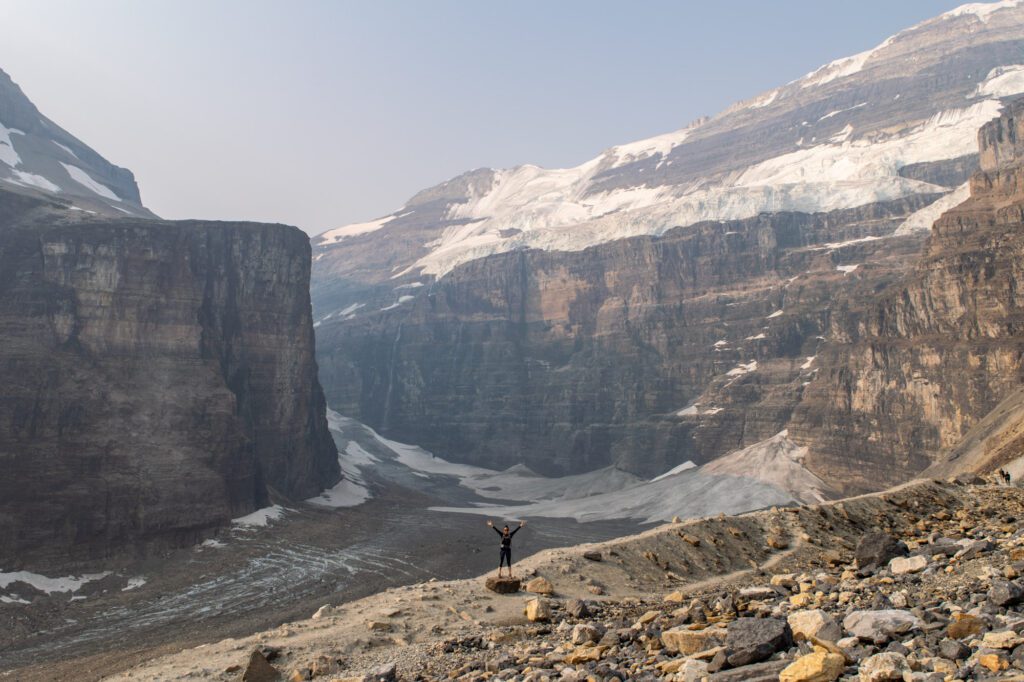
The Plain of Six Glaciers (9.1 miles, 1,929 feet elevation gain): Of the hikes at Lake Louise, this is our favorite (we’ve done it twice now, and it was breathtaking both times).
It takes you out and back to a magnificent view of Abbot Pass and the glaciers up there, with a fun teahouse stop along the way. Great views all the way through!
Read our trail guide: Hiking the Plain of Six Glaciers.
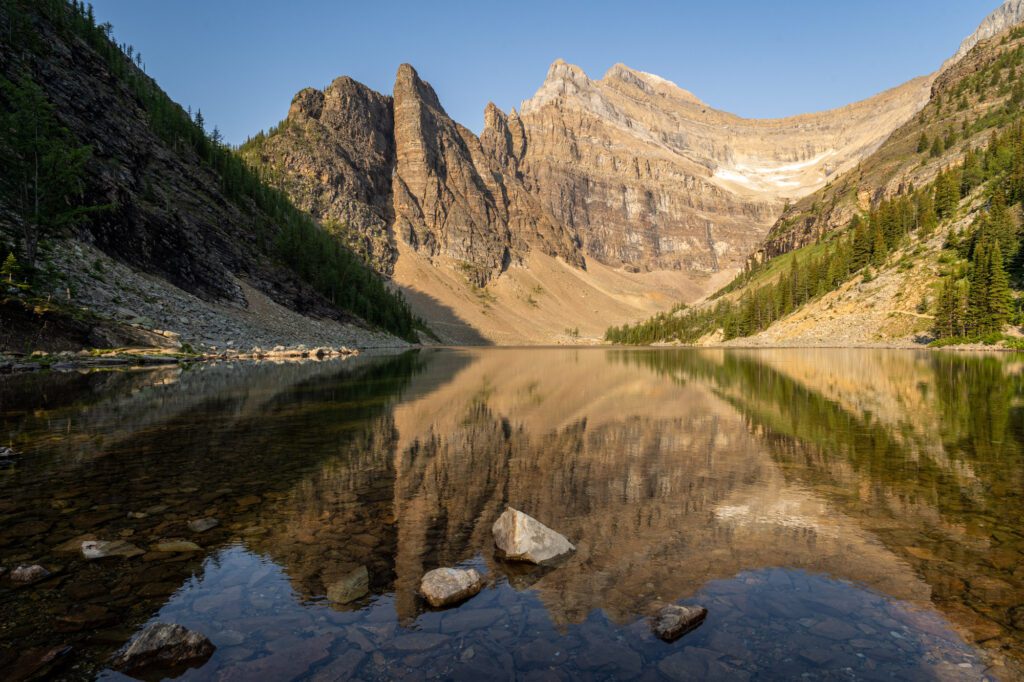
The Big Beehive Loop (6.7 miles, 2,552 feet elevation gain): A close second, this hike takes you up past picturesque Lake Agnes (and the teahouse of the same name) to the top of the Big Beehive, which has a commanding view out over Lake Louise and the Bow River Valley. It’s a great hike, especially in the fall when the Larches along Lake Agnes turn bright gold.
The Glaciers + Beehives Loop: (12 miles, 3,500 feet elevation gain): If you’re an experienced hiker, you’re mentally and physically prepared, and you absolutely MUST experience both, you can combine the two hikes into one big loop, which is what we did on our last trip.
It’s a tough hike, but it’s doable if you’re prepared with plenty of snacks, water, and a reasonable fitness level.
It will take you all day, especially if (like us) you linger for a bit at each of the two teahouses to catch your breath.
If you are going to do the full loop, we’d advocate for two things.
First is skipping Little Beehive, because it’s not worth the effort given you’ve already done the Big Beehive.
Second is hiking clockwise, out to the Plain of Six Glaciers first (which is very exposed and is tough in the beating sun) then looping back to Lake Agnes and the Big Beehive.
Basically all of these hikes are going to take the better part of a day, and you’re going to want to spend the rest of it recovering and replenishing, because there’s another big day coming tomorrow!
The Fairmont Chateau Lake Louise makes for a great spot for a well-earned drink (or cup of tea) after your hike.
It’s a pretty expensive stay (we’d never even consider it, frankly), but they have a number of bars and restaurants onsite and the location right on the lake can’t be beat.
Day 4: Moraine Lake and Drive Back
In some ways, we’ve saved the best for last here. While, yes, you’ve seen some pretty incredible alpine lakes over the course of your itinerary, Moraine Lake is almost in a league of its own.
So much so that they’ve closed the road to Moraine Lake entirely to passenger vehicles to curb the deluge of visitors camping in the parking lot to get a view of the most famous lake on Instagram at sunrise.
On your last day, close your trip out with a morning visit to Moraine Lake, a hike, and then wipe the tears from your eyes as you make your way back towards the airport in Calgary.
Getting to Moraine Lake
The first thing we need to cover here is getting to Moraine Lake, which has changed over the past few years as record traffic numbers overwhelmed the infrastructure at the most popular lake on Instagram and necessitated some limitations on visitation.
As of a couple of years ago, Moraine Lake Road – the only road into the lake – is closed to private vehicles.
That means that the only way to access Moraine Lake is by shuttle or bus, and there are both public transportation options and private options.
It’s also worth noting that the lake is only accessible by vehicle from May to October.
We’ll talk about both public and private offerings, but we’re going to focus more on the public transportation options.
The first option is the Parks Canada Shuttle. This option leaves from Lake Louise Ski Resort, which is just across the highway from Lake Louise Village.
That does mean that, if you’re coming from Banff or Canmore, you will need to drive about an hour to catch the shuttle (the next option might be better, depending on what you’re looking for).
This option connects you to the Lake Louise Lakeshore, Moraine Lake (via a connector shuttle that leaves from Lake Louise lakeshore), and the Lake Louise Campground.
It runs frequently – every 20 minutes between 6:30am and 7:30pm – but it still fills up in the summer. Book well in advance. More information here.
The second option is combining the Roam Transit Lake Louise route (route 8x) with the Moraine Lake Connector shuttle (operated by Parks Canada).
This is a great option if you’re staying in Banff, because it means you don’t have to make the 45-60 minute drive out to Lake Louise Ski Resort to connect with the Parks Canada Shuttle.
Instead, you take the 8x from downtown Banff to the shore of Lake Louise, and then hop on the Parks Canada connector that takes you to Moraine Lake.
This requires you to purchase the “Roam Superpass” when you book your ticket, which gives you access to the connector shuttle. More information here.
The third option is the Moraine Lake Express through Roam Transit (route 10). The most important thing to know is that this option is only available in the fall, September through mid-October.
This route leaves from the town of Banff (in front of Banff High School) and makes a beeline to Moraine Lake, which makes it a really nice option if you’re staying in Banff and don’t want to drive out to Lake Louise. More information here.
All three options are very competitive, and you should book your tickets well in advance, especially if you want the coveted early morning slots.
Keep in mind that even if you want to just use the connector to Moraine Lake, you need to check in at Lake Louise Ski Resort and take the shuttle from there to Lake Louise.
There are two private transportation options we want to highlight for different reasons.
The first is the Sunrise Shuttle, which is the only option for photographers who want to see Moraine Lake at sunrise (aside from spending $$$ to stay at Moraine Lake Lodge).
It takes you from Banff to the lake, arriving around 45 minutes before sunrise, where you’ll stay for two hours before being whisked back to Banff.
It’s pricey, and we wish there was an option to stay at the lake to get an early start on a hike, but it’s the only way to have the lake to yourself at sunrise.
The second is the open top buses operated by Wow Banff, and their route goes from Lake Louise Ski Resort, to Lake Louise, to Moraine Lake.
Moraine Lake (and Where to Find the Best Views)
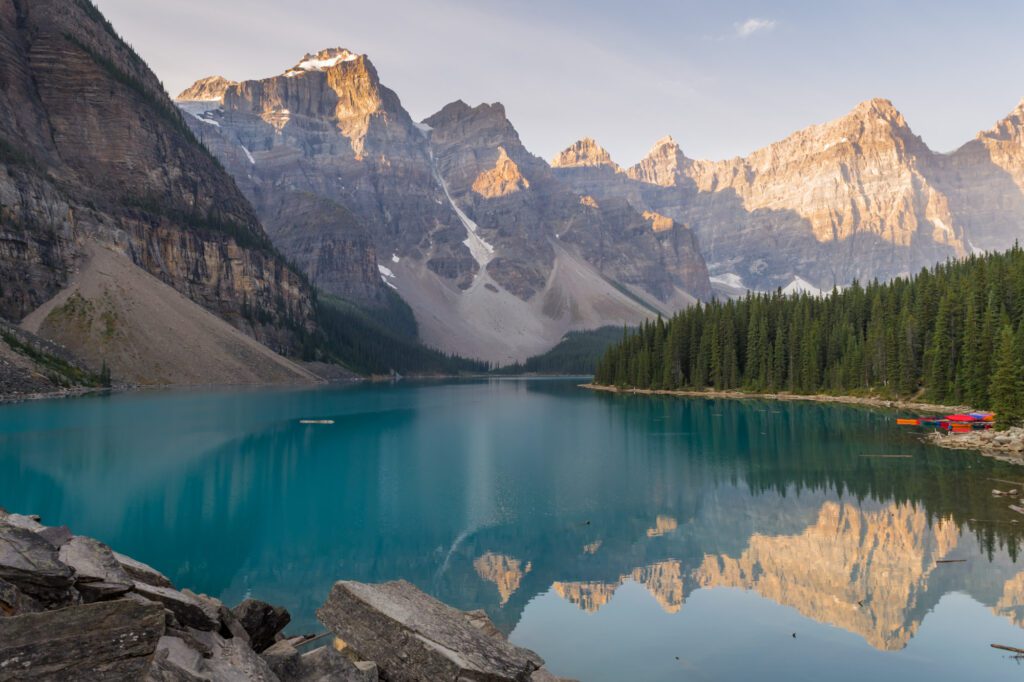
There’s a reason Moraine Lake is one of the most popular views on Instagram. One of the things we appreciate about it is how it changes throughout the course of the day.
Before the sun rises over the mountains it’s tucked into, the water is a crystal clear blue, with reflections of the Valley of Ten Peaks in the still water.
As the sun rises, it illuminates the tiny glacial particles in the water, and the water turns into a unique cloudy turquoise color.
There are two places you should go to find the best views of the lake.
The first is the rockpile at the northeastern end of the lake, which you can access via a short trail from the parking area.
You’ll head around the back of the rockpile and climb up over the top, where you’ll be presented with the iconic view.
The second place to go is the lakeshore trail, which we’d definitely plan on walking at least a little ways along the edge of the lake.
We especially like this view early in the morning with the colorful canoes in the foreground and the lake and peaks in the background.
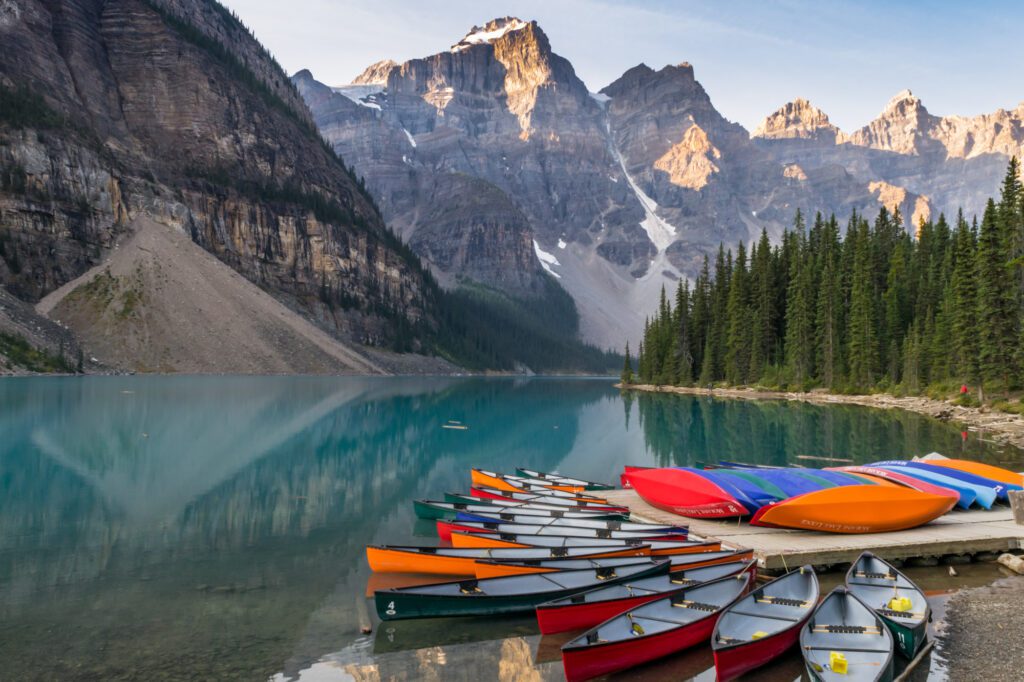
To this day, after tens of thousands of pictures taken on our travels, this is one of Matt’s favorite photos he’s ever taken.
Hiking at Moraine Lake
There are a few great hikes that leave from the shore of Moraine Lake, and we want to give a special shout out to the hike to Sentinel Pass via Larch Valley, which is probably our favorite hike in the Canadian Rockies.
It’s not easy by any stretch, but the views from the pass are truly spectacular (and well worth the effort).
Plan on spending your morning on the trail before, sadly, heading back to the airport to catch your flight home.
Consolation Lakes (4.6 miles, 1,000 feet elevation gain): This hike continues past the rockpile to a string of two lakes. It’s the easiest of the three, and is a very gradual grade.
Eiffel Lake (7.6 miles, 2,000 feet elevation gain): Another alpine lake, surprise! This hike is longer with more elevation gain, but it’s still in the moderate category.
The first mile and a half climb the same switchbacks as Sentinel Pass, which aren’t easy, but then it’s a mostly level walk out to Eiffel Lake, another turquoise lake with a tiny fraction of the crowds at Moraine.
Sentinel Pass and Larch Valley (7 miles, 2,600 feet elevation gain): The switchbacks at the beginning and end of this hike are the hardest parts, with a nice stroll through beautiful Larch Valley in the middle as a break.
The views from Sentinel Pass back over Larch Valley and Minnestimma Lake are breathtaking, as is the final ascent to the pass.
What to Add With More Time in Banff
If you have more time to spend in Banff and are looking for some other things to add to your itinerary, here are a few things we’d add (along with how much time we’d add for them).
It’s worth noting that the very first thing we’d add is an extra half day to the last day of the itinerary above, so that you don’t have to drive back to the airport to catch a flight after a morning of hiking at Moraine Lake.
More Hikes (+1 Day for Each)
If you’re into hiking, there are plenty (PLENTY) of other great hikes in Banff National Park to add. We’ve included a bunch of extra hikes above in the “choose your own adventure” sections, but here are a few more to consider.
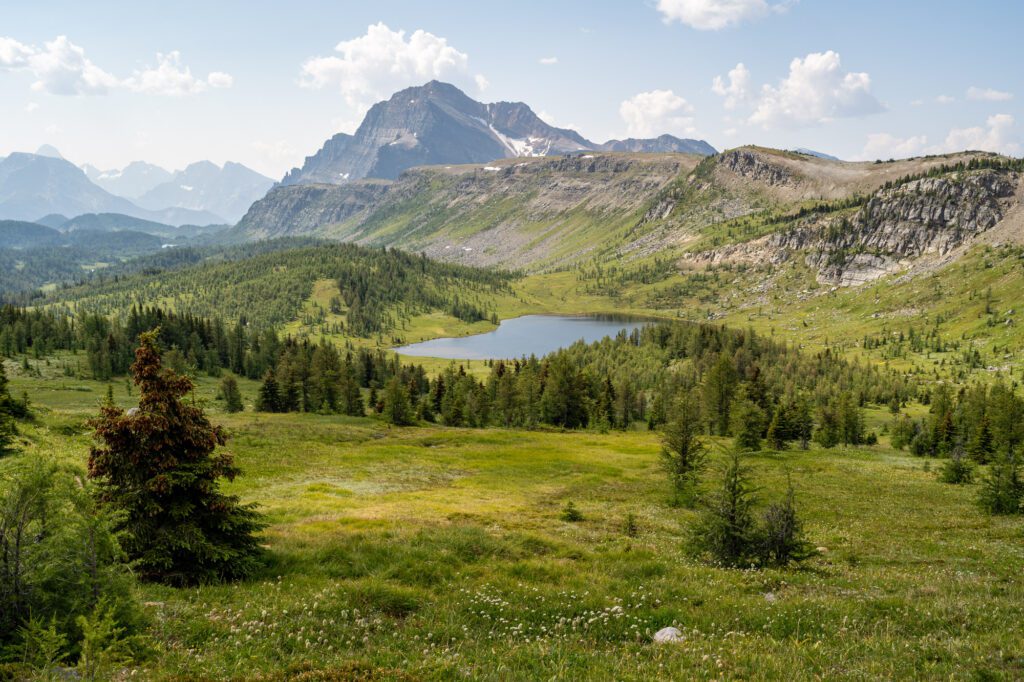
Healy Pass (11.1 miles / 2,814 feet elevation gain): We loved this hike. It’s a must-do if you’re in the Rockies in early summer (call it mid-July?) for the stunning wildflowers or mid-October when the larches are lighting up.
From the pass, you have a nice view of the Ramparts and the Monarch in one direction, and the peaks backing Egypt Lake in the other.
It also leaves from the Sunshine Meadows parking lot, which is giant, which means there’s no parking nightmare.
C-Level Cirque (5.8 miles / 2,490 feet elevation gain): We mentioned this earlier as an option around Lake Minnewanka, and we’re mentioning it here again as a moderate option that’s an easy drive from Banff.
You climb up through the forest for the first few miles before emerging into a rocky bowl, at which point it’s a quick scramble up to a viewpoint back towards the lake.
Helen Lake (7.2 miles / 1,700 feet elevation gain): While Wilcox Pass is our favorite hike on the Icefields Parkway, this is certainly a close second.
The hike takes you up through the forest for the first half, alternating between flat sections and super steep sections, before bursting into a beautiful meadow surrounded by rocky peaks and nonstop views.
A short meadow meander later brings you to Helen Lake, which is backed by Cirque Peak.
We’d basically say add a full day for each of them, because they’ll likely take 4-5 hours each.
Yoho National Park (+1-2 Days)
Yoho National Park is adjacent to Banff National Park, and gets far fewer visitors than either Banff or Jasper.
If you’re using Lake Louise as a home base for Louise and Moraine Lake, we’d add an extra night or two to get out to Yoho, which is a short drive west on the Trans-Canada Highway.
We wouldn’t exactly call it a hidden gem – it’s very much on the beaten path – but we think it rivals Banff and Jasper in terms of natural beauty.
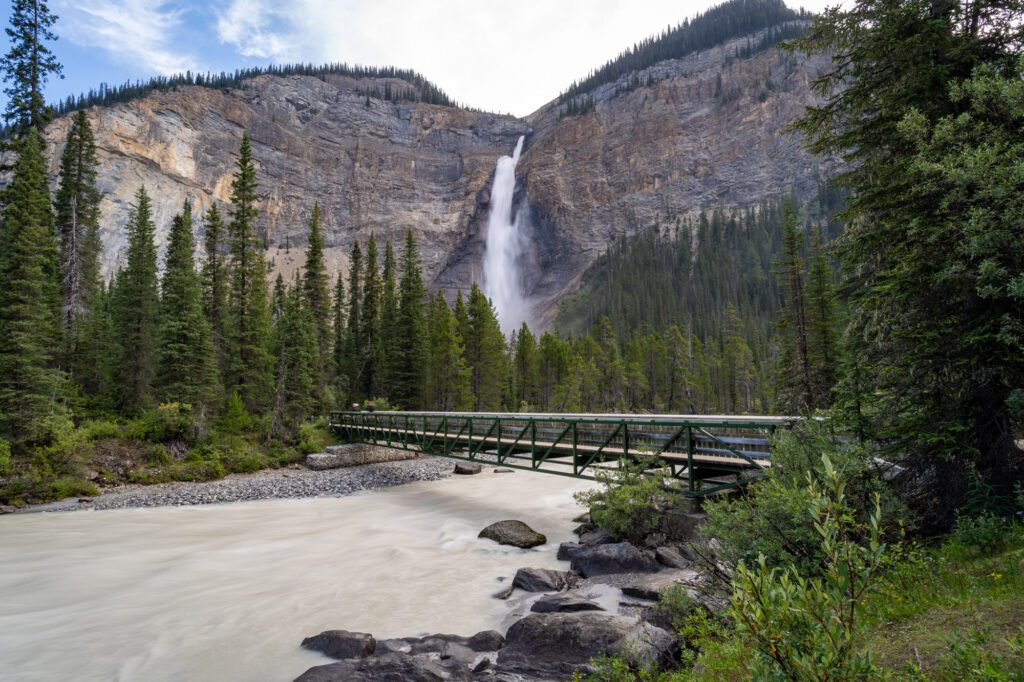
With one day, we’d head out to Emerald Lake for sunrise before the crowds (and for the picture-perfect reflections on the calm surface of the lake) and then head over to Takakkaw Falls afterwards, which is one of Canada’s highest waterfalls.
After the waterfall, there are a few great hikes that leave from the falls.
The first is the first-ever hike we did in the Rockies, the iconic Iceline Trail, which climbs straight up the wall of the valley to get up above the treeline.
From the ridge, you have excellent views back towards the falls and a sweeping view out over the valley.
It’s somewhere between a moderate and hard hike, and we’d do it as a loop down past Celeste Lake rather than as an out-and-back.
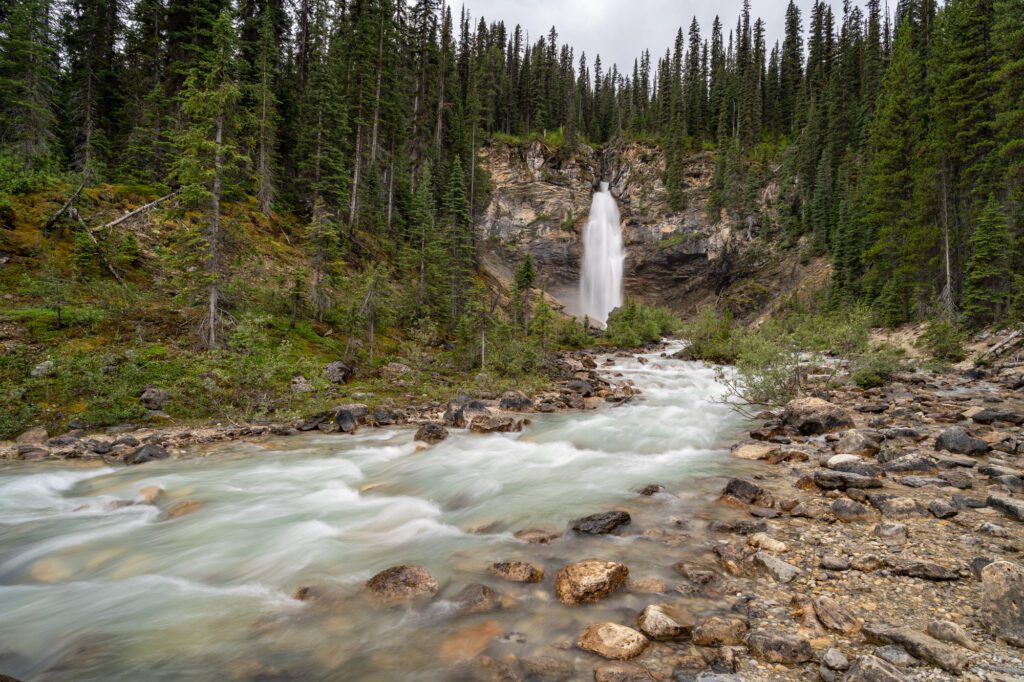
The second option is the easier (mostly flat) hike out to Laughing Falls, which follows the river out into the Little Yoho Valley with a few beautiful waterfalls along the way.
If you’re feeling spicy, you can continue past Laughing Falls out into the valley to Twin Falls, which roughly doubles the distance of the hike.
Jasper National Park (+2-3 Days)
If you’ve got 7+ days, we’d add time in Jasper National Park because, by the time you’ve driven out to the Icefields Discovery Center on the Icefields Parkway, you’re halfway there anyway.
However, we’d only add this if you have a full two days to dedicate to Jasper, because it is kind of a long (but beautiful) drive to get there and back.
If you’re looking for an idea of what to do in Jasper, we’d point you to our Canadian Rockies itinerary, which has a breakdown of how to spend two days in Jasper.