Hiking in Glacier National Park: A Guide for First Timers
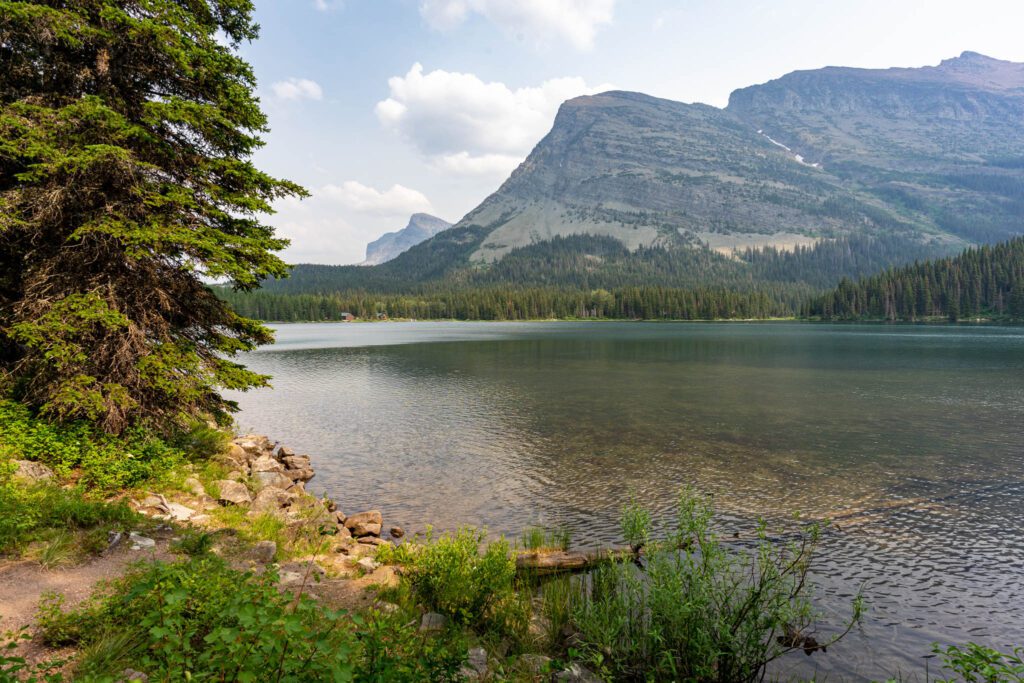
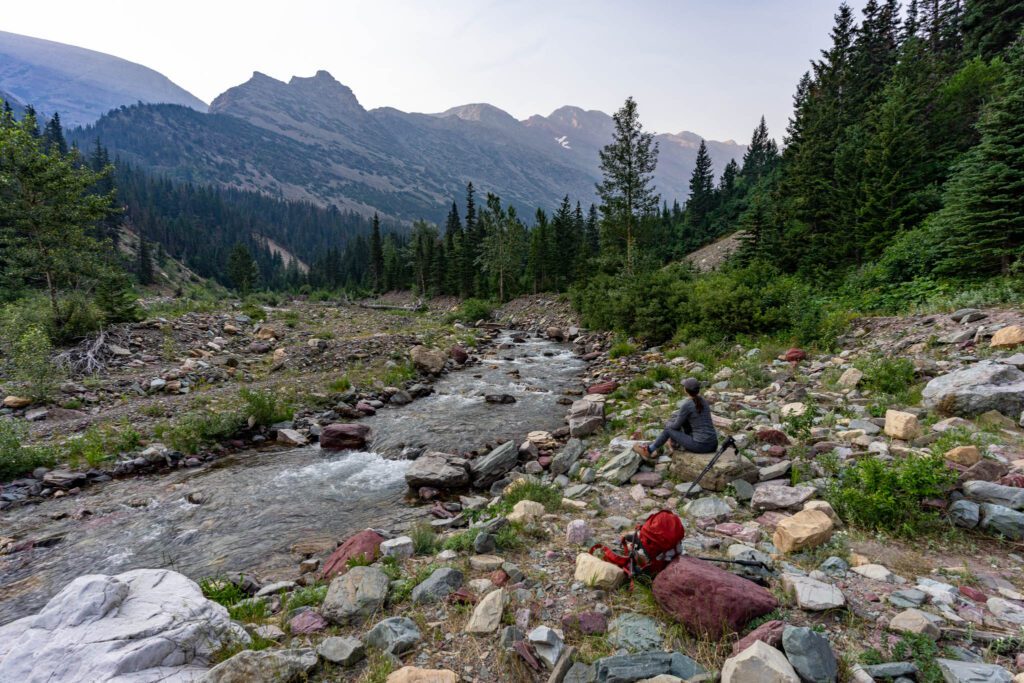
Rocky peaks. Dense forest. Blue-green alpine lakes. Tons of wildlife. Glacier National Park is special. Within Glacier National Park, which is in northwestern Montana just south of the Canadian border, there are approximately 730 miles of hiking trails.
Over the course of a week in the park, we tackled a whopping 70 of them, averaging 10 miles per day!
Well, we’re here to tell you that it’s even better up close, which you can only experience by heading to Montana and hitting the trails in Glacier.
In this guide, we’ll go through the best hikes in Glacier National Park, according to… well, us.
We’ve spent a week exploring Glacier, taking hundreds of photos and trekking many, many miles to compile this guide to help you discover the perfect hike for your fitness and experience level.
There are options for everyone in the park – from grizzled trail veterans looking for a rugged climb, to families who want to take in some amazing views with minimal effort – and we’ve done our best to cover them all (both in terms of hiking them, and also writing about them).
You’ll find family-friendly strolls, moderate walks through the forest, and strenuous climbs that end at alpine lakes, spectacular viewpoints, and even a glacier!
We’re going to focus heavily on the hikes we did in Glacier, which we largely really enjoyed. We’ll also give you some alternatives that we didn’t hike, but had on our list and just ran out of time for.
Sound good to you? Let’s get into it!

Disclaimer: Some of the links in this post, like hotel links, are affiliate links, meaning at no additional cost to you, we make a little bit of money if you click through and book. That being said, we would never recommend something to you that we don’t stand behind 100%.
Glacier National Park Geography: A Quick Primer
Glacier National Park is split into roughly five or six regions, depending on who you ask. For the purposes of most people visiting the park, there are really three to focus on:
- West Glacier: Apgar Visitors Center to Logan Pass along Going-to-the-Sun Road
- East Glacier: Logan Pass down to the St. Mary Visitor Center along Going-to-the-Sun Road
- Many Glacier: West of the town of Babb, north of Going-to-the-Sun Road
If you have more than 5-7 days in the park, you can start to think about adding Two Medicine Lake, Polebridge, or Goat Haunt to your itinerary.
If you have something like 2-3 days, we’d focus on the three outlined above.
For the purposes of this guide in particular, which is focused on hiking in the park, we’re going to simplify it even further. Below, you’ll find the best hikes along Going-to-the-Sun Road (from West to East), and then the best hikes in Many Glacier (from easiest to hardest).
The Best Time to Visit Glacier National Park
The tragedy of hiking high in the mountains is that the season is always disappointingly short.
The best time to hike in the park is during the summer, which means roughly July through September. The road running west to east through the park – Going-to-the-Sun Road – opens in June and closes in October. That timing shifts depending on the year, but it’s a pretty safe bet that it will be open from sometime in June through September.
On many of the hiking trails in the park, particularly at higher elevations, snow lingers on the trail until late June some years, and returns sometime in October.
July and August bring blooming wildflowers to many of the alpine meadows at higher elevations, while September brings fall color thanks to the golden larches and aspens lighting up the valleys and hillsides (usually mid-September).
Weather in late September and into October starts to get unpredictable, and you might end up with some early snow and temperatures below freezing.
Tips For Visiting Glacier National Park
Here are a few things that we think you should know before you head to Glacier.
The Bears
Glacier is bear country – both black bears and grizzly bears – and there are a lot of hikes on this list (particularly in Many Glacier) that go right through prime grizzly bear stomping grounds.
The bad news? Grizzlies are scary. The good news? We hiked 70 miles in the park and saw exactly zero grizzlies on the trail.
Still, it pays to be prepared. The best way to avoid bear encounters is to be loud.
Hike in groups. Make lots of noise (I’ve been known to serenade the bears with beautiful freestyle songs to the melody of your favorite pop tunes), especially around blind corners on the trail.
And most importantly, be aware of your surroundings – bear tracks and bear poop are good signs to look for, and listen for bear noises (basically grunting).
Give bears plenty of space, and yield the trail to them if they’re on it. Wait for them to clear the area before you head through. Be especially careful around mama bears and their cubs.
Trail Closures
Somewhat related to grizzly bears, the park closes trails (or portions of trails) due to increased grizzly activity on a regular basis.
When we were there, two trails were temporarily closed completely, and a third had rangers at the trailhead giving everyone a crash course on how to handle hiking in grizzly bear habitat (which I covered the main points of in the section on bears directly above this one) due to ripe huckleberry bushes along the trail and the bears it was attracting.
It’s best to head to the Visitor Center early in your stay to talk to a ranger and check on trail statuses.
You can find it online here, but the online version was more confusing to us than helpful.
Remember the Altitude
Glacier National Park isn’t really that high compared to other places we’ve been.
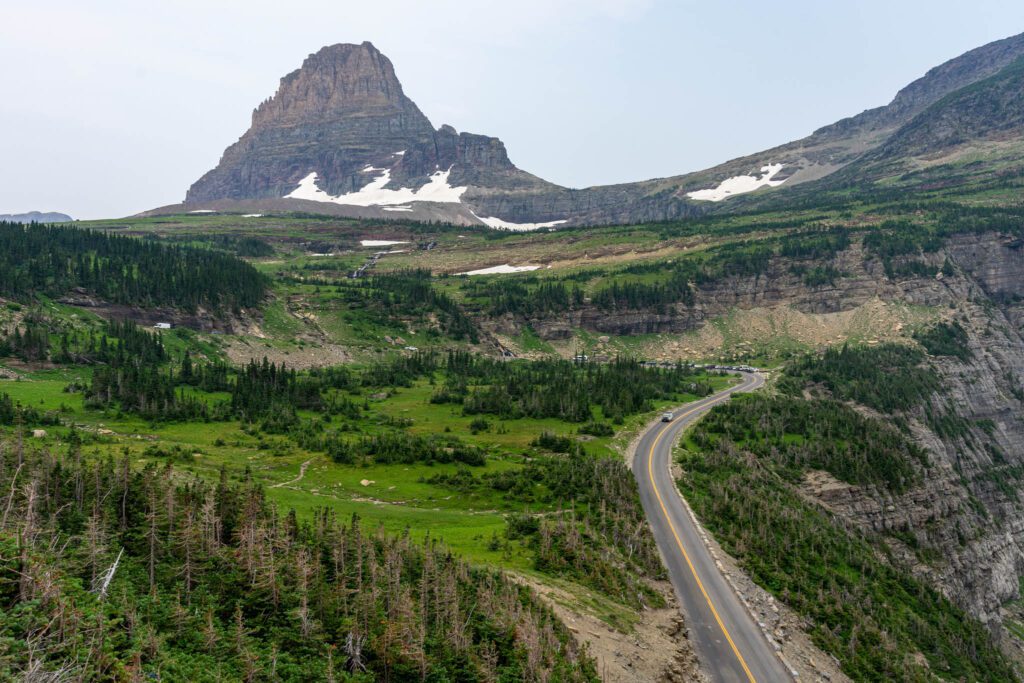
The highest point you’ll drive to is Logan Pass, which is 6,600 feet above sea level. Apgar is at around 3,000 feet, while St. Mary and Many Glacier are at around 4,500 feet.
Give yourself some time to acclimate before you tackle the more strenuous trails in the park, especially the ones at higher elevations near Logan Pass.
Know the signs of altitude sickness, and immediately descend at least 1,000 feet if someone in your party starts experiencing them.
Parking at Trailheads
When there are entry reservations required for driving along Going-to-the-Sun Road between 6:00 am and 5:00 pm, the parking situation at trailheads along that road was insane.
Parking lots were completely full by 6:30 am, sometimes earlier as people had to get into the park before the permit times went into effect.
If you want to drive yourself to the trailhead (versus taking the shuttle – more on that below), then you’ll need to get up early.
Especially for the hikes at Logan Pass, where they completely closed off the parking lot to new cars by 9:30 am the day we took the shuttle up there.
In Many Glacier, the situation was far less intense. Show up by 8:00 am or so to guarantee a parking spot (plus, most of the trailheads are walkable from the campground and Swiftcurrent Motor Inn, two of the three places to stay in that part of the park).
Beat the Crowds
The main trails in the park are going to be crowded. There’s no getting around it.
The best way to beat the crowds is either to get an early start – we routinely started at 6:30am and usually saw very few people on the way up, and hordes of people on the way down – or to choose a less popular trail.
If you’re looking for a trail to escape the crowds, look at Siyeh Pass along Going-to-the-Sun Road, and Cracker Lake near Many Glacier.
We saw less than 20 people total on each of those trails (Alysha counted), compared to the 20 people we saw about every 100 yards on some of the more popular trails.
Still, the popular trails are truly worth it. We’d highly, highly recommend a pre-7:00 am start to have them to yourselves (or as much as you possibly can in a National Park).
Using the (Free) Park Shuttle
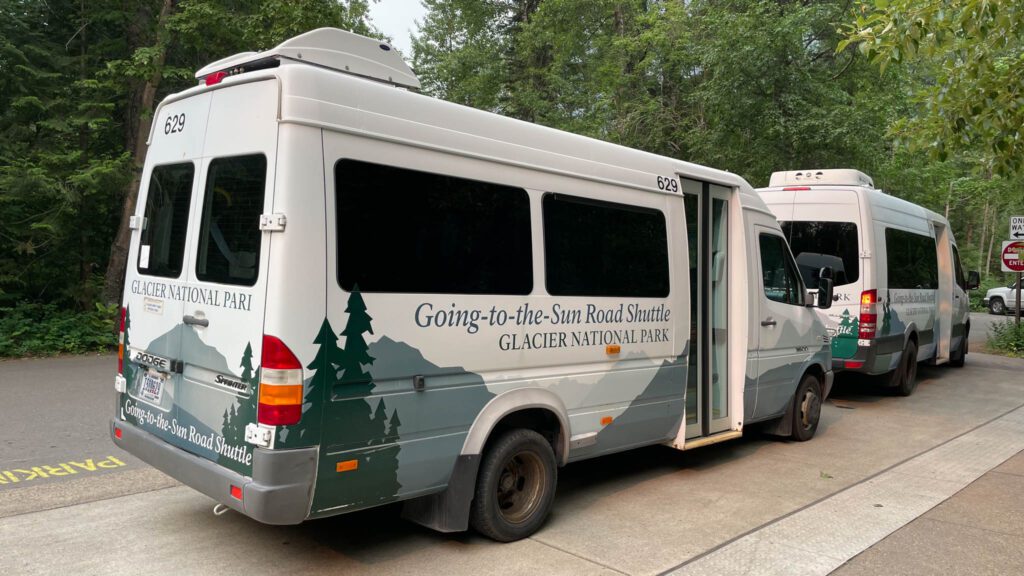
The park shuttle in Glacier National Park is a little less robust than its counterparts in places like Zion National Park and the Grand Canyon, but it’s a useful tool for hikers in Glacier.
There are two shuttle routes that run the entirety of Going-to-the-Sun Road, the main artery through the park from west to east. One starts at the Apgar Visitors Center on the west end of the road, one starts at the St. Mary Visitor Center at the eastern end of the road. They both make lots of stops en route to Logan Pass, where both lines end.
The first shuttle of the day leaves either Visitor Center at 7:00 am, and the last shuttle of the day leaves Logan Pass (heading back to the Visitor Center) at 7:00 pm. If you want to end up on the first one, show up at 6:30 am (earlier on weekends).
The shuttle is especially useful for hiking the Highline Trail, (spoiler alert) one of our favorite hikes in the park.
That hike is best as a point-to-point hike, where you start at Logan Pass, hike out to the Granite Park Chalet, and descend down to the Loop where you can catch the shuttle back to the Visitor Center.
The alternative is an out-and-back from Logan Pass, which is over four extra miles, and a lot more elevation gain.
The 10 Best Hikes in Glacier National Park: A Complete Guide
Now that we’ve laid out some of the things we think you should know before hitting the trails in Glacier, let’s get into the hikes themselves.
Like we mentioned before, we’ve broken the guide up into two sections: hikes along Going-to-the-Sun Road, and hikes near Many Glacier.
Hikes Along Going-to-the-Sun Road
This section is organized from west to east along Going-to-the-Sun Road.
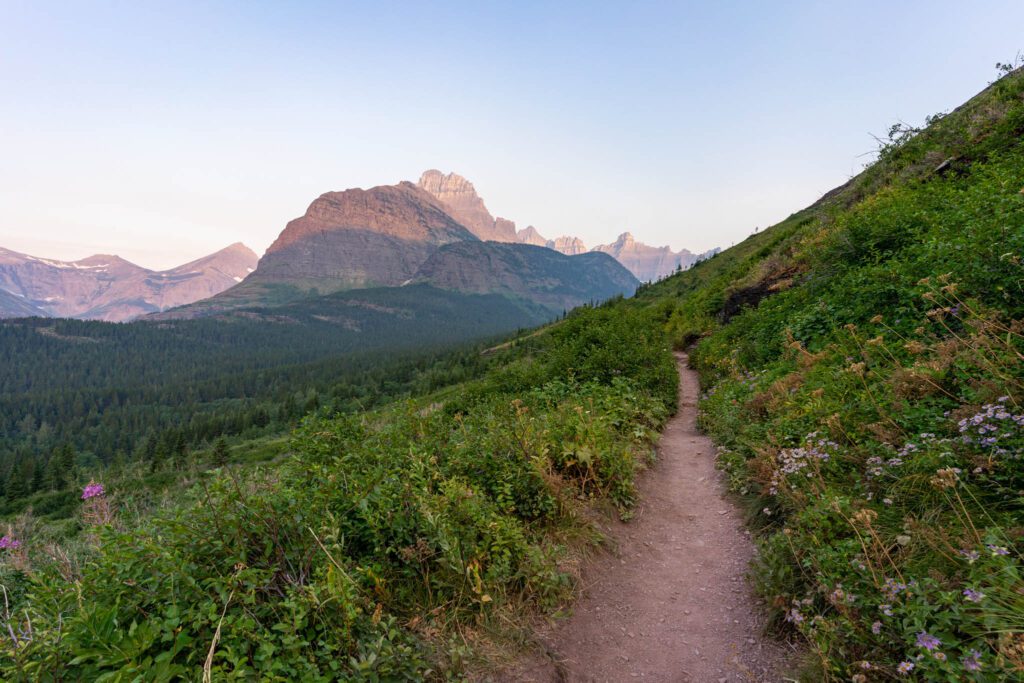
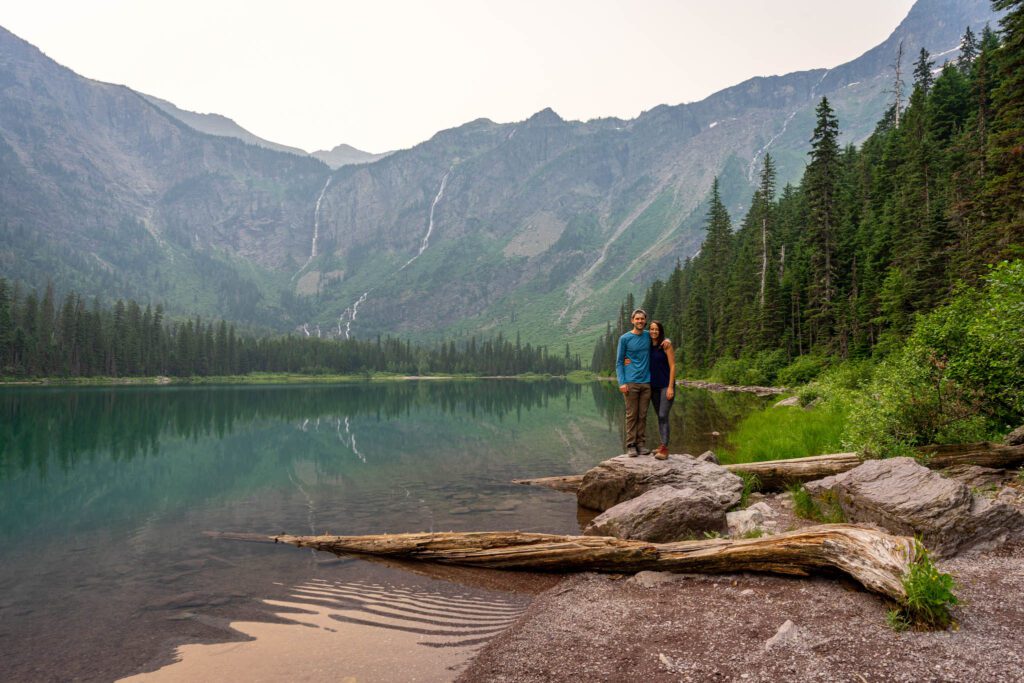
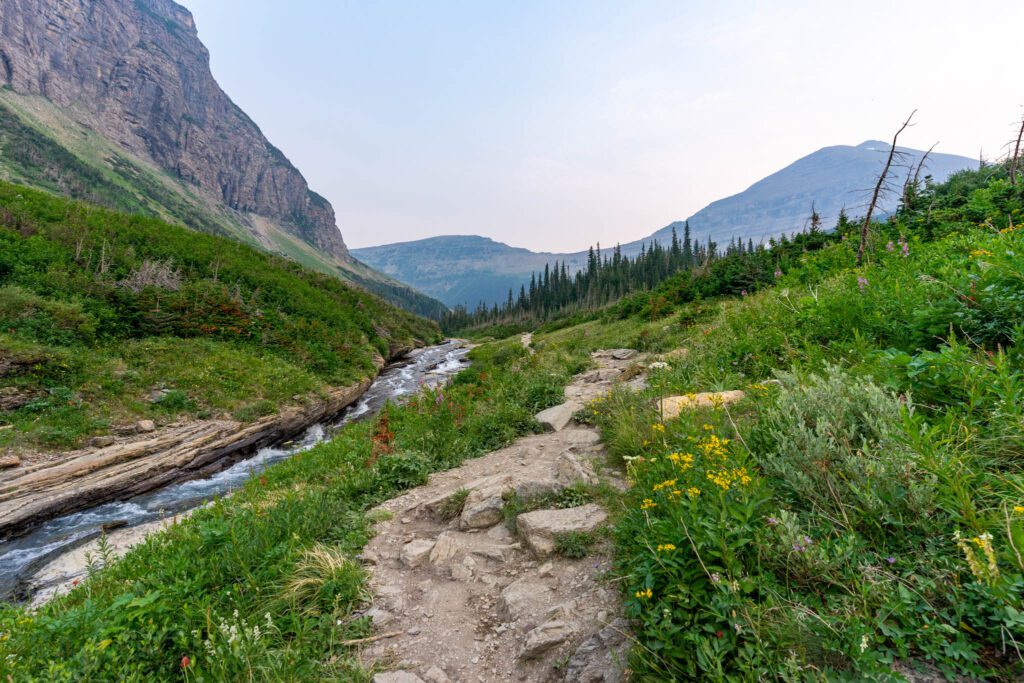
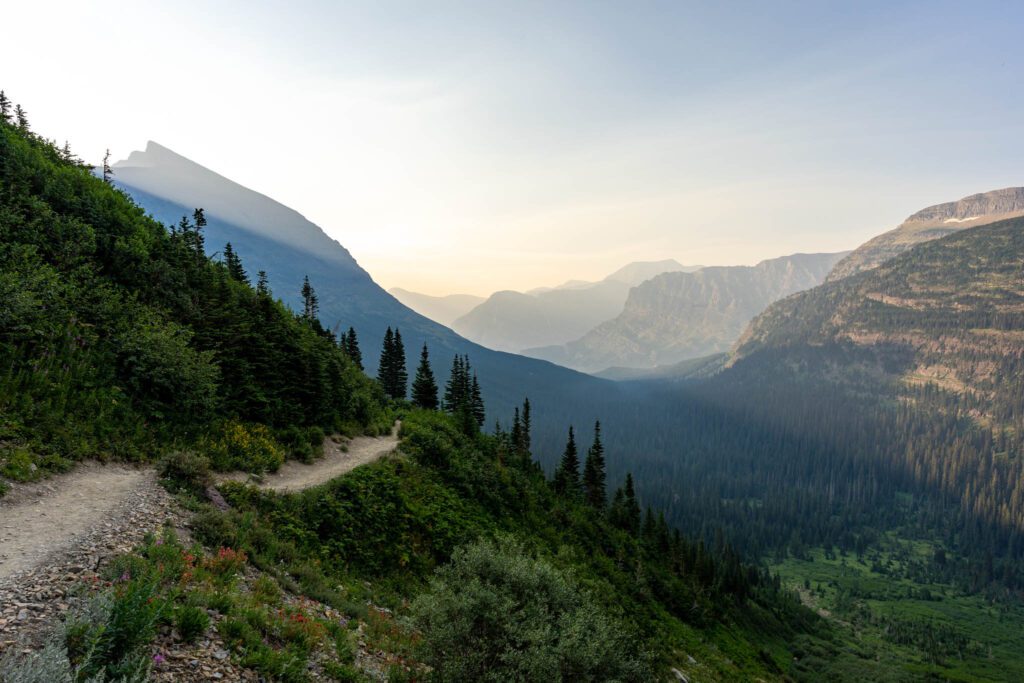
Avalanche Lake
- Length: 6 miles (to the far end of the lake)
- Elevation Gain: 750 ft.
- Trail Type: Out and Back
- Difficulty: Easy / Moderate
- Trailhead Location: Avalanche Picnic Area
This is one of the best family-friendly hikes in the park. It leaves from the Trail of the Cedars Trailhead, six miles east of the Lake McDonald Lodge, and shares the same trail for the first part of the hike. Definitely don’t miss the Avalanche Gorge!
We saw kids as young as three or four on this trail. It’s not particularly difficult, though it does climb 700 feet over two miles or so.
The trail splits from the Trail of the Cedars and starts to head uphill, following Avalanche Creek as it makes a gradual climb through the hemlock and cedars on its way up to Avalanche Lake.
You’ll reach the northwest shore of the crystal clear alpine lake at 2.2 miles in, and from there you have a great view across the lake to the mountains behind. If you’re there in the early summer, there’s a huge waterfall directly across the lake from you.
The downside of this hike being so accessible is that it’s super crowded on that shore. Venture a little further up the trail, which hugs the southwest shore until it reaches the other end of the lake.
There are a bunch of spots where you can get down to the shore along the way, and most of them are much less crowded than that first viewpoint.
It’s an out-and-back trail, so you’ll head back the way you came to get back to the trailhead. It’s mostly downhill on the way back.
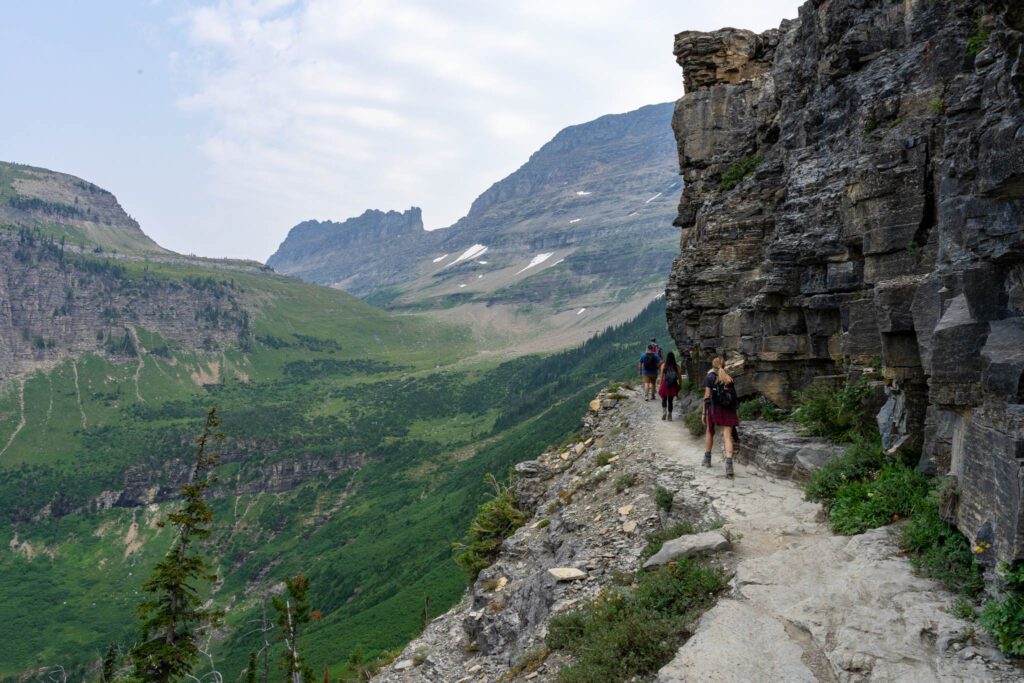
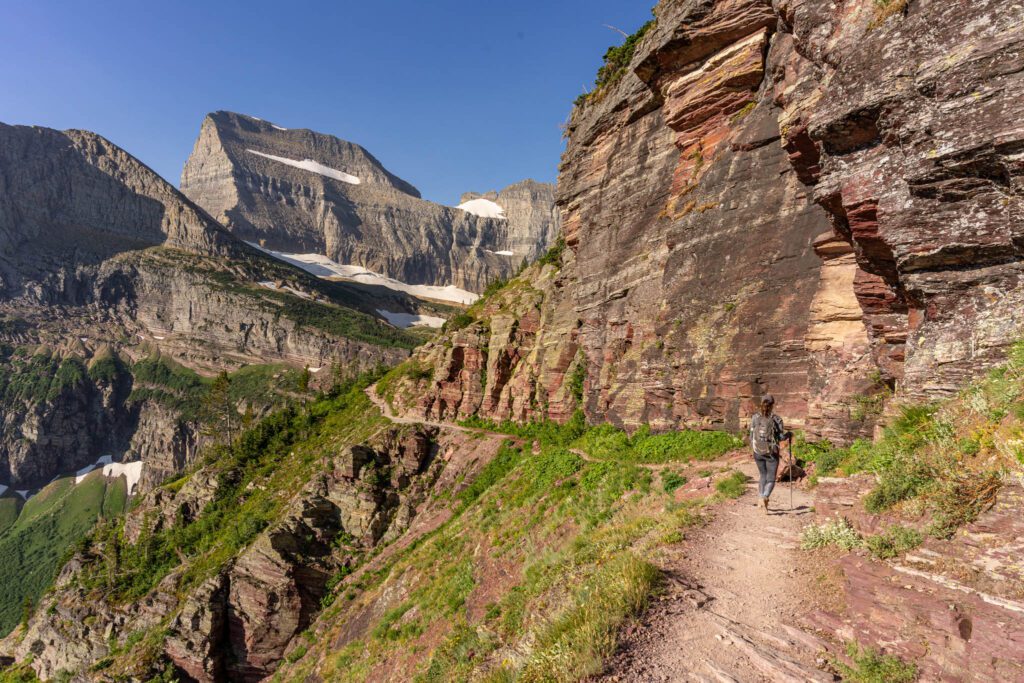
The Highline
- Length: 11 miles
- Elevation Gain: 1,550 ft.
- Trail Type: Point to Point
- Difficulty: Moderate / Hard
- Trailhead Location: Logan Pass
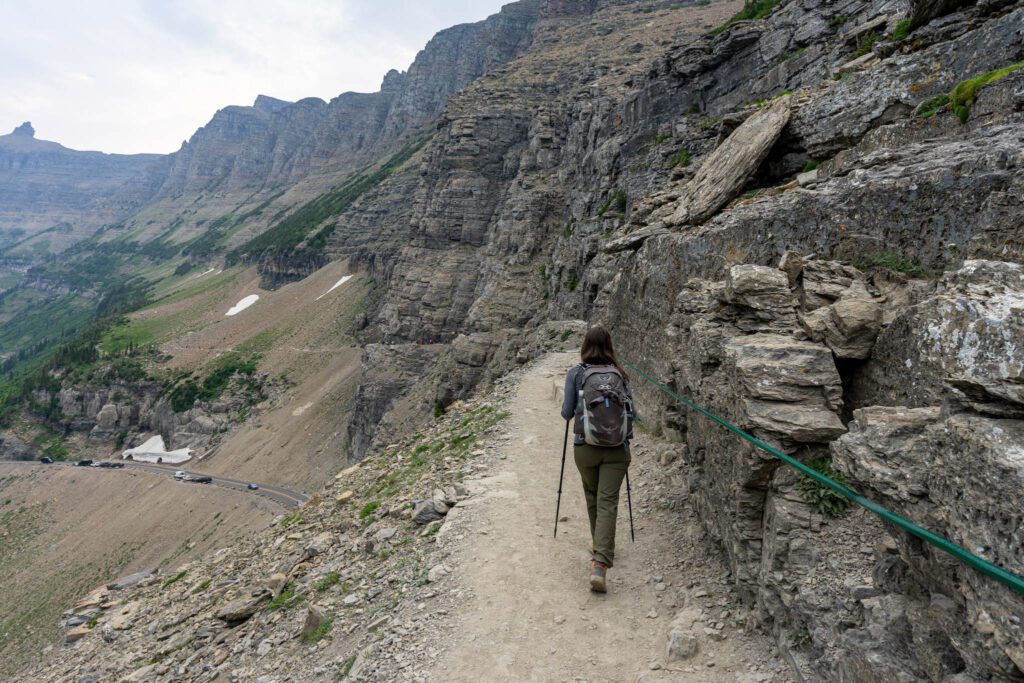
This is one of the most iconic hikes in the park. The trail is probably most known for its first half mile, where the trail rises 100 feet above Going-to-the-Sun Road. At points, the trail is six feet wide or less with a steep drop off down to the road.
The entire way, this hike hugs the Garden Wall along the Continental Divide, which means you have rocky peaks on your right, alpine meadows straight ahead, and jaw-dropping views of the valley and Going-to-the-Sun Road to your left.
The trailhead is at Logan Pass, which means that parking is a disaster. When we were there, the parking lot was full by 6:30 am or so.
If you want to do this hike and drive yourself, you’re going to need to be willing to wake up early. Otherwise the park shuttle is a great option, and is actually the way we’d recommend doing it. Why, you ask?
There are two route options for this hike. The first is a point-to-point hike from the Logan Pass Visitor Center down to the Loop, which is a shuttle stop.
The stats above reflect this hike, which is the shortest and easiest way to do it. BUT, it requires either two cars or using the shuttle, because you end the hike at a different place than you started.
The second way to do it is as an out-and-back from the Logan Pass Visitor Center. Doing it that way means it’s four miles longer, and you have to climb the pass twice over the course of the hike.
We’d strongly recommend doing it one-way if you can swing it. Taking the park shuttle (which requires reservations in 2021) is the easiest way to do it, and is how we did it.
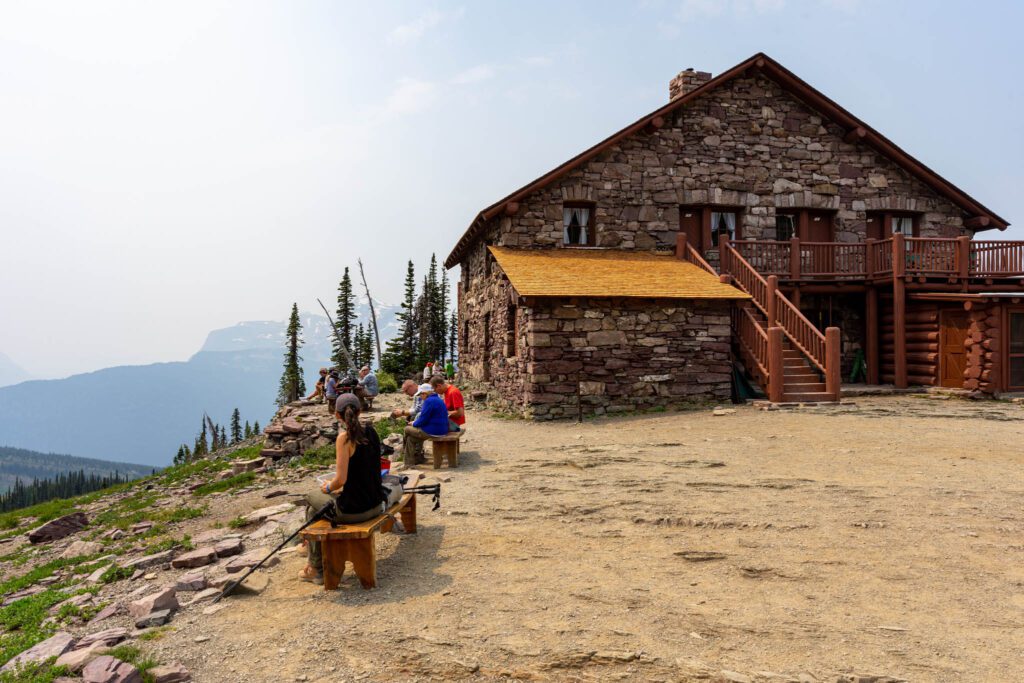
The first seven miles of the trail take you out to the Granite Park Chalet, a backcountry chalet with several rooms where you can spend the night (if you book six months in advance, to the day – see here). It’s a great lunch spot, and there’s a small store that sells things like sparkling water and snacks if there’s something you’re craving.
The next four miles of the trail descend 2,600 feet over the course of four miles, which is a brutal descent. Trekking poles will be your best friend. Trust me.
I will say that I am apprehensive about heights, and we actually skipped the last part of the Angels Landing Trail in Zion National Park because it felt too sketchy for me. This trail was much, much easier to handle.
There’s a garden hose attached to the wall of the mountain that you can hang on to, if it makes you feel better. Hug the inside of the trail for that first half mile or so, and the rest of the hike will make it worth it.
At 6.3 miles into the hike (0.8 miles before the Granite Park Chalet, coming from the Logan Pass Trailhead), there’s an offshoot that takes you up to the Grinnell Glacier Overlook. This trail is a big addition to an already difficult hike.
It climbs 900 feet in 0.6 miles, which is a ridiculous pace. But the view is supposedly spectacular, so if you’ve got gas in the tank and are up for an intense climb at this point in the hike, do it!
We skipped it because we were already on pace for a 16 mile day, and felt like the extra climbing might be a bit too much given we were planning on hiking 70+ miles over the course of a week.
We have a whole guide to hiking the Highline Trail so that you know exactly what to expect before you hit the trail.
It includes the parking situation at the trailhead, how to use the park shuttle to do the hike, different route options, and a play-by-play description of the hike from start to finish.
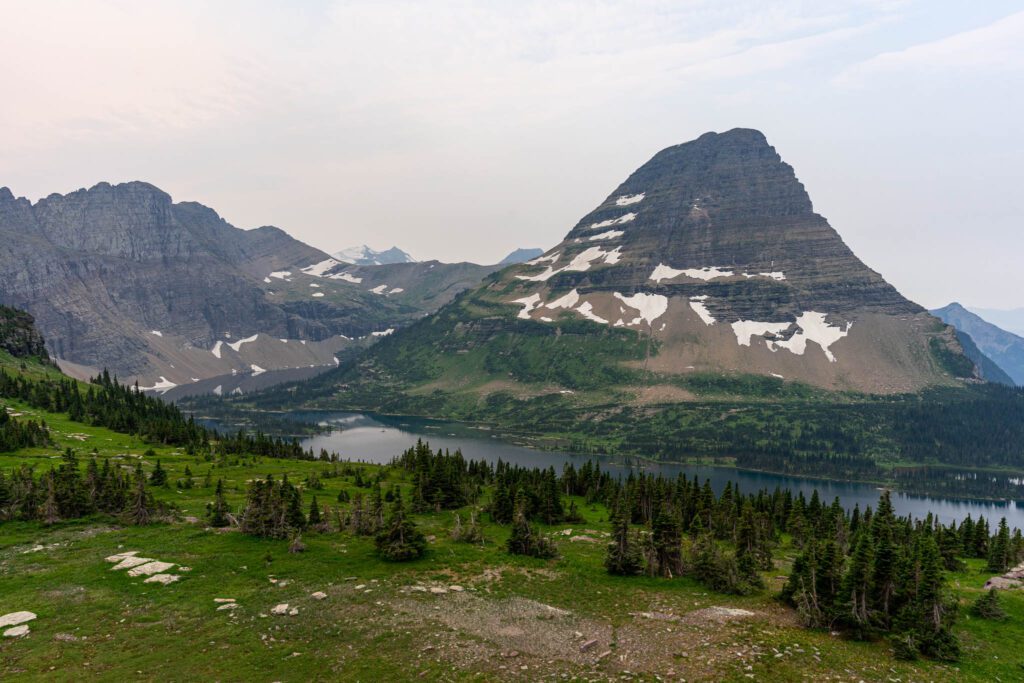
Hidden Lake + Hidden Lake Overlook
- Length: 3 miles
- Elevation Gain: 600 ft.
- Trail Type: Out and Back
- Difficulty: Easy / Moderate
- Trailhead Location: Logan Pass
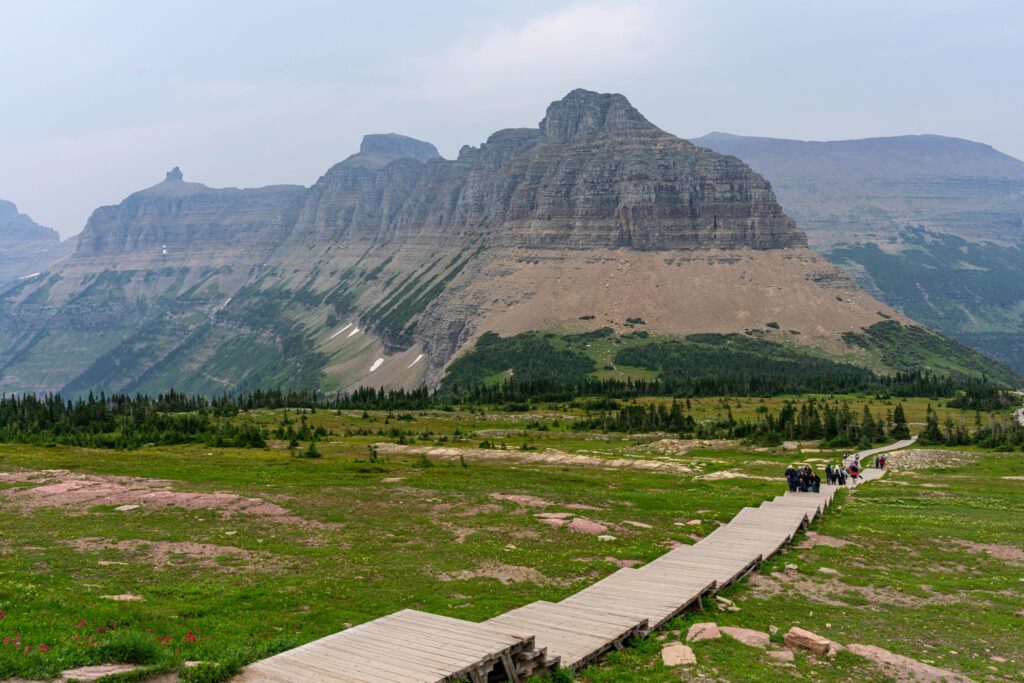
This hike also leaves from the Logan Pass Visitor Center, heading up behind the building to an overlook with stunning views of Hidden Lake and the surrounding basin.
It’s a crowded trail, mostly because it’s a boardwalk for most of the first half of the trail, and it’s relatively short.
But don’t be surprised to find out that this hike is actually kind of difficult. It climbs 600 feet in a mile and a half, which is 400 feet climbed per mile. That’s at the easier end of the moderate category.
There are two options for this trail. The first is heading up to the overlook, which is a short climb that is pretty accessible for hikers of all fitness and experience levels.
It’s well worth the effort to get up to the overlook, and it’s a great place to see wildlife. We saw a bear (far away on the opposite hillside), bighorn sheep, and mountain goats (also far away) over the course of this short jaunt.
The second option continues past the overlook down to the shore of the lake. It’s a steep descent on the way down, which means you have to do a lot of climbing to get back up. What goes down must come back up.
This option roughly doubles both the distance and the elevation gain on this hike, making it a more difficult option.
The first half of the trail, like I mentioned above, is a boardwalk through alpine meadows filled with wildflowers of all colors in the early summer.
It’s gorgeous, and you have all sorts of amazing views on all sides thanks to the Garden Wall and Reynolds Mountain, among other peaks.
The trail climbs steadily up to the overlook, where you’ll have a great view of Hidden Lake, with it’s brilliant blue water, and Bearhat Mountain looming ominously over its shores.
Make sure to check trail conditions at the Visitor Center before you go – the second half of this trail (the part down to the lake) is often closed for a few weeks in mid-to-late July due to spawning fish in the lake, and the bears that come to feast on them.
If you’re doing both this hike and the Highline on the same day, first do the shorter hike to the Hidden Lake Overlook, skip the hike down to the lake and save your energy for the longer Highline Trail. That’s what we did, and it was a great day of hiking.
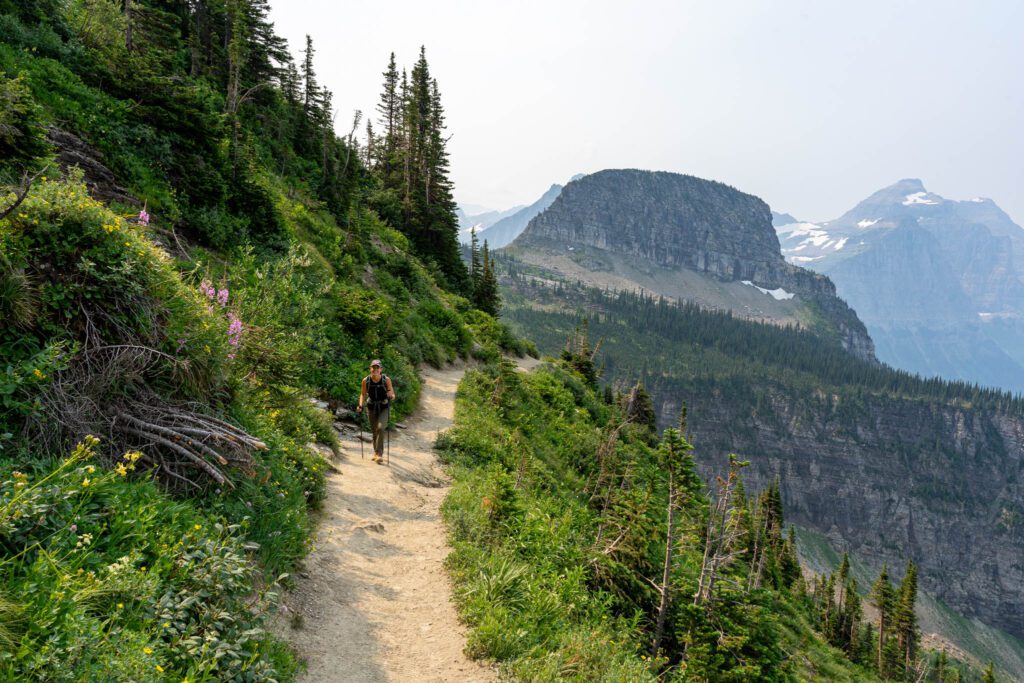
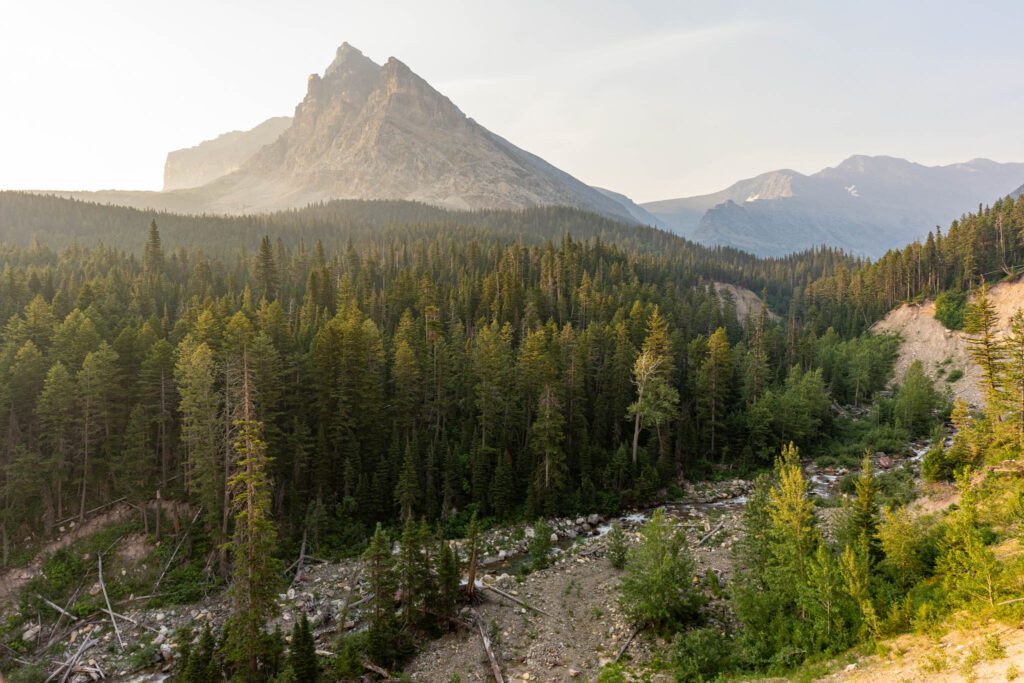
Siyeh Pass
- Length: 9.2 miles
- Elevation Gain: 2,400 ft.
- Trail Type: Out and Back
- Difficulty: Hard
- Trailhead Location: Piegan Pass Trailhead
Note: the day we did the Siyeh Pass Trail was extra smoky, which is why the pictures don’t quite do this hike justice. This was our first big hike in the park, and luckily we got better visibility for the rest of our trip.
If you’re looking for an equally beautiful but far, far less traveled hike in the park, check out Siyeh Pass.
On the three hikes directly above, we probably saw roughly 100 people per mile. On this hike, we saw a total of 20. And since we got an early start (roughly 6:30 am), we only saw six people on the way up. SIX! In a National Park!
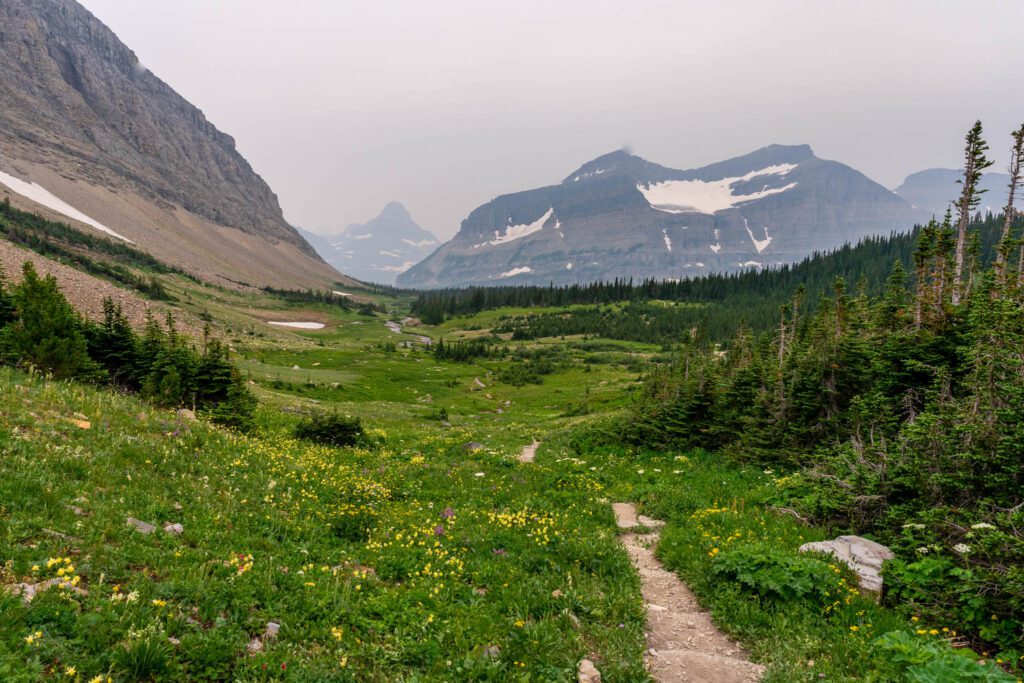
The other thing we liked about this hike is that, with the exception of the last mile of trail, this hike was pretty easy, and traversed a wide range of landscapes like forest, alpine meadows, and finally rocky high alpine terrain.
The endpoint of the hike is Siyeh Pass, which has sweeping views out to the eastern side of the park with too many jagged rocky peaks to count.
Again, like many hikes in the park, there are multiple ways to do this hike. The best way to do it is one-way from the Siyeh Pass Trailhead down to Sunrift Gorge. Unfortunately, due to reduced shuttle service in 2021, that route required either two cars or hitchhiking.
The disadvantage here is that you have to make a connection on the shuttle to access the trailhead, which is at Siyeh Bend about three miles east of Logan Pass (in 2021, the shuttle didn’t even stop at the trailhead due to reduced service).
You can also drive, which means you’ll hike out and back from the same trailhead and miss one half of the one-way hike.
The way to do this hike if you only have one car and aren’t comfortable hitchhiking is to do it out and back from the Siyeh Pass Trailhead (you could also do the same from Sunrift Gorge, but we were told by a ranger that the better part of the hike is the part from Siyeh Bend up to the pass).
The hike itself starts with an amazing climb along the river, where you’ll be facing the mountains in the distance.
The trail turns off to the right, and starts a forested climb that continues for about a mile before you reach a fork in the trail. Head left, and continue through the forest. The trail oscillates between forest and meadows for another 1.3 miles, where you reach another junction.
This time, turning left heads up to Piegan Pass, which is one of the ways to get up and over to Many Glacier (that would be a fantastic backpacking trip!). Head right, which takes you up to Siyeh Pass.
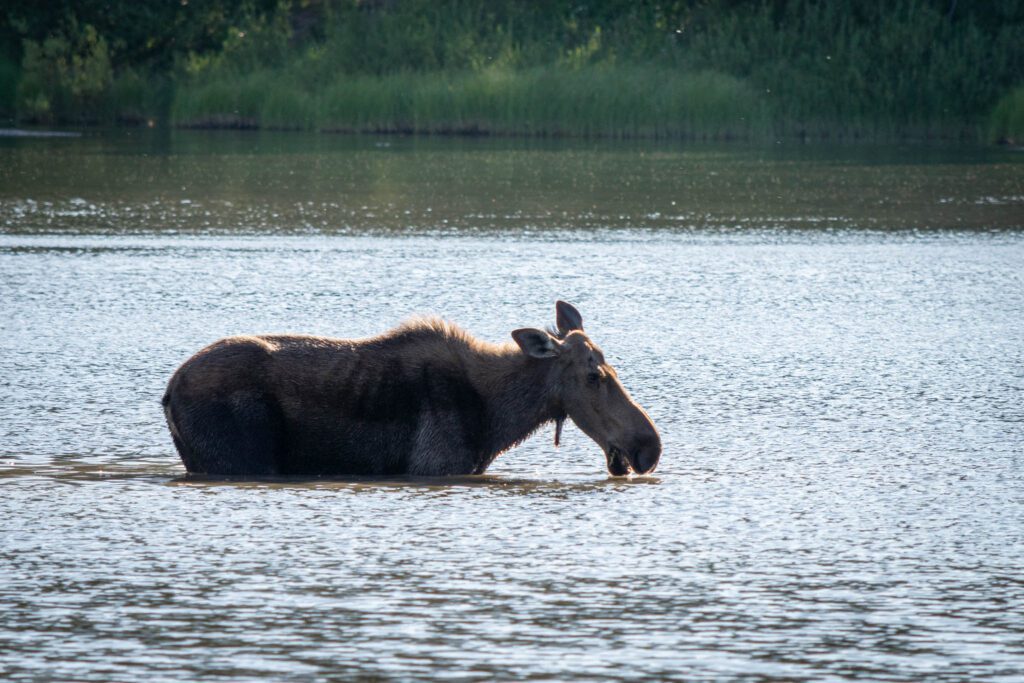
You’ll pass through some open meadows, where we actually saw a moose! It ran across the trail 20 yards or so in front of us, and then meandered its way up the hillside to the right and found a spot to rest in the trees.
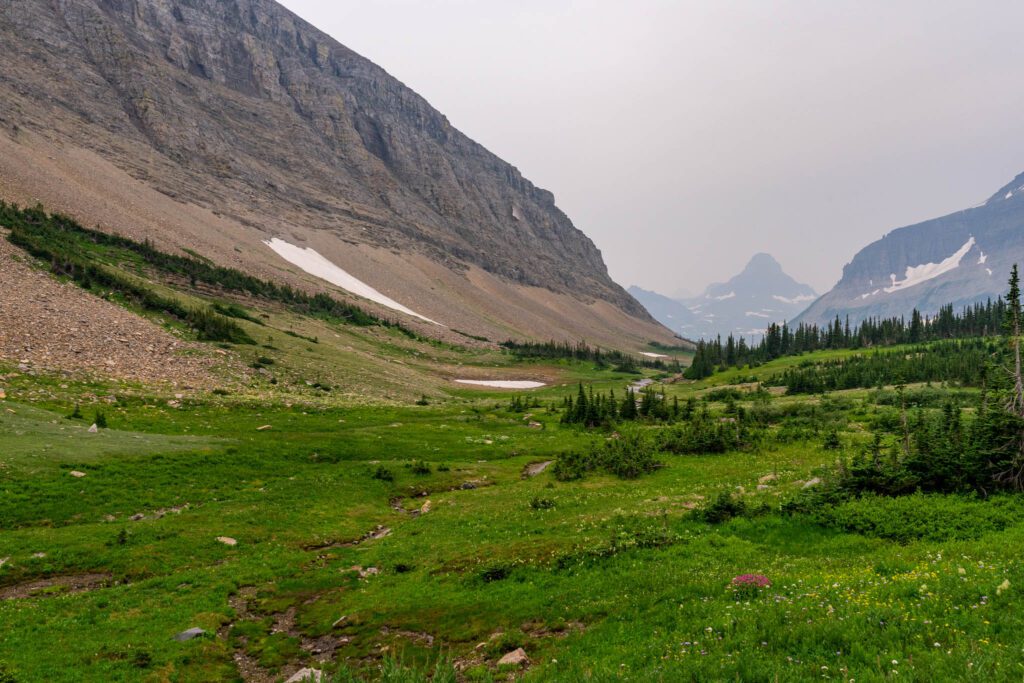
This is where the climb begins. You start the ascent with a stream crossing followed by a set of stairs that take you up and out of that meadowed area.
Immediately you’ll probably notice that the terrain changes drastically as soon as you get to the top of the stairs. Lush meadows give way to rocky high alpine landscapes, and you’ll see the trail winding its way up ahead of you.

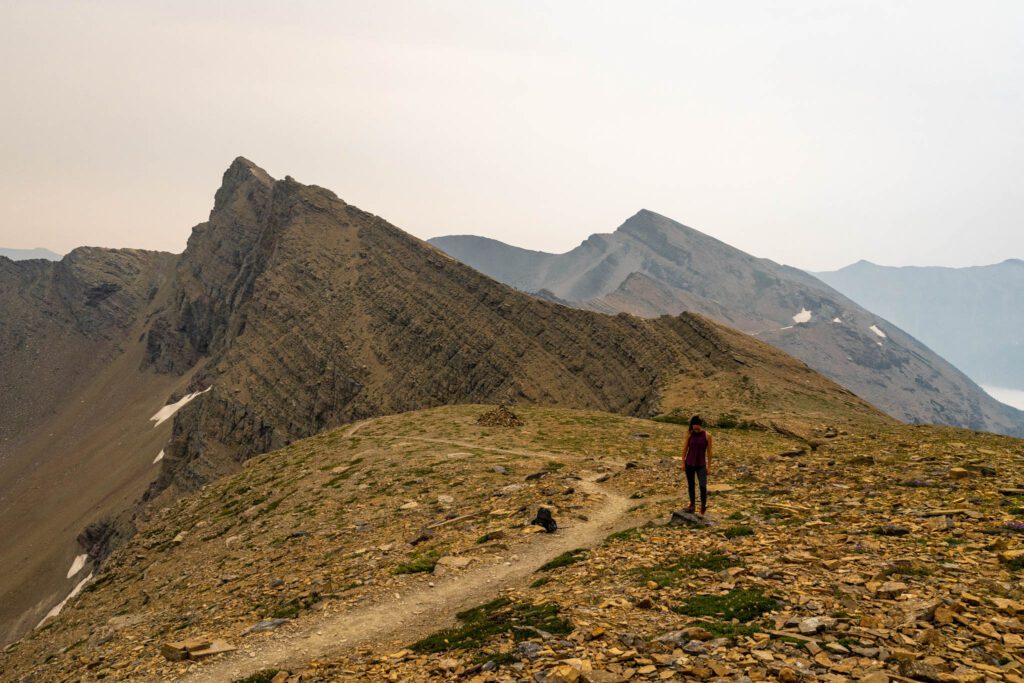
It’s a tough, exposed climb, so make sure you have plenty of water and sun protection for this part of the hike (reapply!). You’ll climb 800 feet in a mile to reach the pass, and the views are spectacular.
From there, you descend based on the route you chose – either continue straight to head down to Sunrift Gorge if you’re doing it one-way, or head back the way you came if you’re heading back to your car at Siyeh Bend.
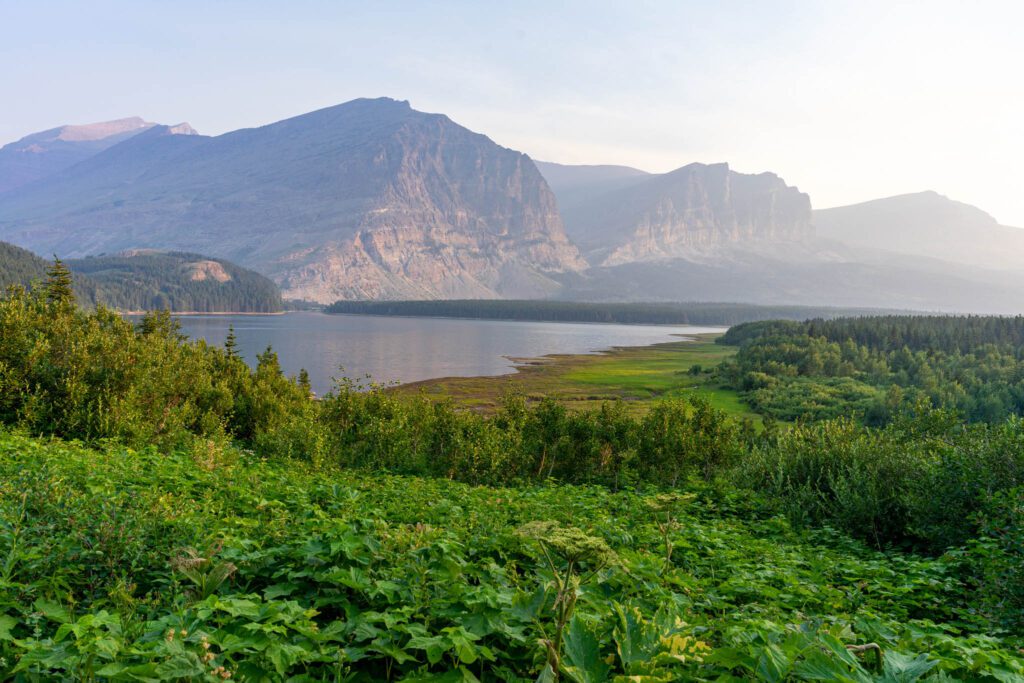
St. Mary + Virginia Falls
- Length: 3.6 miles
- Elevation Gain: 500 ft.
- Trail Type: Out and Back
- Difficulty: Easy
- Trailhead Location: St. Mary Falls Parking Lot (or the shuttle stop)
Full disclosure: We didn’t get a chance to do this hike because the parking situation at the trailhead was a nightmare (our mistake for showing up at noon on a Saturday, I suppose), but if you are looking for a nice and easy hike featuring multiple waterfalls in the eastern half of the park, this is your best bet!
You can start this hike either at the St. Mary Falls shuttle stop, which is the closest option but only works if you’re taking the shuttle, or from the St. Mary Falls Trailhead, which adds less than a mile to your hike and is the better option if you’re driving.
You’ll start with a short hike to St. Mary Falls that descends down into the valley to reach the waterfall. St. Mary Falls is a two-tiered waterfall, and you’re going to hear it before you see it. The pool under the falls lights up with an aquamarine hue when the sun hits it, which is unique.
Continue on to Virginia Falls, which is a little bit further and climbs back out of the valley, but is worth the effort. It’s much more impressive than St. Mary Falls – cascading off of the rim of the cliff. The trail takes you right to the base of the falls.
Hikes near Many Glacier
We fell in love with Many Glacier and its abundance of wildlife, beautiful alpine lakes, and more laid back vibe when compared to the parts of the park along Going-to-the-Sun Road.
We hiked 40+ miles of trail in this neck of the woods. Here are our picks, from easiest to hardest.
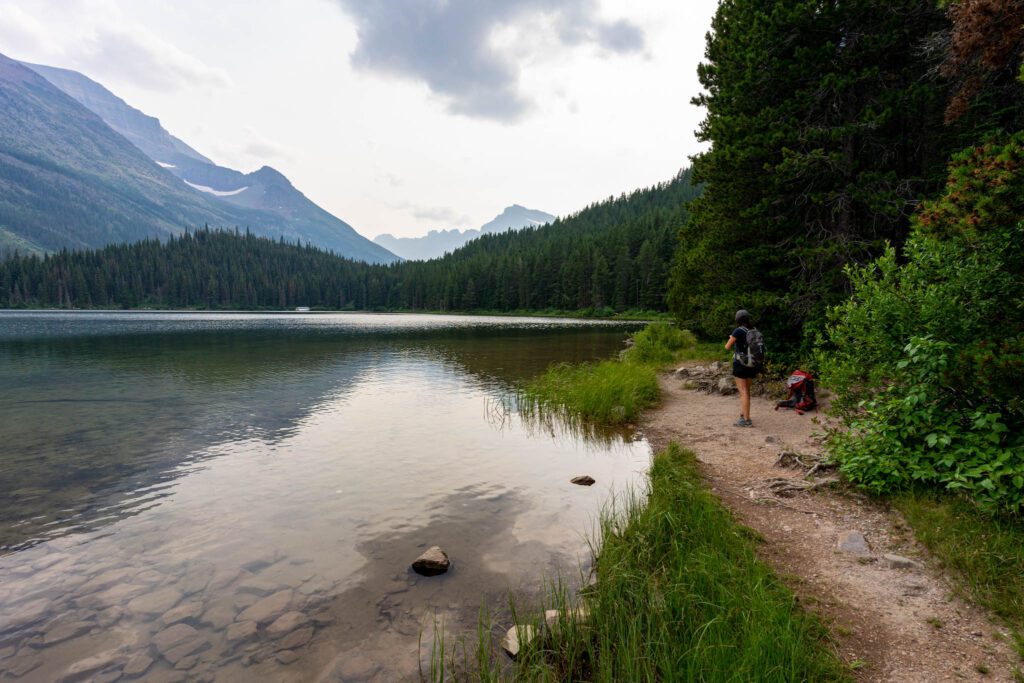
Swiftcurrent Lake Loop
- Length: 2.6 miles
- Elevation Gain: 250 ft.
- Trail Type: Loop
- Difficulty: Easy
- Trailhead Location: Either the Many Glacier Hotel or Grinnell Glacier Parking Lot
This is really just a nice, easy stroll around Swiftcurrent Lake. You’ll start from either the Grinnell Glacier Trailhead or the Many Glacier Hotel, and circumnavigate the entire lake, returning back to where you started. It’s essentially flat, and you hug the lakeshore for the majority of the hike.
This makes for a very pleasant afternoon walk, starting from the Grinnell Glacier Trailhead. From there, you’ll enter the forest and within a quarter mile, find yourself along the western shore of the lake.
Across the lake to your left is the Many Glacier Hotel, which I have to say is quite the location and ambiance, and to your right is the boat dock (which we’ll talk about below in the Grinnell Glacier Trailhead section).
Continue along the shore for a quarter mile, where you’ll reach a junction. To the right is the trail to Lake Josephine and Grinnell Glacier, to the left is the boat dock, and straight ahead is the trail around the lake.
Continue around the lake, stopping to admire the ever-changing views as you go. Eventually, you’ll make it to the Many Glacier Hotel, which is the perfect point to stop and enjoy a drink on the deck with lake views.
They have a store on the ground floor with a nice selection of beer, wine, and cider, and a bar on the side of the hotel closest to the main road.
After your intermission, continue along the north shore of the lake, which basically follows the main road that you took to get into the park.
Fishercap Lake and Redrock Falls
- Length: 3.8 miles
- Elevation Gain: 275 ft.
- Trail Type: Out and Back
- Difficulty: Easy
- Trailhead Location: Swiftcurrent Trailhead
This hike passes two lakes and ends at a multi-tiered waterfall. And it’s mostly flat, so it’s perfect for families and hikers who want a less aggressive option. The first part of the trail is a relatively gentle, shaded climb through the forest, and then the trail levels out for the second half of the hike out to the falls.
Start from the parking lot of the Swiftcurrent Motor Inn and head out to the west. Pretty quickly – about a quarter mile in (the sign says 0.7 miles, but we are highly skeptical), you’ll reach a turnoff down to Fishercap Lake.
This lake is special because it happens to be a fantastic spot to see moose! However, they mostly come out to snorkel for greens around dawn and dusk, so if you’re doing this midday, they might be resting and you’ll have to come back at a different time.
Continue along the trail, which gently rises and falls, until you reach the shore of another lake. Follow the path along the north shore and make your way to the west end of the lake, where you’ll find Red Rock Falls.
Take a second to explore – there’s a good viewpoint down and to the left of the falls, and then another one on the rocks basically in the middle of the falls – then continue back the way you came to finish out the hike.
The trail continues on to Bullhead Lake, ANOTHER alpine lake in this neck of the woods, and eventually up to Swiftcurrent Pass, which is just above the Granite Park Chalet and is one of the passes that connects Many Glacier to Going-to-the-Sun Road.
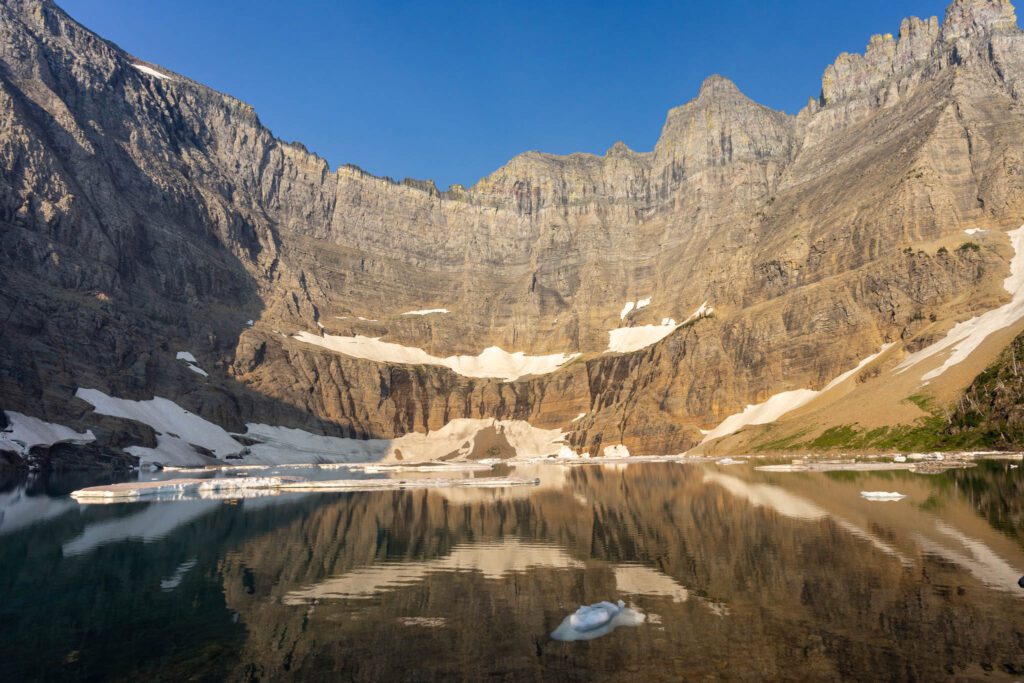
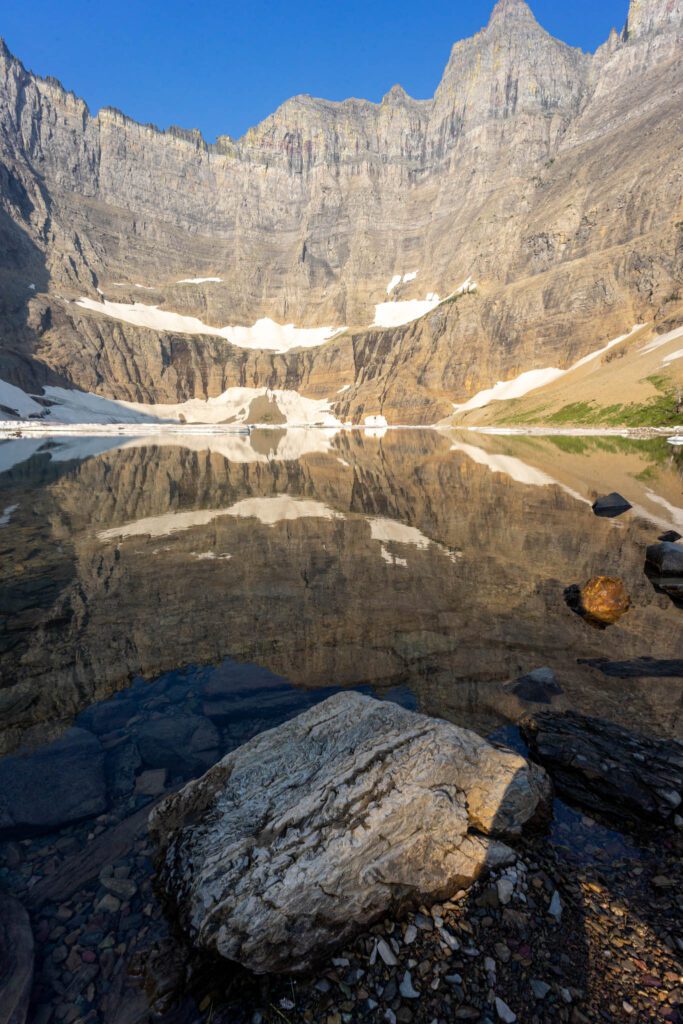
Iceberg Lake
- Length: 9.6 miles
- Elevation Gain: 1,765 ft.
- Trail Type: Out and Back
- Difficulty: Moderate / Hard
- Trailhead Location: Iceberg / Ptarmigan Trailhead
This hike was pretty good, if we’re being honest, but that might be because the next two hikes on this list – Cracker Lake and Grinnell Glacier – were both spectacular, and we did Iceberg Lake after tackling those two on back-to-back-to-back days.
The thing we like about this hike is the accessibility. It’s right around 10 miles, which is long, but not too long, and it doesn’t climb nearly as much as the Grinnell Glacier Trail.
Those two factors make it a great option for hikers who want a nice, moderate hike that will give them a good workout that also comes with a good payoff. But the trail itself isn’t particularly special or interesting.
The payoff, as you might have imagined based on the name, is a lake with icebergs in it.
We were pleasantly surprised at the fact that there were, in fact, icebergs in it despite record heat and record low precipitation in the winter. It’s tucked away into a basin, and you really don’t get your first glimpse of the lake until you’re basically on top of it.
The sunlight turns the water a bright blue hue, and it’s hard to figure out how exactly the icebergs are still there when it’s a summer day above 80 degrees.
The hike leaves from the Iceberg / Ptarmigan Trailhead, which is behind the Swiftcurrent Motor Inn. There are ~10-15 parking spots for cars at the trailhead here, and if it’s full you can park in the bigger lot in front of the Swiftcurrent Motor Inn, which adds a negligible distance to your hike.
One thing to know – the first mile or so of this trail is lined with berry bushes that ripen in the summer, which means it’s prime grizzly territory.
We were there around the third week of July, and there was a “bear frequenting” advisory on the trail that meant there was a pair of rangers at the trailhead giving people tips on how to avoid an encounter with a grizzly, which is bad news for both the human and the animal (be loud so the bear knows you’re there, yield the trail to the bear and give plenty of space, and be aware of your surroundings).
They mentioned that they may be closing the trail in the near future, so make sure to check the trail status at the ranger station before heading out.
You’ll start with a climb across a brush-heavy mountainside (where the grizzlies love the berry bushes), and emerge onto a ridge that has great views of the valley.
Then the trail enters the forest, and you’ll get to Ptarmigan Falls at the halfway point or so.
Unfortunately, you can’t really get a good viewpoint of the falls due to the terrain and the foliage. Immediately after the falls is the junction to Ptarmigan Lake. It’s well-signed, but you need to stay left (or continue straight) towards Iceberg Lake.
The trail emerges out of the forest back onto a mountainside, and you start to see where Iceberg Lake sits as you climb.
But, like I mentioned, you don’t really get a good view of the lake until you’re basically at its shore. There were some nice wildflowers in the meadows along this stretch of trail, especially right before you reach the lake.
There are two pit toilets along the way too. One right before Ptarmigan Falls, and one near Iceberg Lake.
Cracker Lake
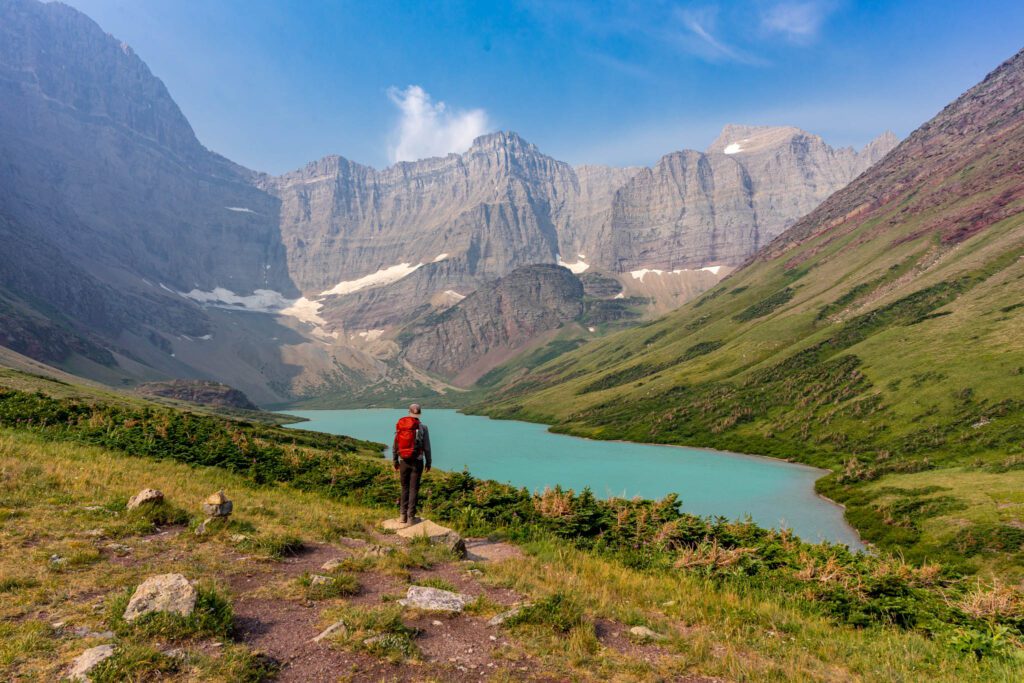
- Length: 12.2 miles
- Elevation Gain: 1,975 ft.
- Trail Type: Out and Back
- Difficulty: Moderate / Hard
- Trailhead Location: Many Glacier Hotel Parking Lot
We loved this hike, and one of the best parts about it is the lack of people on the trail. We saw a grand total of exactly 20 people – excluding backpackers who were already up there – on the entire hike up and down.
For context, we saw at least 10 groups of 15-20 people along the Grinnell Glacier Trail the day before, without counting the never-ending swarm of smaller groups between them.
If you’re looking for a less-crowded, equally spectacular hike in the Many Glacier area, look at Cracker Lake. It’s like Siyeh Pass in that it offers a great payoff with a fraction of the people.
The hike starts from the parking lot behind the Many Glacier Hotel, and shares the first bit of trail with horses. You can tell because there’s a LOT of horse poop along the trail, especially on the first half.
The trail starts with a meander through the forest before emerging onto the western tip of Lake Sherburne, passing through an area known as Cracker Flats. There are some nice views of the lake starting at about 0.8 miles in.
Then, you start climbing. At about 1.5 miles in, after you lose sight of the lake, the trail turns into switchbacks for a hot second – roughly a mile – before emerging onto a ridge. From that ridge, you have a great view of the creek below on your left side, with a peak rising thousands of feet above it.
From there, the trail levels out for almost exactly a mile, and the terrain starts to change from forest to a more rocky alpine terrain.
The trail gradually changes from dirt to little rocks (then it changes back to dirt again), and you pass through a couple of boulder fields where you should keep an eye out for pikas, little rabbit-like creatures that live in the crevices in the boulder fields and are just the cutest. If you’re passing through a rocky area and hear a high-pitched squeak, keep your eyes peeled for pikas.
Once again, you enter the forest briefly before you hit the home stretch, which involves a winding, climbing trail that traverses the mountainside on its way into a valley with three walls of towering rocky peaks.
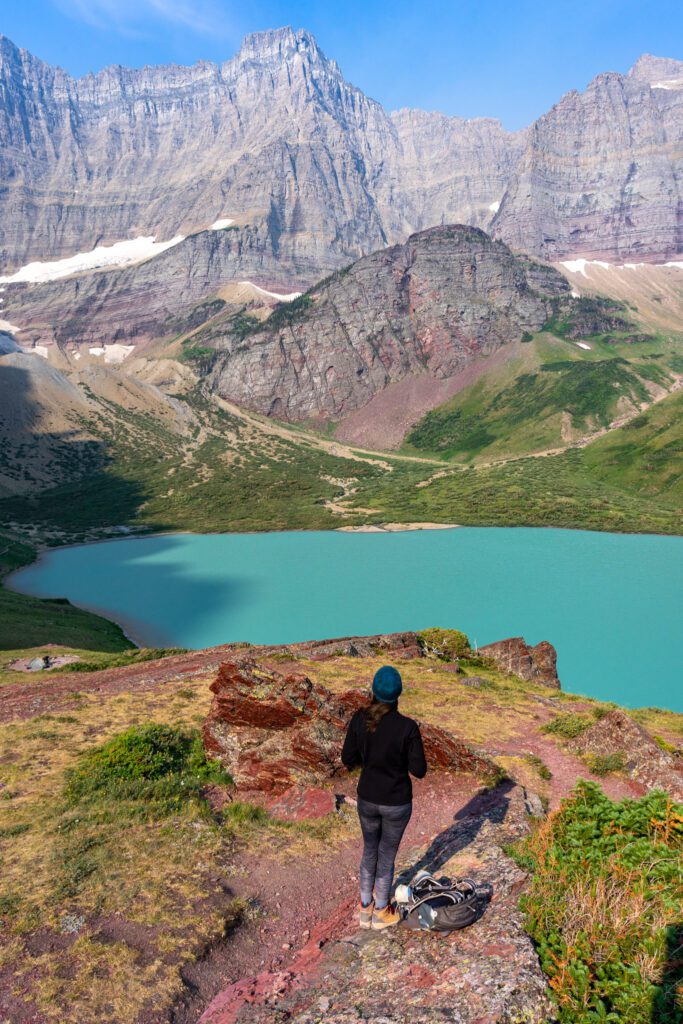
At the base of those rocky peaks is Cracker Lake, which is one of those alpine lakes with a turquoise color that has to be seen to be believed. The color is particularly stunning when the sun is out and high in the sky, and in the early summer the meadows above the lake are covered in all sorts of wildflowers.
Continue up to the bluff ahead, passing a pit toilet along the way that is literally right on the trail with a clear window, and be amazed at the 270-degree views of the lake and the valley.
There’s a backpacker campground here, which would be a great way to spend a night so you can catch the lake at sunrise and sunset.
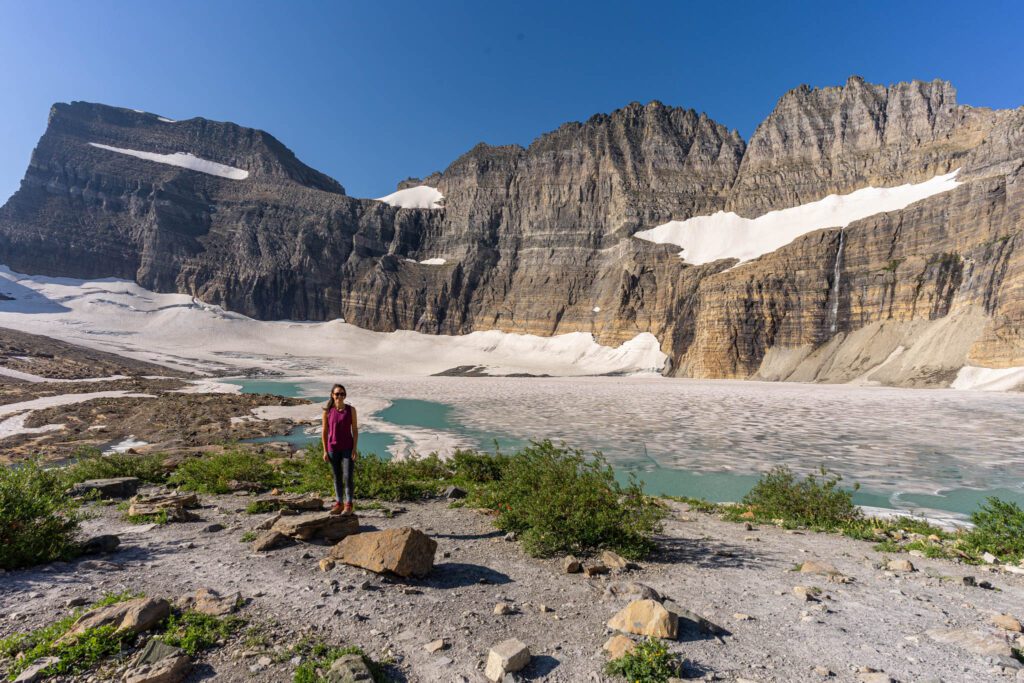
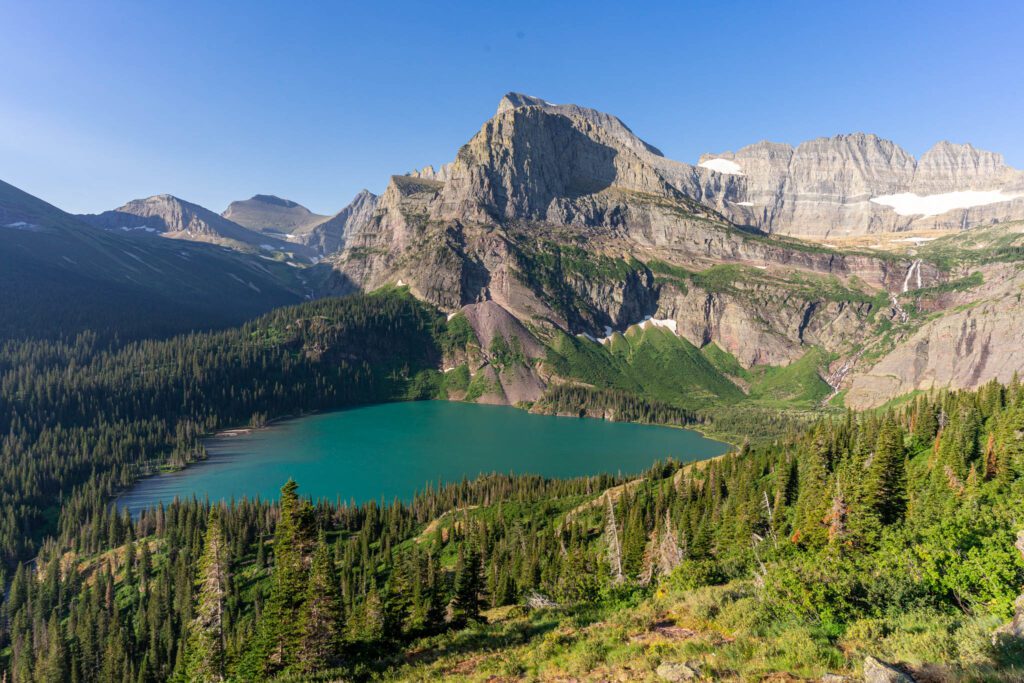
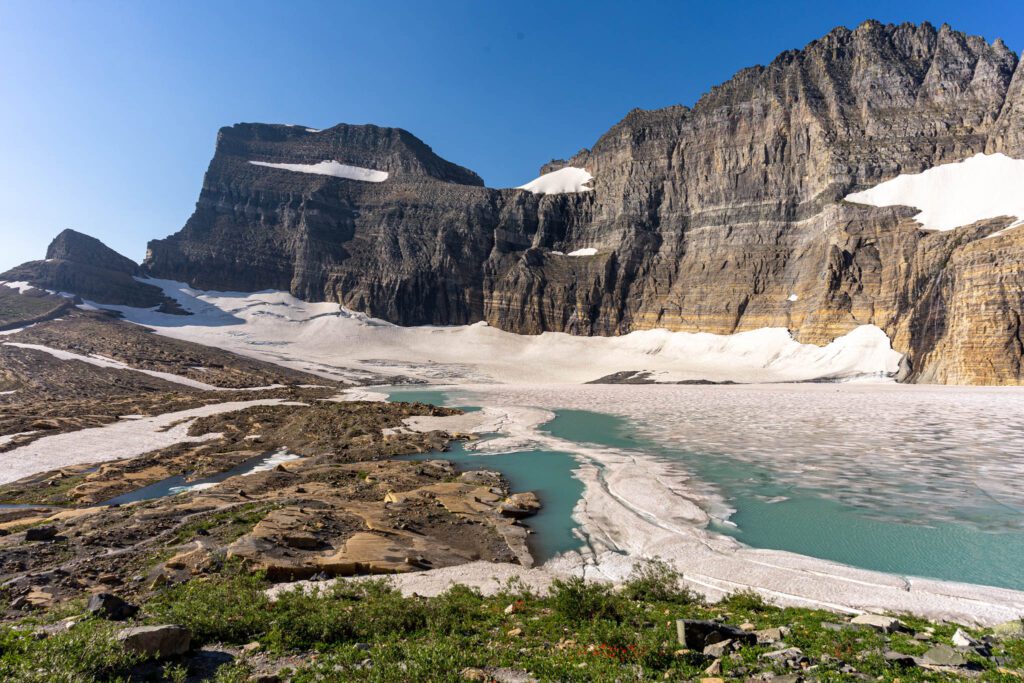
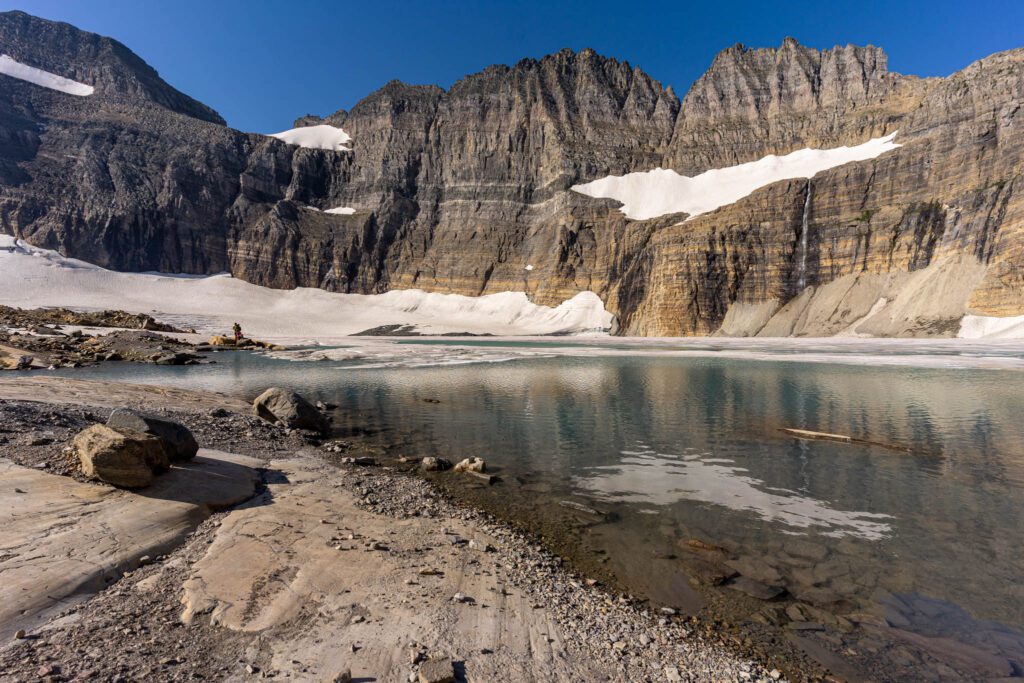
Grinnell Glacier
- Length: 10.5 miles
- Elevation Gain: 2,600 ft.
- Trail Type: Out and Back
- Difficulty: Hard
- Trailhead Location: Many Glacier Hotel or Grinnell Glacier Parking Lot
This is the hardest hike on this list, but the payoff is more than worth the effort it takes to reach it. You came to Glacier National Park, which means you probably are interested in seeing some glaciers. And this trail is one of the better ways to do that in the entire park.
There are a couple of tips we’d give you before you head out to tackle this hike.
- It’s crowded. Start as early as humanly possible and you’ll both get a parking spot and get the best light and have the trail all to yourself. 7:00 am or earlier is best.
- You can cut 3.4 miles off of your roundtrip hike by taking the boat shuttle from the Many Glacier Hotel, which costs $35. It crosses Swiftcurrent Lake, you disembark and get back on a boat to cross Lake Josephine, then take a connector trail to meet up with the main trail. We don’t think you should do this because it’s expensive for what it is, it doesn’t run early, and it cuts off the part of the hike that is basically a flat stroll along the lakeshore. But you do you, I suppose.
- You can do this hike either starting from the Grinnell Glacier Trailhead, or from the Many Glacier Hotel. It’s basically the same hike – both trails meet at the trail junction near the boat dock at the far end of Swiftcurrent Lake, and take the same path up. Parking is easier at the lot behind the hotel, but only marginally so.
The difference between this hike and, say, Iceberg Lake, is that every second of the last three miles of the hike up to the foot of the glacier is downright spectacular.
First, you climb a ridge and are met with incredible views of turquoise Grinnell Lake in the valley below, with the rocky face of Angel’s Wing rising above it. That view continues to get better and better the higher you get on the trail.
Then the hike emerges onto the mountainside, with alpine meadows full of wildflowers in the summer. The trail snakes ahead of you, and you can start to see views of the glacier as you approach.
The trickiest part of this hike is a waterfall crossing, which is really only an issue in the early summer when there’s enough water to make it annoying.
We were pleasantly surprised that the rocks under the waterfall weren’t really slippery at all, and the best option is to put your electronics away and take the main path, rather than trying to take the steep and slippery workaround that some people have tried to use down and to the left.
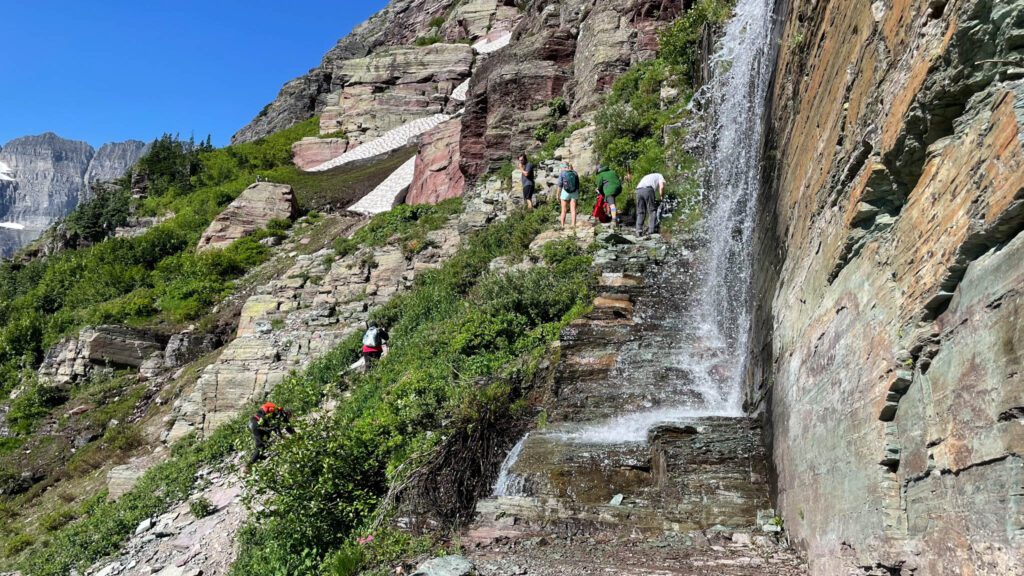
After the waterfall, the trail gets narrow and there’s a pretty steep dropoff at points, but it’s short-lived.
You’ll hit a single, steep switchback, and find yourself at a nice little shaded area with picnic benches and a pit toilet. This is the staging area for the final ascent to the glacier.
The last stretch of this trail is short but intense. You’ll climb a series of steep, rocky steps that snake their way up the mountain.
At the top, you’ll start to see why we loved this hike so much. The scale of what you’re looking at – the blue-green glacial pool, the multiple glaciers, the waterfall, and the Garden Wall are all in view. I could keep describing it, but words don’t do it justice, so here are some pictures.
The trail descends back the way you came. If you started early, be ready for long waits for endless groups of people to come up the trail. They have the right-of-way if they’re climbing!
We have an entire guide to hiking the Grinnell Glacier Trail, which goes into much more detail about the trailhead, boat shuttle, and the trail itself.
Other Hikes near Many Glacier to Consider
Many Glacier was our favorite part of the park, mostly due to the plethora of amazing hikes to choose from. There were so many that we didn’t make it to every hike on our list (we managed almost 40 miles in three days though!).
Here are some other hikes to consider in the Many Glacier area if you find yourself with more time, or are looking for something a little different.
Hey you! Planning a trip to Glacier National Park? Don’t miss our other Glacier travel guides to help you plan an incredible trip.