How to Plan a Perfect 3 Day Glacier National Park Itinerary
Alpine lakes. Towering rocky peaks. Moose, mountain goats, and grizzly bears. Glacier National Park, which straddles the Continental Divide, has 700 miles of hiking trails (we tackled 70 miles of them over the course of our week in the park), more than 100 named lakes (and another 500+ that remain unnamed), and a diverse range of flora and fauna thanks to its unique position perched between the great plains and the Pacific Northwest.
The namesake glaciers of the park are impressive, but the effect of running water, which has created vast valleys and cascading waterfalls, is the real hero of the geologic story of the park.
We spent a week in the park over the summer, when the weather is warm, wildflowers are blooming, and the hiking trails are clear of snow, and we loved every second of it.
In this guide to planning a perfect trip to Glacier National Park, we’ll go through the logistics you need to know to have a smooth and pleasant visit (and trust us, there are more than usual for Glacier) and give you a 3 day Glacier National Park itinerary that you can essentially copy and paste for your own trip.
A note: Normally, we put the logistics – like how many days, when to visit, and how to get around – at the end and get right into the meat of the itinerary. But the logistics are really, really important for Glacier National Park, so we’re going to have them up front for you to read through.

Disclaimer: Some of the links in this post, like hotel links, are affiliate links, meaning at no additional cost to you, we make a little bit of money if you click through and book. That being said, we would never recommend something to you that we don’t stand behind 100%.
A Geography Overview of Glacier National Park
Before we get into the meat of this guide, we need to take a second to talk through the park’s geography, because it’s VERY relevant to planning your trip.
Glacier National Park is in northwestern Montana, just south of the US border with Canada. The biggest towns nearby are Kalispell and Whitefish, which are outside the western edge of the park, and Shelby and Great Falls, which are outside the eastern entrance.
For the purposes of this guide, we’re going to break the park into three distinct areas. There are really five or six, but a few of them (Goat Haunt, Polebridge, and Two Medicine Lake) are a bit out of the way, and we’d recommend focusing your time unless you have more than four or five days in the park.
Those three regions are West Glacier and East Glacier at either end of Going-to-the-Sun Road, and Many Glacier, which is north of that stretch and is accessed via Babb, MT.
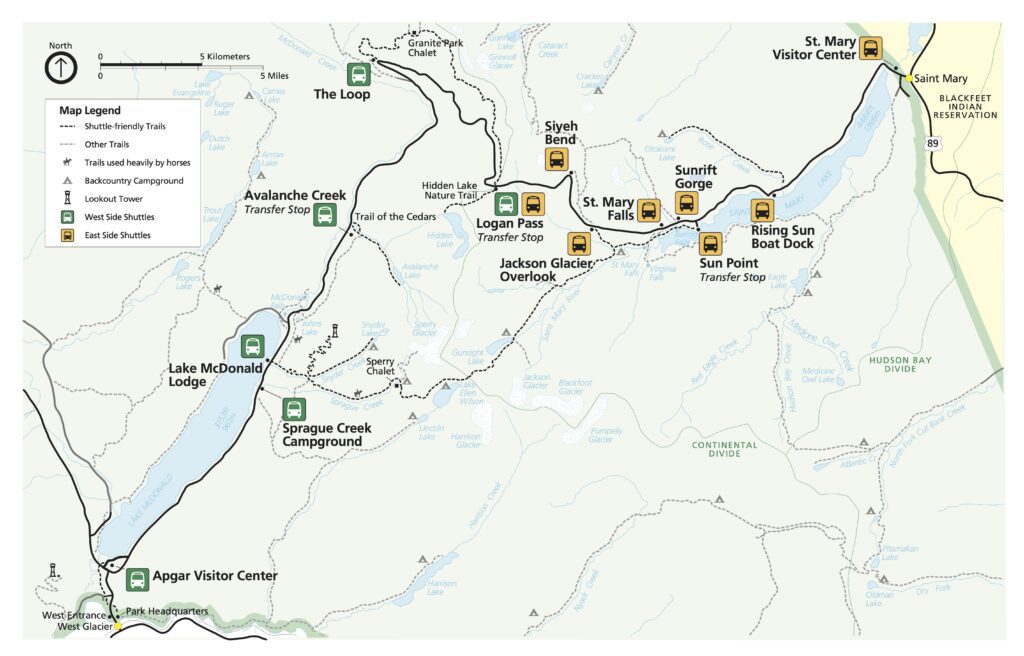
West Glacier
This is the stretch along Going-to-the-Sun Road from the West Entrance to Logan Pass, and is the most visited part of the park. It’s about 33 miles, and takes an hour and fifteen minutes to cover the whole thing without making any stops.
Along the way, you’ll find the Apgar Visitor Center, Lake McDonald Lodge, Avalanche Lake, the Loop, and the world-famous Highline Trail, one of the best hikes in Glacier National Park.
It ends at Logan Pass, which is at 6,500 feet of elevation and is the highest point in the park accessible by car.
East Glacier
This 17-mile stretch of Going-to-the-Sun Road starts at Logan Pass, and descends down to St. Mary Lake and the town of St. Mary, passing the Jackson Glacier Overlook, Baring Falls, St. Mary (and Virginia) Falls, and more.
It’s slightly less visited than West Glacier, but is still worth spending some time exploring. There are some places to stay around St. Mary Lake that would be a good backup option if you weren’t able to snag a spot near Many Glacier, which leads us to…
Many Glacier
If you like hiking, this is our favorite area of the three in the park. Many Glacier is not along Going-to-the-Sun Road. To get there, you have to leave the park through the east side, and reenter near the town of Babb, Montana.
There are an unbelievable number of amazing hikes leaving from trailheads nearby, and a few beautiful lakes that are right off of the road if you’re not up for a long trek. There’s also some great spots to see wildlife (including moose), and a cool boat tour to do.
We would highly recommend that you devote one day of your itinerary to Many Glacier, and stay the night if you can.
We’re going to use these three areas to help you organize your itinerary in the day-by-day section below, so we wanted to give you a crash course in Glacier National Park’s geography before we started throwing out terms that we haven’t explained.
Of course, it goes without saying that this is our way of slicing and dicing the park up into more digestible chunks, and there is plenty to do and see outside of these three areas.
How Many Days Do You Need in Glacier National Park?
We chose to write this guide for three days because we think it’s the perfect amount of time to spend exploring the park.
When we say perfect, we mean that it’s a good balance between making the most of your precious vacation days while still being able to get a sense for what makes Glacier special.
Obviously, it’s worth saying that you could spend weeks in Glacier and never run out of new things to do and see, but three days will give you a great taste of hiking in Glacier, driving Going-to-the-Sun Road, and exploring around Many Glacier.
Which, conveniently, are the three things we think you shouldn’t miss during your visit to Glacier National Park.
Why not two days? Two days means you’ll have to compress those three things into two days, which means either skipping a long hike (the hiking in Glacier is nothing short of spectacular) or skipping some stops along Going-to-the-Sun road, which is one of the most scenic drives in the country (and we’ve done a lot of the scenic drives on the west coast).
Can you see the park in two days? Sure. But we strongly recommend trying for three to give yourself more time and flexibility to explore the park.
It’s worth it, we promise!
If you only have two days, we have a suggestion for how to spend your time at the bottom of the itinerary below. We also have a one day itinerary for the park below, which involves driving Going-to-the-Sun Road from west to east.
Where to Stay at Glacier National Park
This is a complicated question that depends on your exact itinerary, but we’re going to do our best to cover it as well as we can.
Want more detail? We have an entire, detailed guide to choosing a place to stay in Glacier National Park that might be right up your alley.
Our number one tip is to spend a night in Many Glacier if you have two or three nights (or more). That part of the park was our favorite, and it’s a long way from the western side of the park to Many Glacier – too long for a day trip, we think.
If you have two days, spend the first day driving Going-to-the-Sun Road, then stay the night in Many Glacier, which is another hour or so from the eastern end of the scenic drive. Then, do a morning hike and make the journey back to the western end of the park.
If you have three days, follow the itinerary below, which has you spending the first night on the western side of the park, the second in Many Glacier, and the third back on the west side (or flying home).
Our second tip is to book as early as humanly possible, especially if you want to stay at a lodge or campground inside the park. Things literally get fully booked a year in advance, especially on summer weekends.
Reservations for lodges and hotels inside the park open 13 months in advance, and campground reservations for Fish Creek and Many Glacier open up 6 months in advance.
Staying Near West Glacier
By West Glacier, we’re referring to the western half of the park, roughly from the Apgar Visitor Center to Logan Pass along Going-to-the-Sun Road.
In West Glacier, you’ve got a couple of great options inside the park – both camping and lodges – along with a plethora of options outside the western park boundary.
It should be said that park lodges, while super convenient, are generally a pretty poor value for the money.
If you’re on a budget, you’ll want to either camp, or stay outside the boundaries of the park.
Inside the park, we think you should stay at either the Lake McDonald Lodge (reserve before you were born… or 12 months in advance), which is the best place to stay, or Fish Creek Campground (reservable up to six months in advance).
Camping Options Inside the Park: If you’re interested in camping, you should head over to the NPS site for information on camping in the park, which can be found here. Other options for camping on the western end of the park include:
- Apgar Campground: Huge campground right near the Visitor Center – reservations required.
- Sprague Campground: Along Going-to-the-Sun Road between the Visitor Center and Lake McDonald Lodge, reservations required.
- Avalanche Campground: At the Avalanche Lake / Trail of the Cedars trailhead along Going-to-the-Sun Road, reservations required.
Accommodations Inside the Park Near West Glacier: There are two other non-camping options located in Apgar Village (near the Visitor Center) – Village Inn at Apgar and Apgar Village Lodge & Cabins. Both are basic, and relatively expensive for what you’re really getting (which is par for the course with hotels inside National Parks, in our experience).
Staying in the Town of West Glacier: Just outside the park entrance, this is the most convenient option outside the park. The tradeoff is that there are just a few, expensive amenities (grocery store and gas), and only a couple of places to stay. Stay here if you want the closest possible location to the park entrance without paying the premium for staying inside the park.
Staying Between Coram and Hungry Horse: This is a good blend of convenience (15 minutes to the Visitor Center) and amenities (plenty of bars, restaurants, groceries, and gas). Plus, there’s some legitimately cool places to stay – like glamping at Under Canvas, or the cozy cottages at Paddle Ridge.
Staying in Whitefish: If you’re okay with a little bit of extra driving (it’s 30 minutes away from the Visitor Center), Whitefish is a cool little mountain town that is the best city near Glacier National Park. There are some great coffee, bars, restaurants, and more. Plus, Whitefish Lake is two minutes outside of town! If you want to be in the heart of all the action, stay at the Firebrand Hotel, a cool boutique hotel in the center of town. Otherwise, look at the rustic cabins at the North Forty Resort or the Lodge at Whitefish Lake, both of which are a bit outside of town.
Staying in Many Glacier
Unfortunately, you only have a few options at Many Glacier, and most are inside the park and book up FAST.
If you’re not into camping, then you have two options. The Many Glacier Hotel is gorgeous, right on the shore of Swiftcurrent Lake, and is going to cost you. The Swiftcurrent Motor Inn (heads up – it’s closed for improvements in 2025) is a little less spectacular, and thus a little bit more affordable.
If you’re camping, the only option is Many Glacier Campground (we stayed here, and it was great – walkable to most of the trailheads!) which you can reserve up to six months in advance.
If you can’t find a place to stay near Many Glacier, your other options are the town of Babb, MT, or near St. Mary Lake in East Glacier (look at Rising Sun Campground and St. Mary Campground, or Rising Sun Motor Inn for non-campers).
Hey you! Planning a Glacier National Park trip? Don’t miss our other Glacier travel guides to help you plan an incredible trip.
Getting Around Glacier National Park
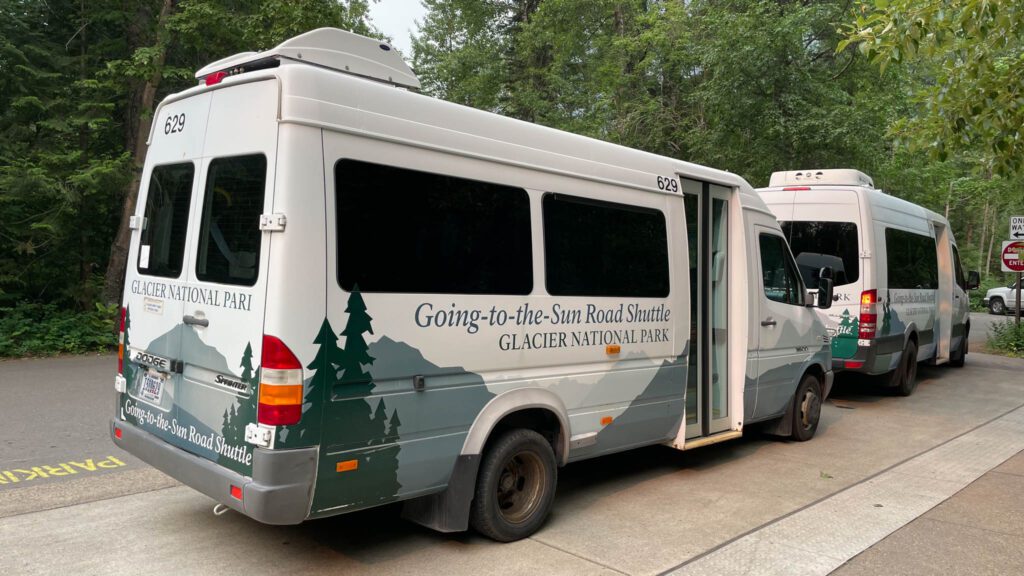
There are two options for getting around the park: driving and the park shuttle.
Driving gives you the most flexibility, but the tradeoff is that parking can be a nightmare.
The park shuttle, which basically has two lines that run along Going-to-the-Sun Road from the western and eastern ends of the park and meet at Logan Pass (the center), is a good option if you want to opt out of the parking nightmare OR your car will struggle with the 3,500 foot climb to Logan Pass (our van was not pleased about it).
With that being said, it’s really a “why not both?” situation.
You should absolutely have a car in Glacier National Park so that you can explore Going-to-the-Sun Road at your own pace, but you should utilize the park shuttle to get to the park’s most popular trailheads for your hikes and avoid getting into a fight-to-the-death for a parking spot or waking up at 4:30am every day (there’s no third option).
We did the drive-to-every-hike thing until we realized the shuttle was a better option and allowed us to sleep in just a bit.
In the guide below, we’ll cover when to use the park shuttle and when to drive in the day-by-day itinerary.
A note on bigger vehicles in Glacier National Park: Vehicles over 21 feet long, 8 feet wide, or 10 feet high are prohibited along Going-to-the-Sun Road. It’s narrow, steep, and at times, short. You can travel from the west end of the park to the east end of the park via Highway 2, which is outside the park to the south, but you’ll be missing all the great stops along the scenic drive. If you have an RV, plan on parking it at the campground or Visitor Center and utilizing the shuttle.
Things to Know Before You Visit Glacier National Park
Here are a few things you’ll need to know as you’re getting into planning a trip to Glacier National Park.
The most important part here is the vehicle reservation, which you will need to enter Going-to-the-Sun Road, Many Glacier, or North Fork. There will be some logistics involved in juggling those different permits.
For the most up-to-date information on entry reservations, we’d head straight to the NPS site, which has a handy map (which you’ll also find below) and an extensive FAQ section.
We also have a section below on the Going-to-the-Sun Road permit system, which is probably the most important permit to secure before your trip.
Vehicle Reservation Requirements
Most importantly, you will need a timed entry vehicle reservation to enter certain areas of the park.
Below is an example of the specific dates and times from 2024, but be aware that the requirements tend to change year to year. Always check the NPS site for the most up to date information.
In 2024, a vehicle reservation was required for three areas of the park: Going-to-the-Sun Road (coming from the west near Apgar), the North Fork, and Many Glacier from 6 am to 3 pm. Each location has unique details and requires a separate vehicle reservation.
Please see the details of each area below. Visitors were able to access the Going-to-the-Sun Road from the east side at St. Mary and Two Medicine without a vehicle reservation.
- Required for each vehicle entering through the West entrance and North Fork from May 24 through September 8, 2024, from 6:00 am to 3:00 pm.
- Required for each vehicle entering through Many Glacier from July 1 through September 8, 2024, from 6:00 am to 3:00 pm.
- St. Mary and Two Medicine entrances do not require vehicle reservations in 2024.
Tickets are released 120 days in advance on a rolling basis starting at the end of January, and they go on sale at 8:00 am Mountain Time on the dot.
Get on within five minutes of them being released for the best shot at getting a timeslot you want. Seriously. It costs $2 per entry reservation.
The other booking window is 7:00 pm Mountain Time for next-day entry.
Entry tickets are good for one day, so you will need multiple entry tickets for your trip. You do need one entry ticket per vehicle, if you have multiple cars / groups.
Park Entrance Fees
It costs $30 per vehicle to enter Glacier National Park (good for 7 days), and you can either pay online in advance (be aware that you must print it out and bring it with you), or at one of the park’s visitor centers.
If you are planning on visiting three or more national parks in the next 12 months, we’d highly recommend an America the Beautiful Pass, which covers entry to all national parks, national forest trailheads, national monuments, and more for 12 months.
It costs $80, which means it pays off with three national park visits (or some combination of national parks, forests, and monuments).
Get Gas Outside the Park
Once you’re in the park, there’s a lot of long drives, and exactly zero gas to be had. Make sure you fill up before you enter the park, either on the western end in West Glacier, or in St. Mary on the eastern side.
The Park Shuttle
There is a free park shuttle that runs from Apgar Visitor Center at the western end, all the way up to Logan Pass and down to St. Mary Visitor Center at the eastern end of Going-to-the-Sun Road.
Utilizing the shuttle is a great way to avoid a) huge crowds at parking lots along Going-to-the-Sun Road (seriously – the parking lot at Logan Pass is often closed to new cars by 9:00 am), and b) driving a steep, narrow road that is downright stressful to drive.
We’d highly recommend using it.
Bears
Yes, you heard correctly – there are bears in Glacier National Park. Two types, in fact. Black bears, which are largely harmless as long as you keep your distance, and Grizzlies, which are a little more complicated.
Rather than give you everything you need to know about bear safety, we’re going to direct you over to the NPS and their advice on visiting bear country.
Two tips to definitely keep in mind are to hike in groups of at least two (but ideally four or more) and to carry bear spray.
Book Everything (Well) in Advance
Glacier is a popular park, and the infrastructure is already stretched thin in terms of the number of visitors that the park can accommodate.
Make sure you have your camping or lodging reservations and entry permits booked well in advance, because they will sell out for the summer months.
There are parts of the park where you won’t have cell service, like at the Logan Pass Visitor Center. We like to download offline Google Maps of places we’re visiting because it gives you the ability to navigate even if you don’t have service.
Here’s a guide on how to download offline maps.
3 Days in Glacier National Park: A Complete Itinerary for First Timers
Now that we’ve got all those logistics covered, on to the best part – the actual itinerary!
We’ve outlined a 3 day itinerary for you below, with options to turn it into one and two day versions below that.
Day 1: Going-to-the-Sun Road
On your first day in the park, you’ll drive the entirety of Going-to-the-Sun Road from start to finish – Apgar to St. Mary – making all sorts of amazing stops along the way that feature everything from short hikes to stunning waterfalls to glacier overlooks on the side of the road.
Then, head up to Many Glacier, our favorite part of the park, to spend the night to put yourself in position to tackle a hike in the morning.
We’re not going to give you every single viewpoint you should stop at – there are too many to count. Instead, we’ll give you the ones we liked the best so you have a starting point for your own drive.
For this particular itinerary, we recommend driving Going-to-the-Sun Road from the West Entrance (at the Apgar Visitor Center) to the East Entrance (near the St. Mary Visitor Center).
We’re recommending that you drive it in this direction for two reasons.
First, most of the pullouts are on the right side of the road as you’re heading up to Logan Pass and beyond.
Second because we want you to end up in Many Glacier for the night, which is accessed from the east side of the park.
Remember, you currently need a park entry pass to drive along Going-to-the-Sun Road between 6am and 3pm – they won’t even let you enter the park between those hours if you don’t have one.
If you aren’t one of the lucky ones, you need to make sure you’re through the entrance station gate before 6am.
Here are some of our favorite stops along Going-to-the-Sun Road, in chronological order if you’re driving from west to east.
Transportation for the day: Drive yourself
The Apgar Visitor Center
We always recommend stopping at the Visitor Center to check in on trail conditions, road conditions, and weather. The Apgar Visitor Center has a tiny store too, if you’re looking for a souvenir (we always get stickers).
Lake McDonald Lodge
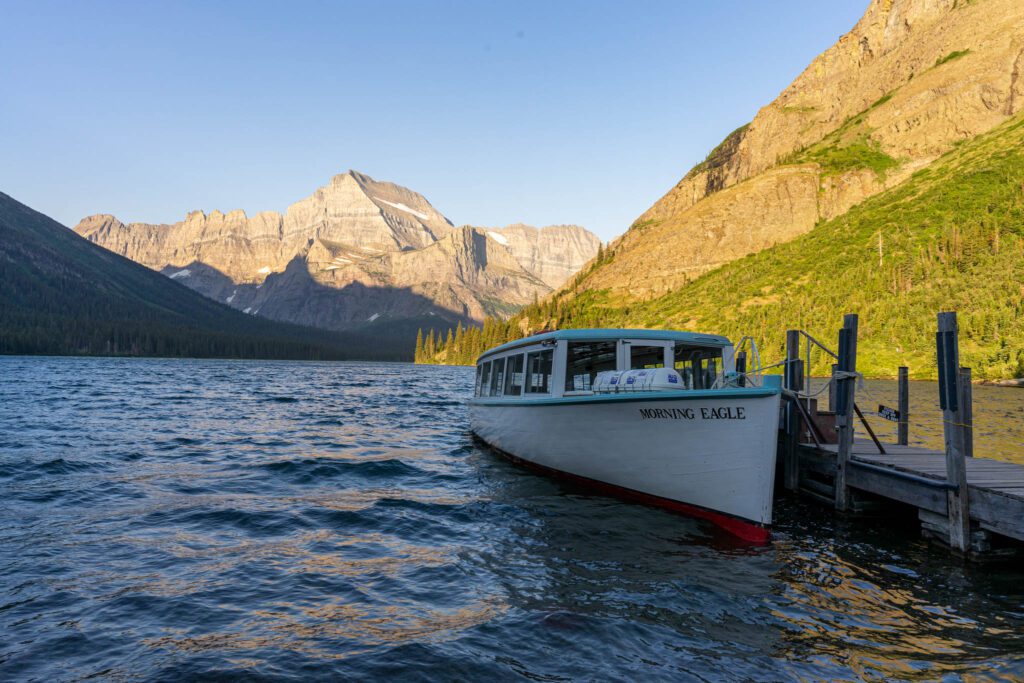
A rustic-yet-opulent lodge set on the shores of Lake McDonald, as the name might suggest. You can stop here to grab coffee, take a boat tour of the lake, or just head down to the lakeshore to check out the multi-colored rocks in the crystal clear water.
Trail of the Cedars / Avalanche Lake
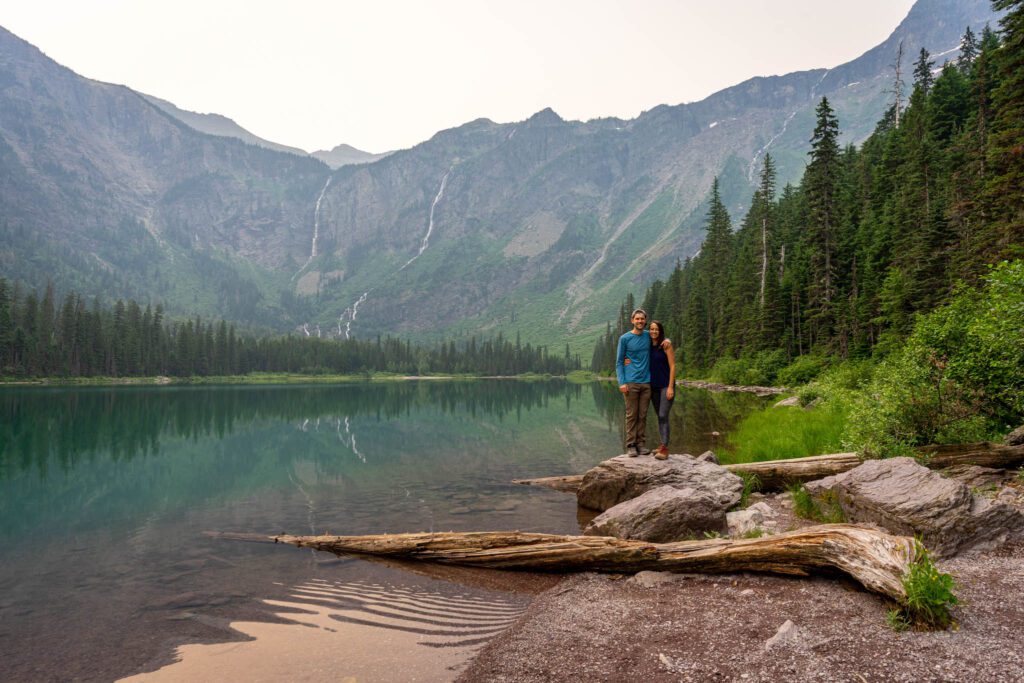
This is your first hike of the day! Avalanche Lake is a 5.5 mile hike with 750 feet of elevation gain (round trip).
It’s relatively easy – we saw kids as young as four or so – and the payoff is a beautiful lake backed by rocky peaks and featuring a waterfall in the distance across the lake.
Along the way, you’ll follow Avalanche Creek and tackle a second, shorter hike called Trail of the Cedars. Don’t miss Avalanche Gorge and its brilliant blue water. When you arrive at Avalanche Lake, you’ll be on the northwest shore.
The trail continues south along the western shore, which is far less crowded and would make a good spot to stop and relax before heading back down.
Parking can be tough at the trailhead here – when we were there, it was routinely full by 6:30am, but people rotated through especially because most people seemed to be doing the shorter Trail of the Cedars.
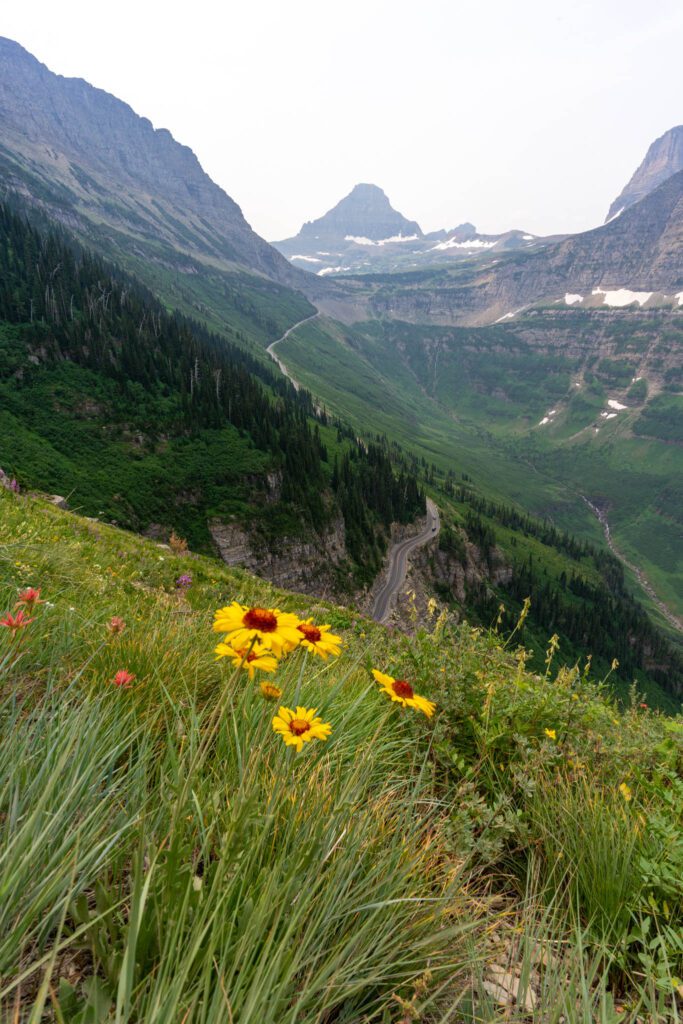
The Loop to Logan Pass
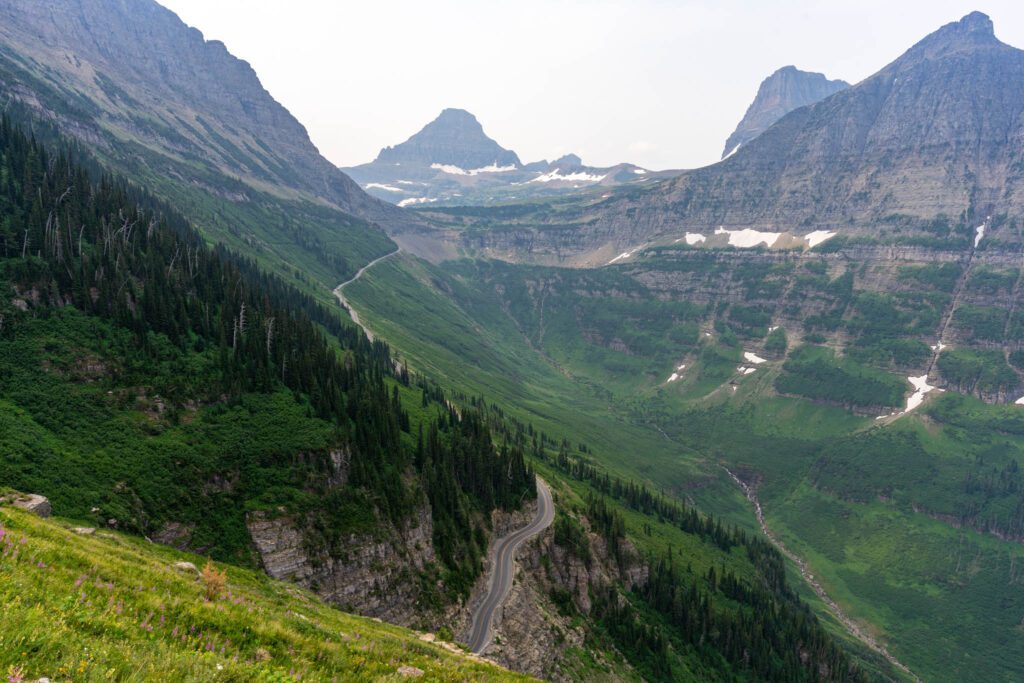
The only real reason to stop at the Loop is for the view across the valley to Heavens Peak and the cascading waterfall careening down its face.
From here on out, the road climbs aggressively up to Logan Pass, and there are a number of pullouts along the way with spectacular views of the valley.
The road is very narrow at points (remember, no vehicles over 21 ft tall, 8 ft wide, or 10 ft tall on this part of the road).
You’ll pass the Weeping Wall, which is a trickling waterfall that comes off a rock ledge onto the road, and the Triple Arches, which are three arches carved into the rock under the road to support it and span the chasm between them.
Neither has a pullout where you can stop and get a good view, so you’ll have to see them as you’re driving.
As you approach Logan Pass, you’ll start to see the Highline Trail, one of our favorite hikes in the park, right above the road.
Logan Pass and The Hidden Lake Trail
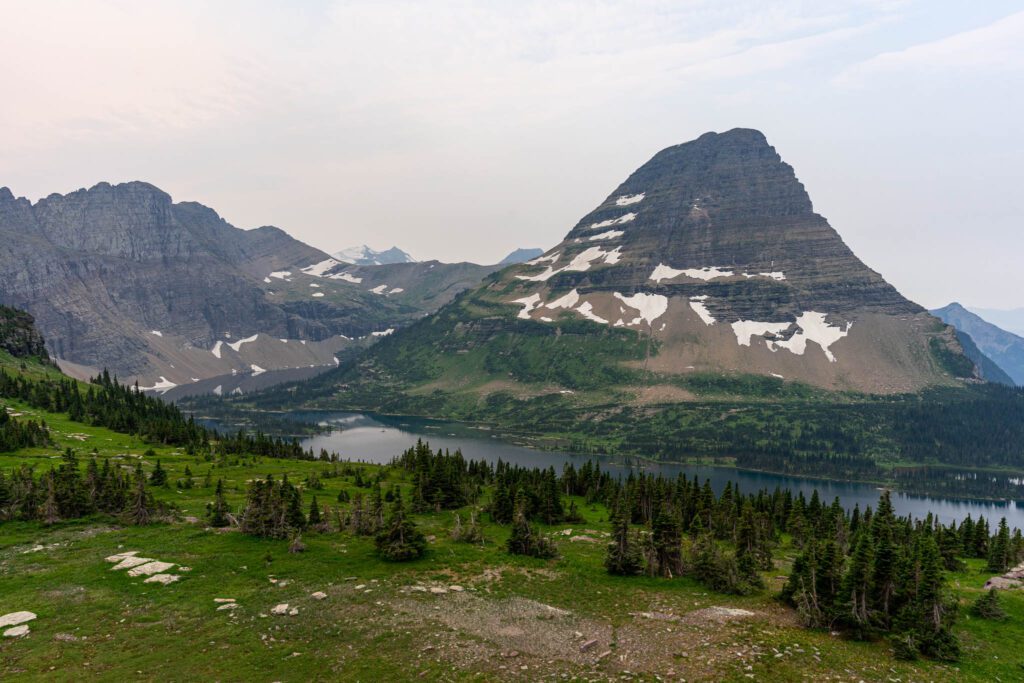
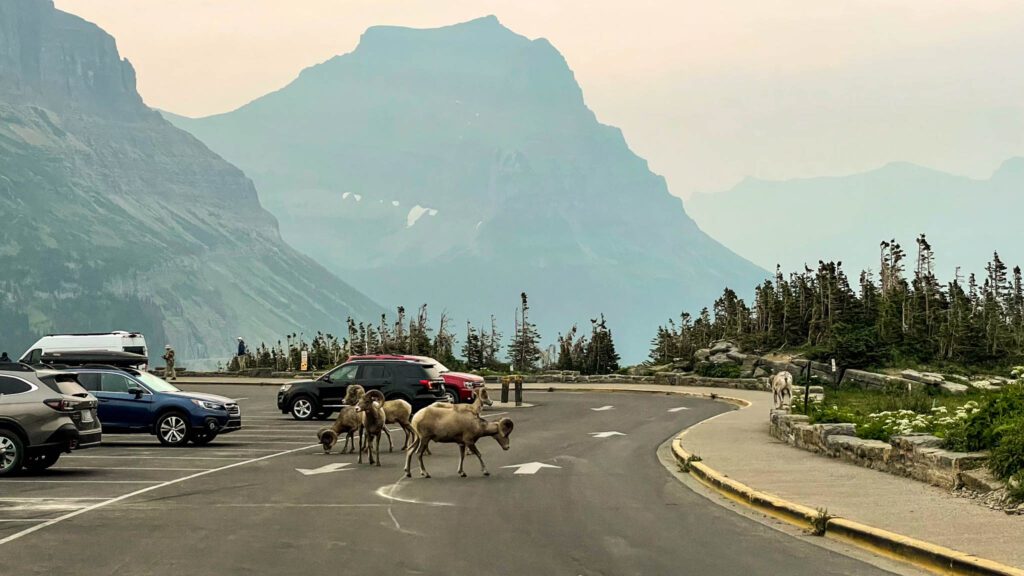
First of all, there’s a good chance you won’t be able to park at Logan Pass, which is right on the Continental Divide, sitting at 6,600 feet above sea level.
The lot is full by 7am at the latest, and they completely close it to new vehicles by 10am (they don’t let you line up, and only let a few cars in at a time).
That being said, it’s okay! We have you taking the shuttle to Logan Pass on day 3 of this itinerary to avoid the whole parking nightmare.
If you do happen to get a parking spot, take it and do the hike to the Hidden Lake Overlook, which is a beautiful stroll through alpine meadows and gives you a great chance to see wildlife like Bighorn Sheep and Mountain Goats. There was a group of sheep in the parking lot when we were there.
Jackson Glacier Overlook
When you get to Logan Pass, you’re more than half way through the drive.
The road, which is right around 50 miles total, takes 33 miles to climb 3,000+ feet to Logan Pass from Apgar, then 17 miles to descend 2,000 feet to St. Mary. Right as you leave Logan Pass the road starts to descend.
You’ll pass Siyeh Bend, then arrive at the Jackson Glacier Overlook. From here, you have a nice view of the shrinking Jackson Glacier, which is one of the largest glaciers in the park, though it has receded quickly over the past 100 years.
There’s some great signage talking about the history of the glacier, and comparing the size in 1911 to 2009.
St. Mary and Virginia Falls
Shortly past the Jackson Glacier Overlook, you’ll reach the parking lot for St. Mary Falls.
This is the start of your second short hike of the day, which takes in two waterfalls in a short and easy 3.5 mile hike (450 feet of elevation gain) starting from the St. Mary Falls Trailhead.
The hike to Virginia Falls, which is the further one from the parking area, is worth the effort to get there. Along this trail, there are countless unnamed cascades that are super photogenic. St. Mary Falls is at 0.6 miles in, and Virginia Falls is at 1.7 miles in.
Baring Falls
Another waterfall, this one is a short and flat 0.6 mile hike out and back from the Sunrift Gorge parking area. Because of its accessibility, it’s crowded. And a fire decimated the forest in this stretch of the park, so it’s fairly exposed. Still, it’s worth the stop.
St. Mary Lake
This isn’t really a stop, but you spend the last eight miles or so of road on the shore of St. Mary Lake, which is the second biggest lake in the park (after Lake McDonald).
It’s 10 miles long, 300 feet deep, and consistently very, very cold. It’s 1,500 feet higher than Lake McDonald, which means the water stays colder throughout the season.
The stretch of road along the northern shore of the lake is prime bear habitat, especially the last few miles as you get closer to the end of the road and berry bushes line the shores of the lake.
It’s a good bet that there will be bears here in the hours around dusk.
There are two stops worth making here.
The first is the famous Wild Goose Island Lookout, which gives you a view over a tiny, tree-covered island out in the middle of the lake with rocky peaks of the Continental Divide rising thousands of feet above the lake in the background.
The second is the Rising Sun Picnic Area, where you can get out, have a snack, and get down to the lakeshore.
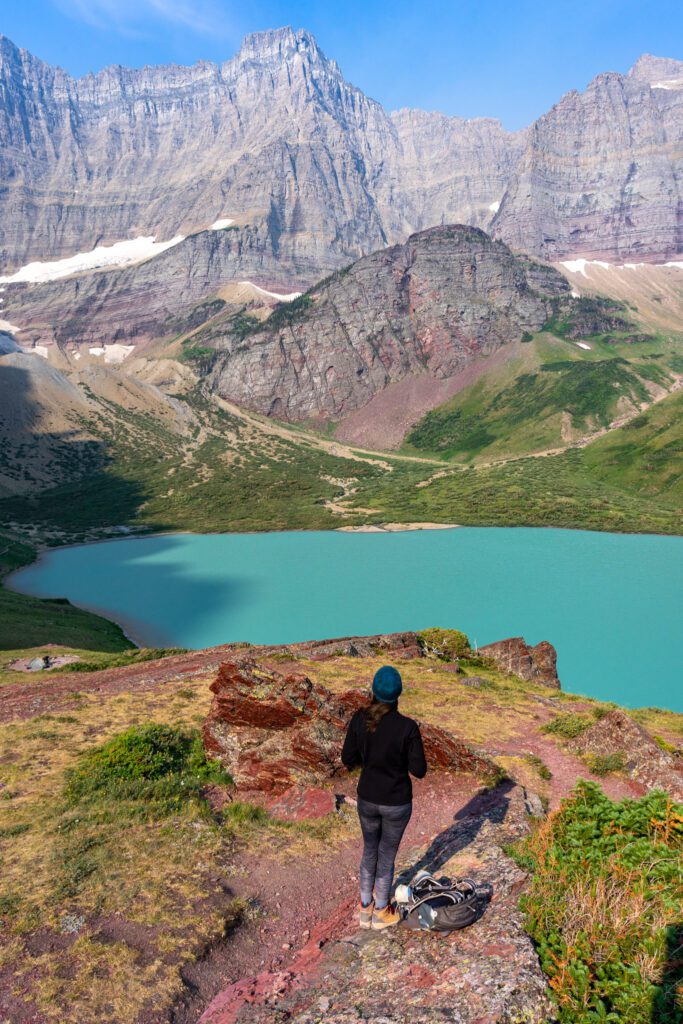
Fishercap Lake at Dusk
When you hit the end of the road, head north towards the tiny town of Babb, Montana, which is where you’ll enter the Many Glacier region.
The road from Babb to the Swiftcurrent Motor Inn (the biggest parking lot in the area) is either a) bumpy and dusty or b) under construction.
The only time they can do work on this road is during the summer, which is also when there are the most people visiting the park. You may have to wait for up to 30 minutes for the road construction, so be prepared for that.
As you get closer to Many Glacier, you might notice the dense collection of berry bushes along the highway.
This is prime bear habitat when the berries are ripe during the summer, and if you see a bunch of cars pulled over to the side of the road, that’s a good cue that there’s some kind of wildlife there.
You’ll pass Sherburne Lake, then Swiftcurrent Lake on your way to the parking lot outside the Swiftcurrent Motor Inn, which is your destination for the evening.
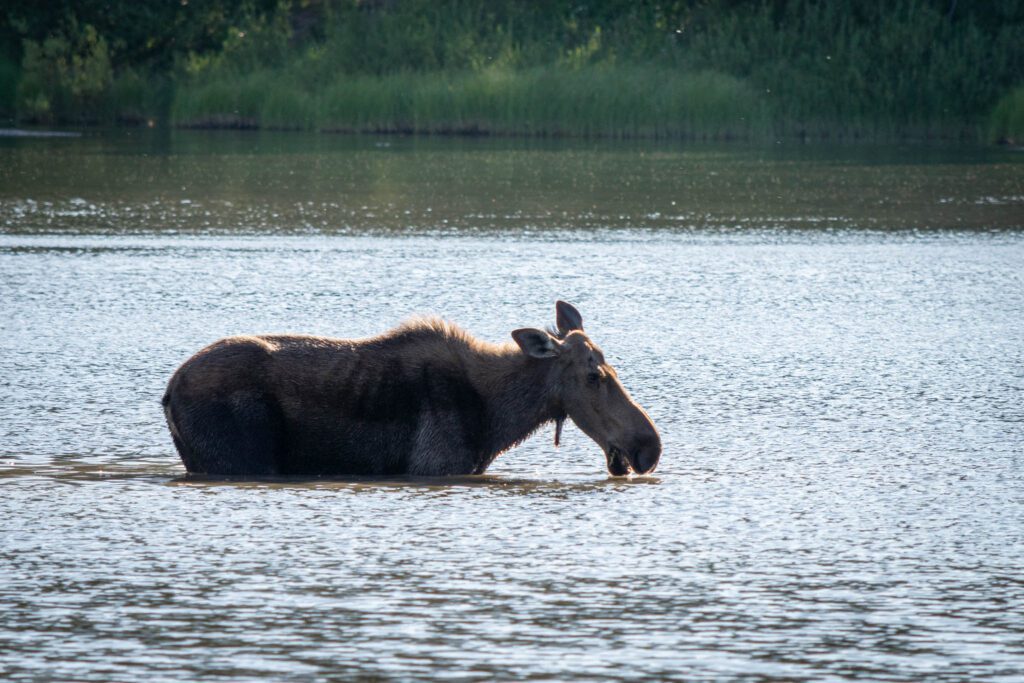
The main attraction for the evening, besides getting situated wherever you’re staying, should be Fishercap Lake. It’s a short 0.3 mile hike out to the west from the Swiftcurrent Motor Inn, and it’s a fantastic place to see moose!
We went twice – once midday, and once in the evening. We saw a moose snorkeling in the lake in the evening, and dusk and dawn are generally the best time to see them out there.
After you’ve (hopefully) seen your fill of moose, head to your accommodations for the evening and call it a day.
Day 2: Exploring Around Many Glacier
Start your day bright and early to tackle one of the hikes around Many Glacier (we’ll give you some options below). End your day by driving back to the western side of the park.
This was our favorite part of the park. The plethora of alpine lakes. The wildlife. The Many Glacier Hotel. And the fact that you don’t need to worry about shuttle reservations! In fact, most of the trailheads and attractions are walkable from where you’re staying if you’re spending the night inside the park.
If you aren’t able to get a shuttle reservation, you could easily spend your three days exploring Many Glacier alone.
We hiked 40 miles of trail here over the course of three days. If you like hiking, you’re going to love this part of the park. That’s why we insist you spend at least one night over here!
Transportation for the day: Drive yourself (or walk to the trailhead, if you’re staying in the park!)
A Morning Hike: Choose Your Own Adventure
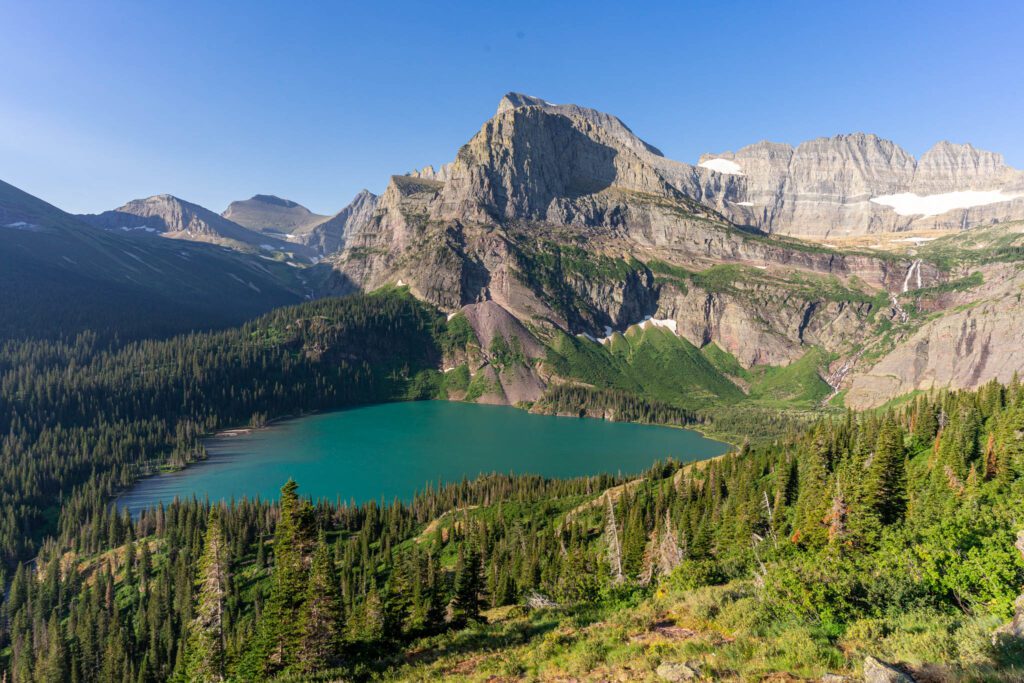
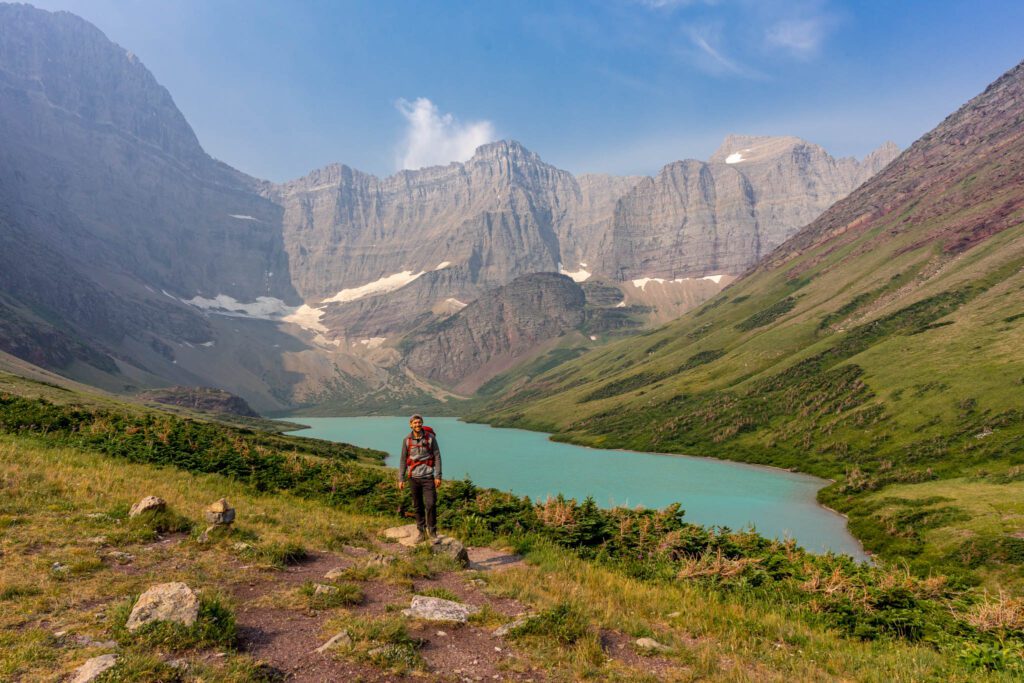
The best hike in the park, at least in our mind, is the Grinnell Glacier Trail.
It starts from either the Grinnell Glacier Trailhead or the Many Glacier Hotel (it’s actually the same distance and elevation gain, roughly) and climbs up into the high alpine terrain above Lake Grinnell.
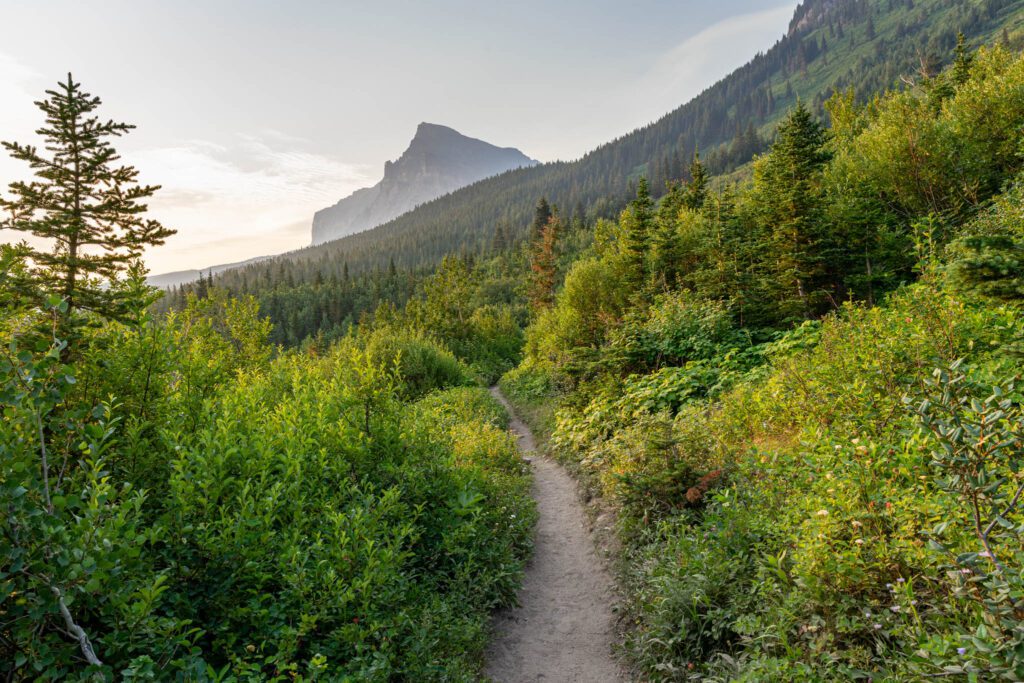
From the trail, the views over Lake Grinnell and Angel’s Wing (plus tons of waterfalls) are worth the climb. You’ll start in the forest, and ascend into alpine terrain, which is decidedly more rocky and less green.
It’s a strenuous hike, covering 11 miles there and back, and climbing 2,400 feet along the way. The first two miles of the trail follow along the shores of Swiftcurrent Lake and Lake Josephine.
Then, the trail starts climbing aggressively, and about half a mile into the climb you’re treated to your first view of Lake Grinnell and Angel’s Wing, which only get better as you continue to climb.
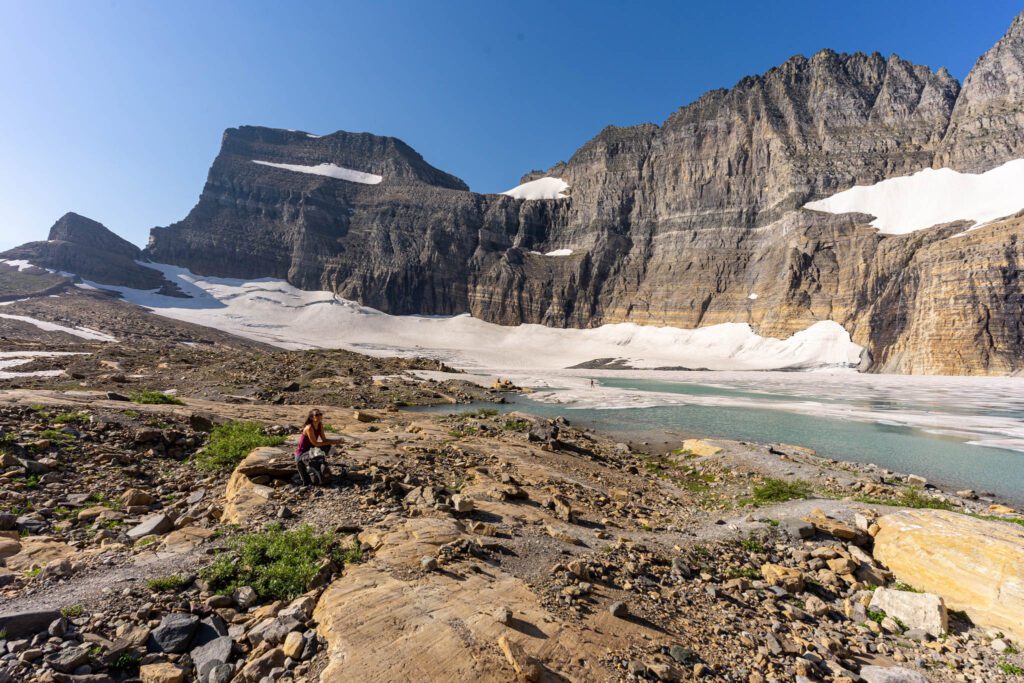
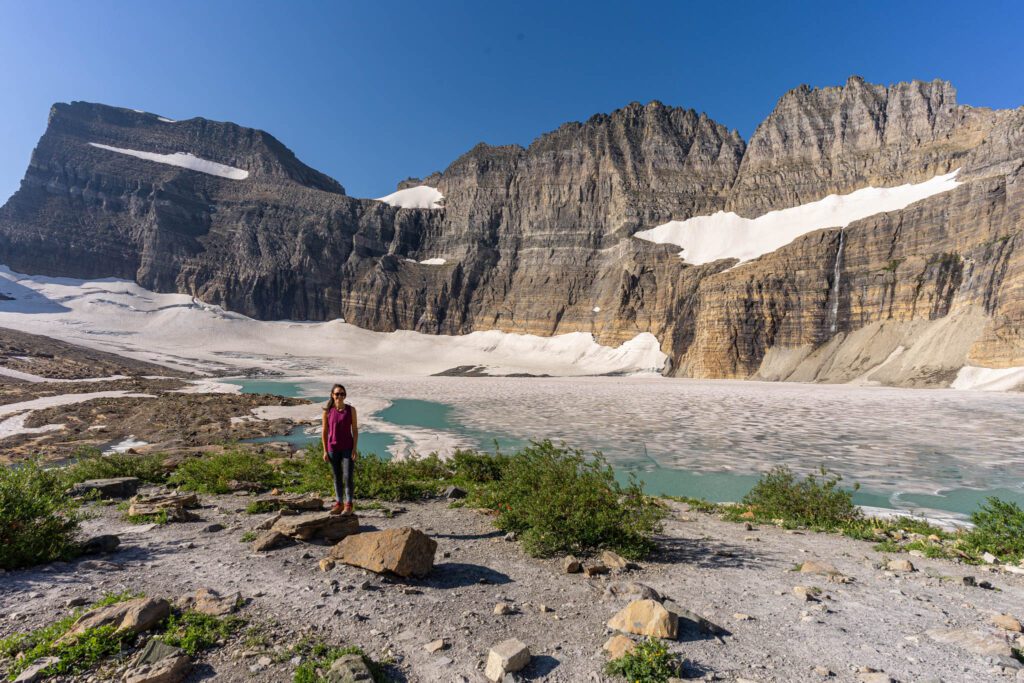
The trail climbs up to a picnic area with benches and a pit toilet, where you can stop and rest in the partial shade before tackling the final climb up to Upper Grinnell Lake and the glacier itself.
The blue-green glacial water and the pieces of glacier are well-worth the effort. You’re in Glacier National Park after all, you should probably see a glacier before you leave.
There’s a boat shuttle that starts from the Many Glacier Hotel, crosses Swiftcurrent Lake, crosses Lake Josephine, and drops you at the far end of Lake Josephine.
The good news is that it cuts off 3.4 miles of the trail, shortening this hike significantly.
The bad news is that it cuts off the easiest part of the hike, which is essentially just a flat stroll along the lakeshore. It costs $35 per person, so unless you’re excited about the boat ride itself, we wouldn’t recommend it.
This hike is crowded, but worth braving the crowds. Get a pre-8am start to beat the crowds on the way up and have the trail basically to yourself.
If you’re looking for a less-crowded hike, we really liked the hike up to Cracker Lake, which is 12 miles long and ends at another gorgeous blue-green alpine lake. A similar (but slightly more crowded option) is Iceberg Lake, which we also did and enjoyed.
For a shorter, more family-friendly hike, check out the Swiftcurrent Lake Lakeshore trail that circumnavigates the lake, or the short and mostly flat trail out to Redrock Falls (past Fishercap Lake).
A Drink at Many Glacier Hotel
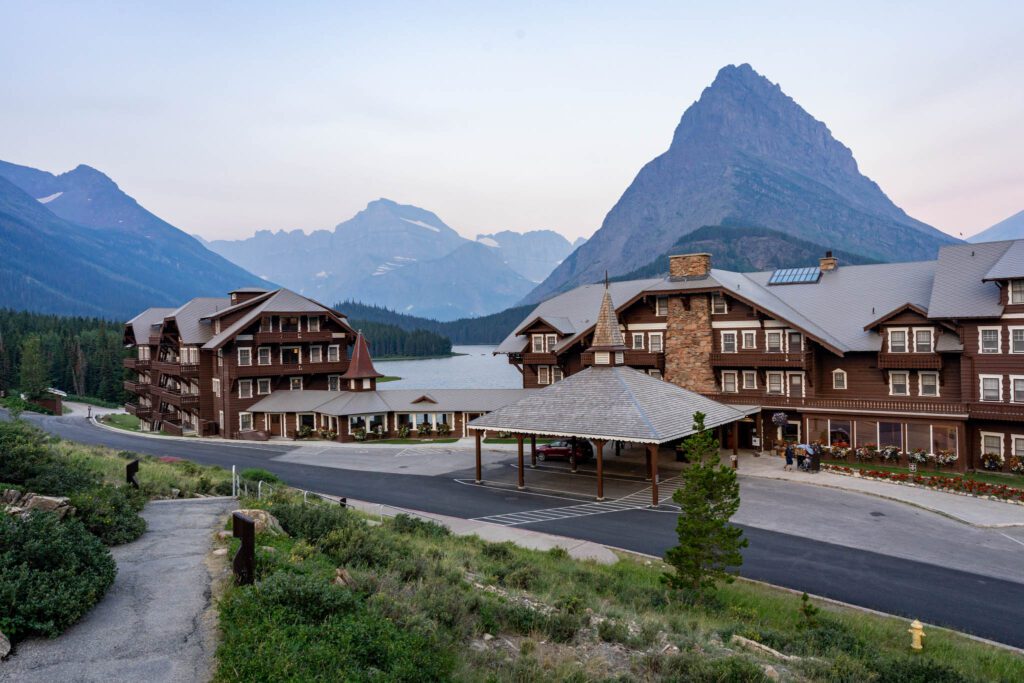
After your hike, we highly recommend grabbing a post-hike drink at the Many Glacier Hotel, which is on the shore of Swiftcurrent Lake. The views from the upper deck of the hotel are spectacular.
There’s a bar inside the hotel serving cocktails, but we opted for the market on the first floor, which had a great selection of beer, cider, and wine, including one of my favorite gluten free beers, Ghostfish Brewing from Seattle!
The Drive Back to the West Side
Head back to West Glacier so that you can be well-positioned to catch the shuttle from the Apgar Visitor Center the next morning.
You have two options – driving along Going-to-the-Sun Road, or skirting the southern end of the park via Highway 2 (which is longer, but an easier drive).
Day 3: Logan Pass and the Highline Trail
On your last day in Glacier, tackle the Highline Trail, one of the most scenic hikes in the entire United States, and explore the area around Logan Pass.
This day includes roughly 15 miles of hiking, if you didn’t do Hidden Lake on your first day – we think you should do both the hike to the Hidden Lake Overlook (~3 miles) and the Highline Trail (~11 miles) if you’re up for it. You’ll need to pack plenty of water, snacks, and wear proper footwear and sun protection.
If that sounds too aggressive for you, our recommendation would be to do the Hidden Lake Overlook and the first two miles of the Highline (and back), which is seven miles of relatively easy hiking.
Transportation for the day: The park shuttle (take it from Apgar Visitor Center up to Logan Pass, then back from the Loop)
Hidden Lake Overlook
Hop on the earliest shuttle you can up to Logan Pass from the Apgar Visitor Center, which takes about an hour.
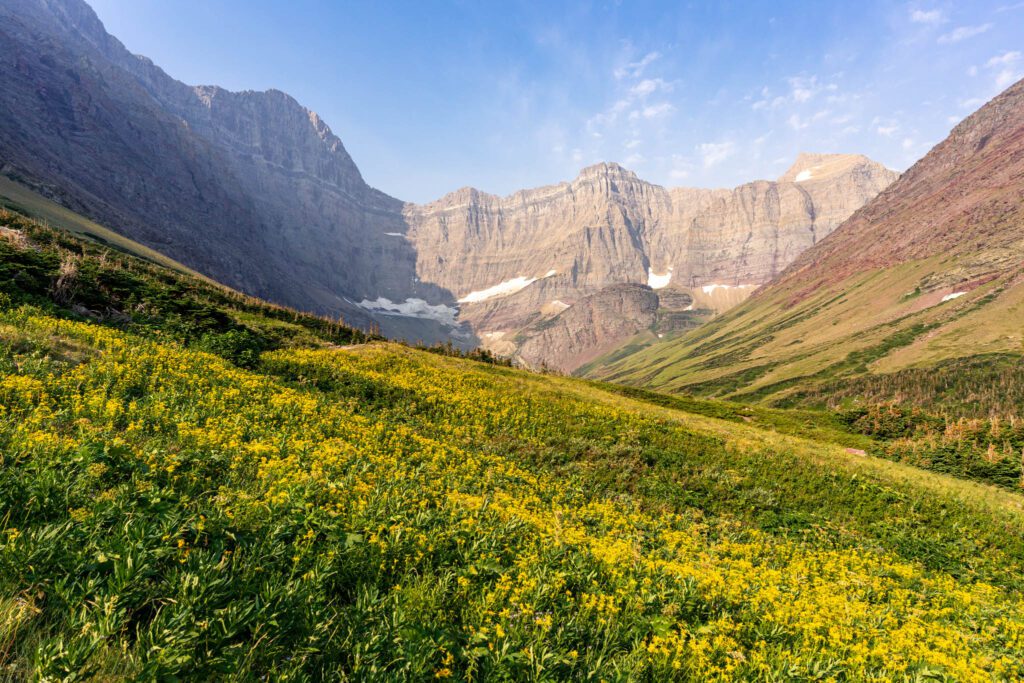
This short hike (3 miles, 600 feet of elevation gain) heads up the hill behind the Logan Pass Visitor Center via a nice boardwalk with great views on all sides.
Wildflowers were blooming in the summer, and the Garden Wall and surrounding mountains provide a spectacular backdrop as you make your way up to the Hidden Lake Overlook. It’s a moderately difficult hike, and it climbs more than we were expecting.
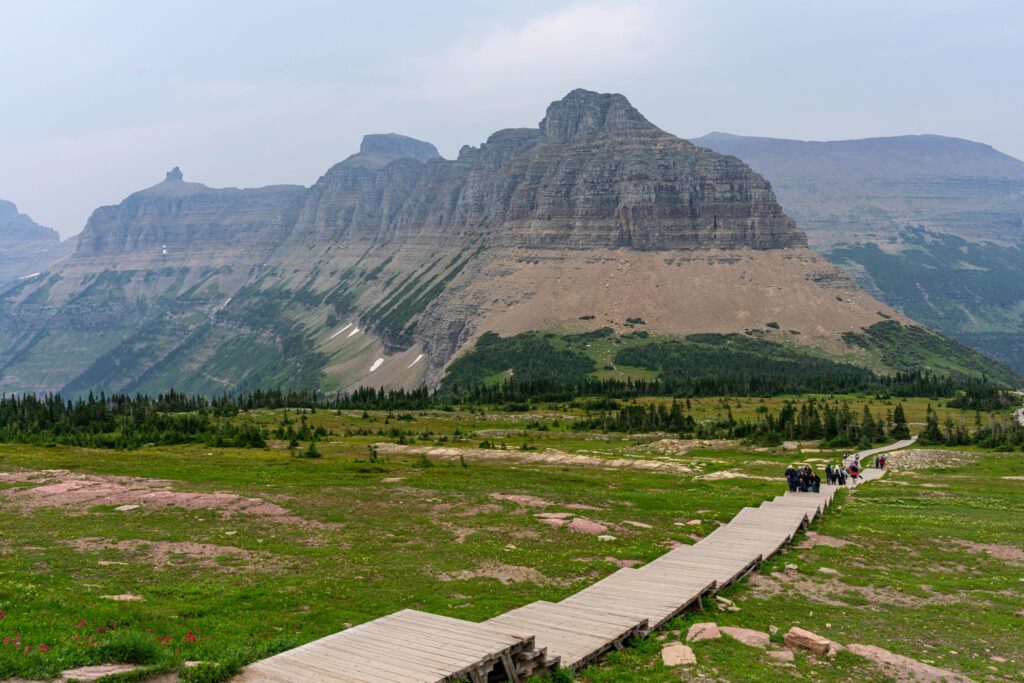
This is a great spot to see mountain goats and bighorn sheep – we saw both along the short walk up to the overlook. Cute little marmots are also abundant at the overlook itself.
You can continue down to the lakeshore, but it doubles both the distance and the elevation gain and we’d only recommend it if you aren’t planning on doing the Highline.
The best part about this trail is the hike up to the Overlook. The hike down to the lake closes for two to three weeks in late July when the fish are spawning in the lake, which brings grizzly bears down for the buffet.
At the overlook, you’ll have a great view over Hidden Lake, with Bearhat Mountain rising several thousand feet above its shores.
The hike heads back the way you came – there’s a water fill station at the Logan Pass Visitor Center (near the bathrooms) and the trailhead for the Highline, your next conquest, is out towards Going-to-the-Sun Road.
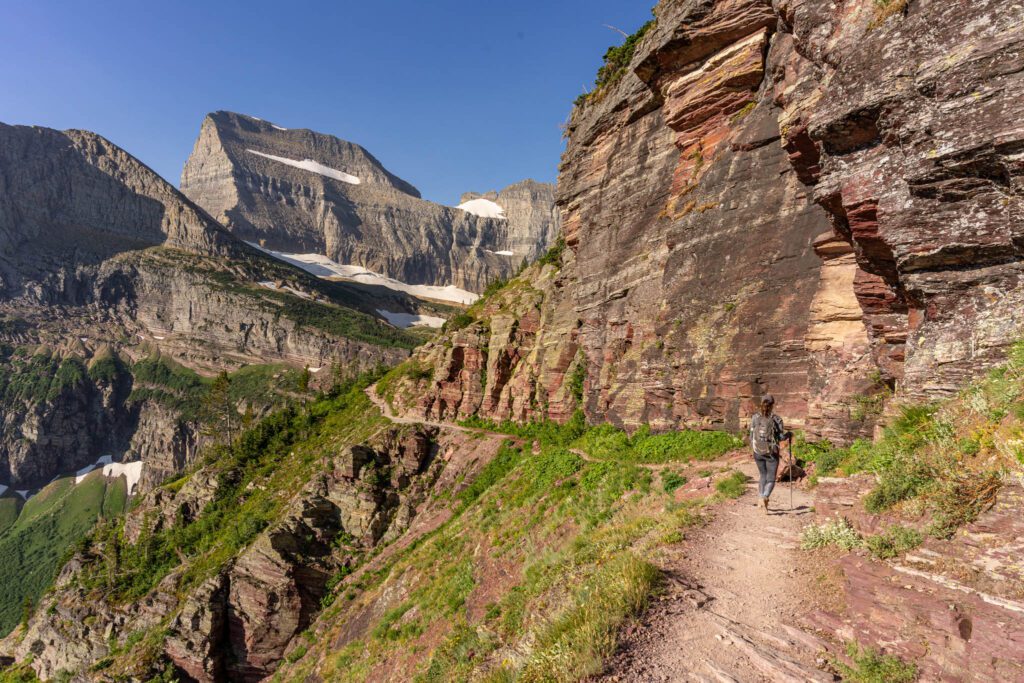
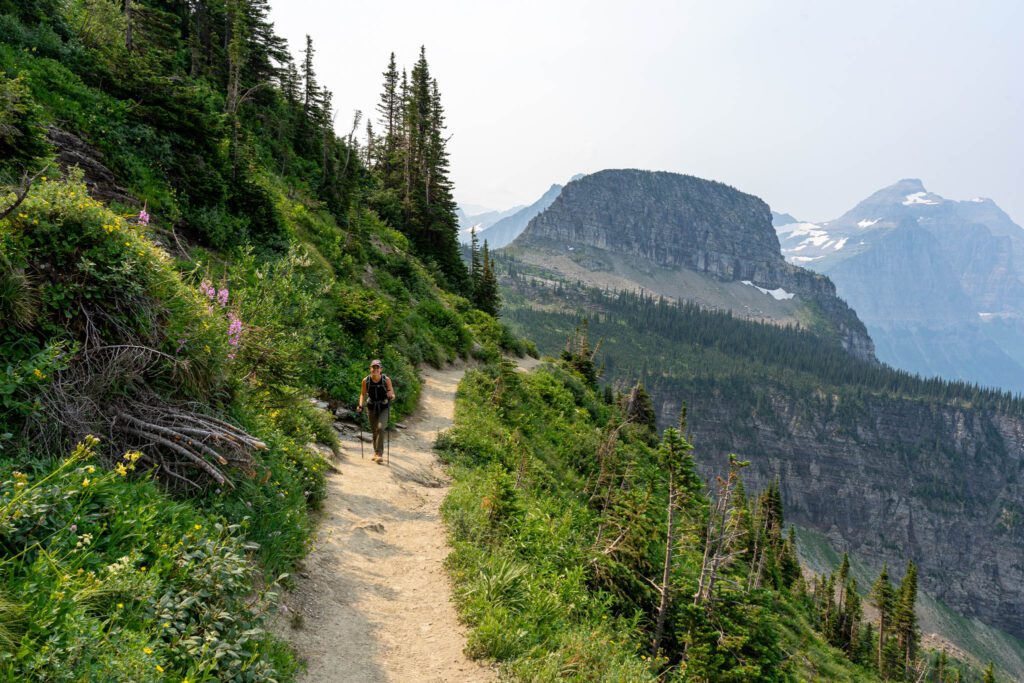
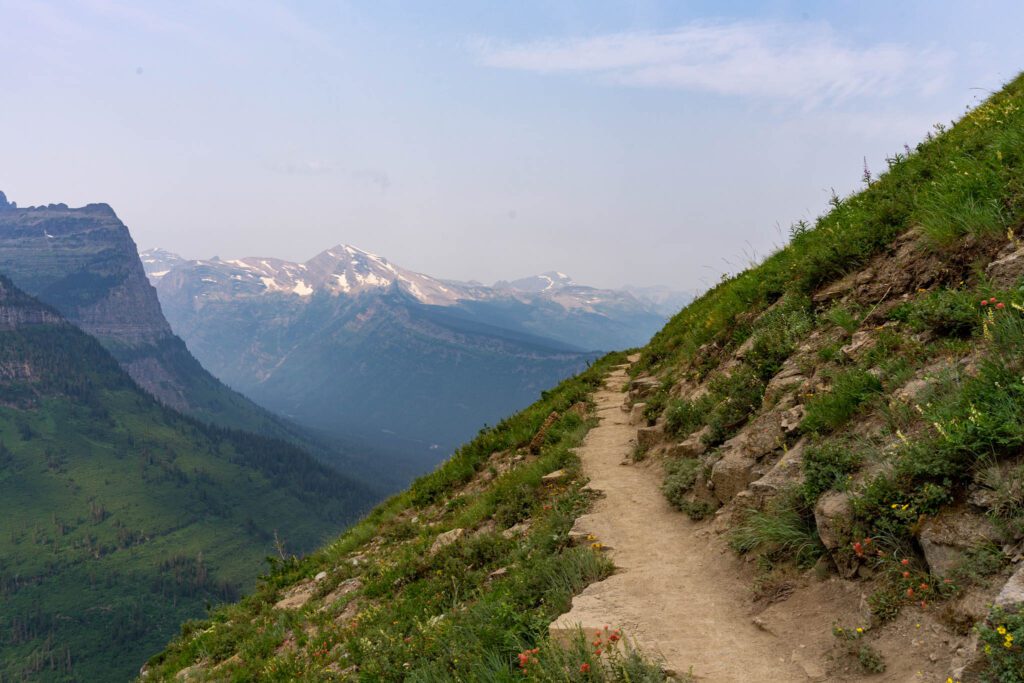
Hike the Highline Trail
The Highline Trail was one of our favorite hikes in the park, and it makes a nice one-two punch with the Hidden Lake Overlook. Combining the two makes it a big day of hiking, but we firmly believe that it’s worth the effort.
First of all, we have a whole guide to the Highline Trail that you should absolutely go read if you’re planning on tackling it. It has all sorts of useful information for hikers – like what route to take, and a play-by-play of the trail so you know exactly what to expect.
Here’s a very condensed version of that guide.
The best way to do the Highline Trail is as a one-way hike leaving from Logan Pass and ending at the Loop, which is a shuttle stop where you can catch the shuttle back to your accommodations.
That hike is just a hair over 11 miles, with 1,500 feet of elevation gain along the way (and a big descent at the end). You can do it as an out-and-back from the Logan Pass Visitor Center, but it’s 15 miles and 2,400 feet gained if you do it that way.
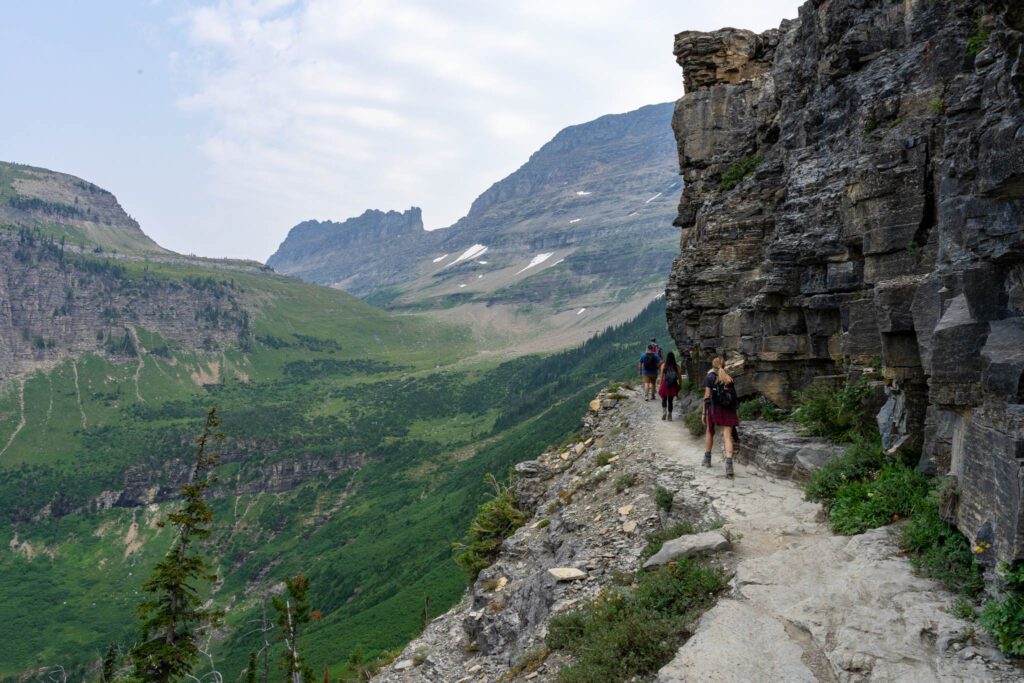
The hike starts on a narrow ledge above Going-to-the-Sun Road, which is a little bit treacherous for people who are apprehensive about heights.
For context, I hate heights. They make my skin crawl. I was totally fine with this stretch of trail, which lasts for about a half mile before widening. There’s a garden hose looking thing attached to the inside wall that you can hang onto if you’re worried.
Hug the inside and get through the first half mile or so, and the rewards are immediate.
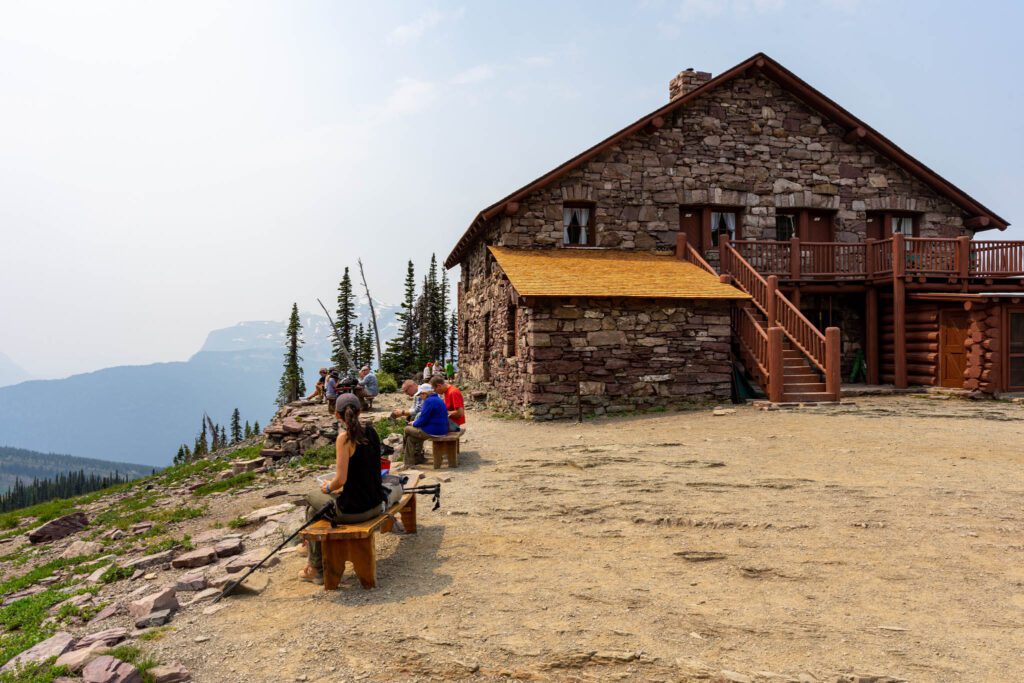
The hike takes you out to the Granite Park Chalet, which is a rustic backcountry hut where you can stay the night if you’re able to get a reservation.
The entire trail between Logan Pass and the Chalet is spectacular. You’ll traverse the mountainside, hugging the Garden Wall (part of the Continental Divide), which towers over you to your right. To your left, you have ever-changing views of the valley beyond.
The first several miles of trail have great views of Going-to-the-Sun Road, which is a couple of hundred feet below you, at times.
At about 6.5 miles into the hike, there’s a turnoff to the Grinnell Glacier Overlook. It was a little smoky and visibility wasn’t great, so we skipped it. But everyone we talked to said it was their favorite part of the hike.
So what’s the problem? To get there, you climb 900 feet in 0.6 miles, which is brutal on its own, and even more brutal as part of a 15 mile day.
If you follow this itinerary as written, you’ll have already seen the Grinnell Glacier from its base. But this is a different perspective for you from above.
The chalet is at just over seven miles into the hike. It’s a good spot to break out your packed lunch and snacks, sit on a bench, and relax while you refuel and recoup. The rest of the hike – either down to the Loop shuttle stop or back to Logan Pass – is going to be brutal.
The descent to the Loop, while it’s downhill, loses 2,500 feet of elevation in four miles. It’s straight down, no breaks. Trekking poles are going to be your best friend.
This hike is going to take the lion’s share of the day. It took us 5 hours, and we’re fast hikers (plus we skipped the overlook). Plan on somewhere around 6-7 hours, including stops.
The Lake McDonald Lodge

On your way back to West Glacier, make a stop at the Lake McDonald Lodge for a well-earned drink on the shore of Lake McDonald.
Lucke’s Lounge is a great place to grab a drink and a bite with lake views – they have craft beer and cider, wine, and cocktails. Russell’s Dining Room is another option, and has a nearly identical drink menu.
There are boat tours of Lake McDonald that leave from behind the lodge. If that’s something that sounds interesting to you, make sure to make a reservation well in advance.
Otherwise, grab a drink (and maybe a bite to eat) and relax – you certainly earned it today.
What to Do with More Time in the Park
If you’re blessed with more time to spend in Glacier, the first thing we’d do is add a night at Many Glacier (this might mean you split your time into two nights at West Glacier and two nights in Many Glacier for ease of booking accommodations).
It’s our favorite part of the park, there are TONS of great hikes to do, and an extra night means a slower pace that will allow you to actually soak it in and enjoy it.
The other thing we’d say here is that you’ve basically covered everything there is to see in the main regions of the park AT A HIGH LEVEL.
We haven’t even scratched the surface of Two Medicine and Polebridge, two further out pieces of the park. That would be something else to add (specifically Two Medicine, which is high on our agenda for our return trip).
The next thing we’d do is take the things we’ve covered in the main itinerary above at a much slower pace, spacing things out and making it a more relaxing pace.
What to Do with Less Time in the Park
If you only have one or two days in the park, here’s how we’d make the most of it.
How to Spend One Day in Glacier National Park
If you only have a single day in Glacier, we’d focus exclusively on driving Going-to-the-Sun Road from start to finish, stopping for a hike or three along the way, and getting out at all the viewpoints that interest you.
Here’s what that perfect day looks like in our minds. You’re going to want to drive and skip the shuttle so you can take it at your own pace.
Start at the Apgar Visitor Center, talk to a ranger about hike closures and things to know, and grab a park map. Start along Going-to-the-Sun Road, making your first stop at the Lake McDonald Lodge to admire the beautiful architecture and, more importantly, Lake McDonald.
Continue along the road to the Trail of the Cedars / Avalanche Lake Trailhead. Get out and hike the Trail of the Cedars Loop at the very least, making sure to check out Avalanche Creek Gorge.
The hike up to Avalanche Lake, which leaves from the same trailhead, is about 4 miles and is pretty easy. If you’re looking for an easy hike to a nice alpine lake, spend a couple of hours on that hike here. If you’re planning on doing one of the longer hikes in the park, skip it and continue along.
You’ll start to gain elevation as you start the climb up to Logan Pass, which sits at 6,500 feet above sea level along the Continental Divide.
Here, you’re DEFINITELY going to want to hike to the Hidden Lake Lookout, which is 2.6 miles roundtrip, for one of the best views in the park. You can continue down to the lake and make it about five miles, but it was closed due to trout spawning and grizzly activity when we were there in late July.
Logan Pass is the high point, and it’s all downhill from here to St. Mary at the eastern end of the road. Stop at the Jackson Glacier Overlook, St. Mary Falls (the relatively short hike to Virginia Falls is worth the trip too!), and Baring Falls.
Finally, enjoy the sun along the shore of St. Mary Lake before you reach the end of the road and make your way back to West Glacier via Highway 2 along the southern border of the park.
Stop at Goat Lick Overlook to check for mountain goats along the way (and stretch your legs).
You could take the road up and over Logan Pass again on the way back, but we think it’s a more stressful drive given the number of people on the road, and the combination of steep and narrow two-lane roads. Plus, the speed limit is just 35 mph!
How to Spend 2 Days in Glacier National Park
If you have two days in the park, follow days 1 and 2 of the itinerary above. Do the scenic drive over Going-to-the-Sun Road to stay in Many Glacier on the first day, do a morning hike, and drive back the next day.
If you’re up for it, plan on fitting in a longer hike on the day where you do the scenic drive. You could add Avalanche Lake, Siyeh Pass, or the Highline without much issue.
If you choose the Highline, plan on driving (instead of taking the shuttle) and head straight there as early as possible to get a parking spot.
In the summer of 2021, the parking lot was routinely full at 6:30am and closed to new vehicles by 9:00-10:00am.
You’ll also need to do this hike out-and-back, which makes it 15 miles long if you go all the way to the Granite Park Chalet. It’s a big hike, so you’re going to have to sacrifice most of the day to tackle it.
It’s 100% worth it. We’d do that plus the Hidden Lake Overlook, then continue along the road down into St. Mary with stops at the Jackson Glacier Overlook, St. Mary Falls, Baring Falls, and St. Mary Lake before heading into Many Glacier.
Then, the next morning, hike the Grinnell Glacier Trail, head out to Fishercap Lake to see if you can spot some moose, and head back to West Glacier for the night (or to catch your flight).
The Best Time to Visit Glacier National Park
The season for visiting Glacier is maddeningly short. Which is true for most alpine wonderlands up and down the west coast.
The best time to be in Glacier is mid-June through Labor Day, also known as summer.
July and August are peak season months because the roads are open, the trails are clear of snow (mostly), and the wildflowers are blooming. Crowds are heaviest in the summer, as you might imagine, but it’s nothing compared to Yellowstone or Yosemite, which see significantly more people each year.
Note that in early June (usually through the 11th or so), Many Glacier Campground is closed.
Still, if you’re visiting in the summer, you’re going to want to book things several months in advance (up to 13 months for the lodges inside the park!), and be prepared to show up to trailheads for the park’s most popular hikes early in the morning to secure a parking spot.
The biggest issue with visiting Glacier outside of the summer is the fact that Going-to-the-Sun Road is closed until late June or early July (see past opening dates here). Which essentially means you’re going to miss most of the best things to do and see in the park.
Plus, the high alpine hikes are going to be snow covered from October through the early summer, depending on the year. So even if you could get to them, you wouldn’t be able to enjoy them without serious winter hiking gear.
Hey you! Planning a trip to Glacier National Park? Don’t miss our other Glacier travel guides to help you plan an incredible trip.