Hiking in Mammoth Lakes: A Complete Guide
In our minds, there are two types of people in life; mountain people and beach people.
If you aren’t familiar with us, we’re mountain people through and through. Which you can see as you browse and read about our favorite places in the world, which all involve rocky peaks, crystal clear alpine lakes, and getting above the treeline.
One of those places that we find ourselves returning to over and over again is California’s Eastern Sierra, which is full of absolutely stunning landscapes.
It’s like Yosemite – the granite, the trees, the lakes – with a tiny fraction of the crowds.
I, Matt, grew up going to Mammoth Lakes in the winter for skiing, and until a few years ago I had never been during the summertime.
Since then, we’ve visited multiple times, and our latest trip had us staying in the area for 10 days in the fall to seek out those gorgeous golden aspens.
In this guide, we’re going to give you our top hiking picks for Mammoth Lakes (and nearby) based on our own experiences exploring the area over two recent trips.
We’ll give you options for different levels, from mellow lake loops to thrilling climbs to mountain passes, and a bunch of other options in between.
By the end, we hope you’ll have discovered a couple of good options for your own trip.
Sound good to you? Let’s get into it.
Disclaimer: Some of the links in this post, like hotel links, are affiliate links, meaning at no additional cost to you, we make a little bit of money if you click through and book. That being said, we would never recommend something to you that we don’t stand behind 100%.
The Best Hikes in Mammoth: Our 10 Favorite Hikes
Let’s get straight into the hikes here.
As we mentioned above, we’re going to use this guide to cover hikes that are right in Mammoth Lakes – and there are a bunch of great options without leaving the immediate area – along with some options that are worth the drive up or down Highway 395 (generally 30-60 minutes).
We’re going to order the hikes below by distance from Mammoth, starting with the hikes right in Mammoth, and working our way out from there.
We’re using the mileage and elevation gain from Matt’s Garmin watch, if you’re curious why some of our mileage and elevation numbers don’t match AllTrails exactly.
Important note here: all of the hikes in this guide are at elevations of AT LEAST 8,000 feet above sea level, and some of them START above 10,000 feet. Which is high. So high, that these trails are going to feel significantly more difficult.
We’d recommend spending one or two days acclimating to the elevation before tackling a difficult hike, and make sure to stay hydrated.
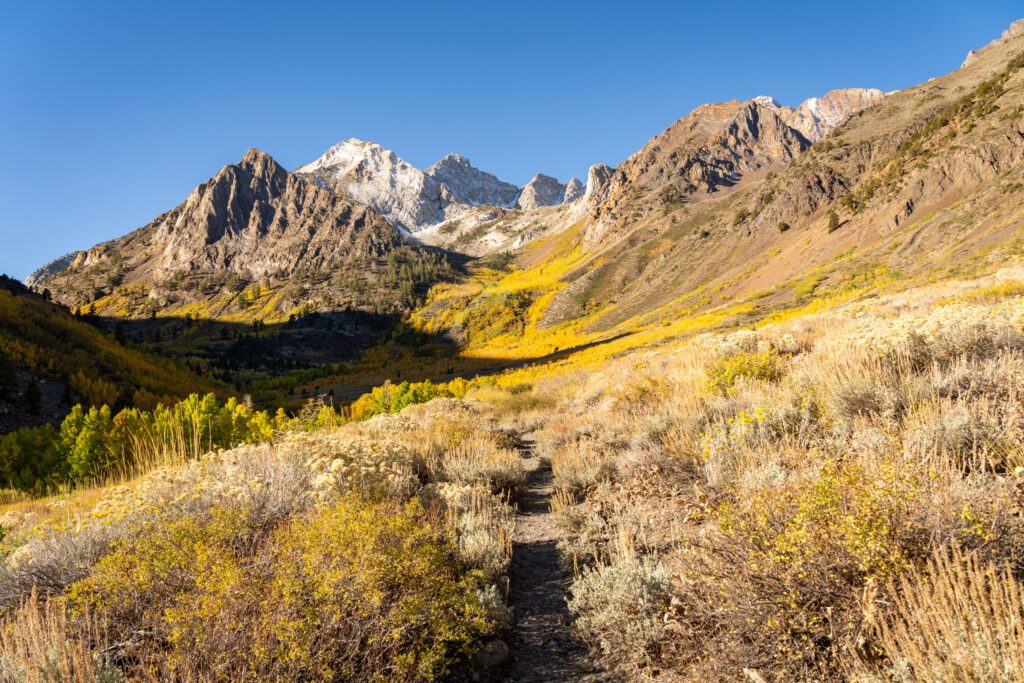
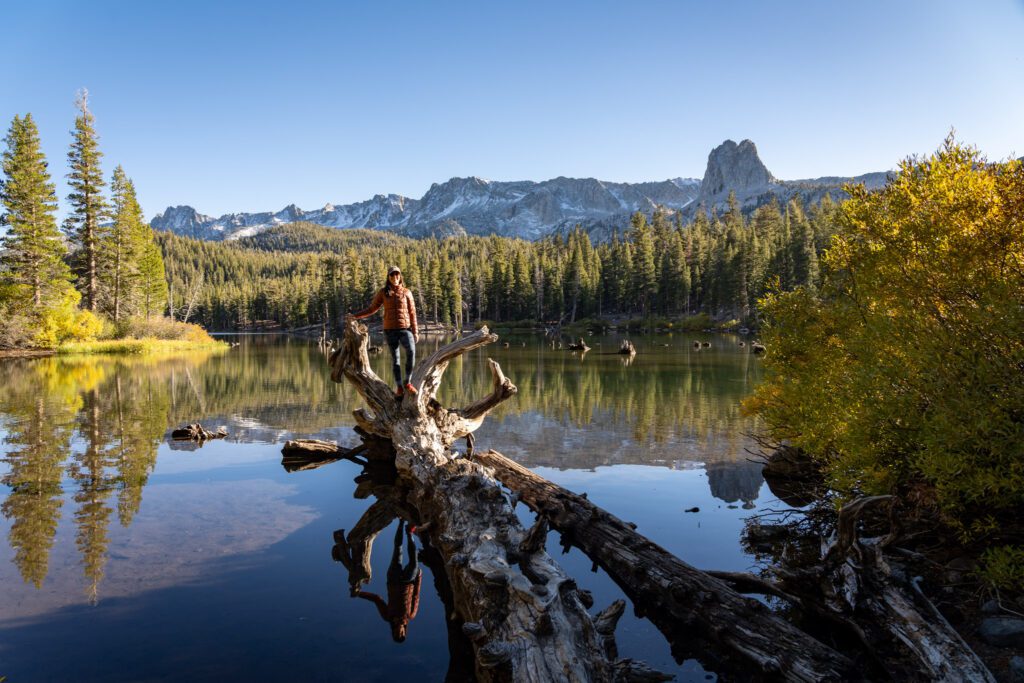
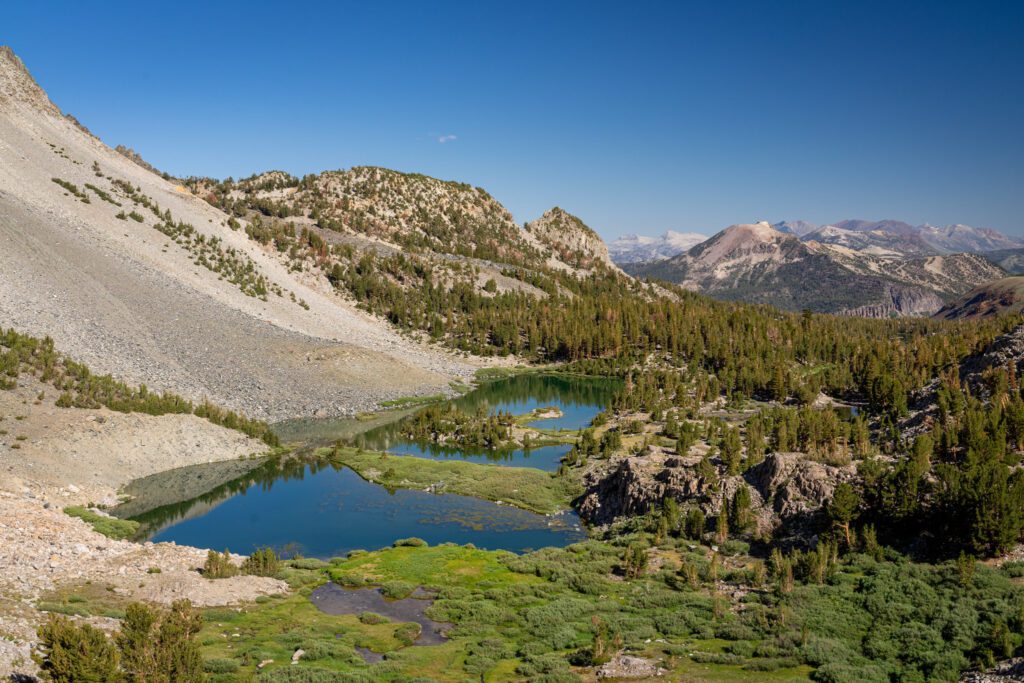
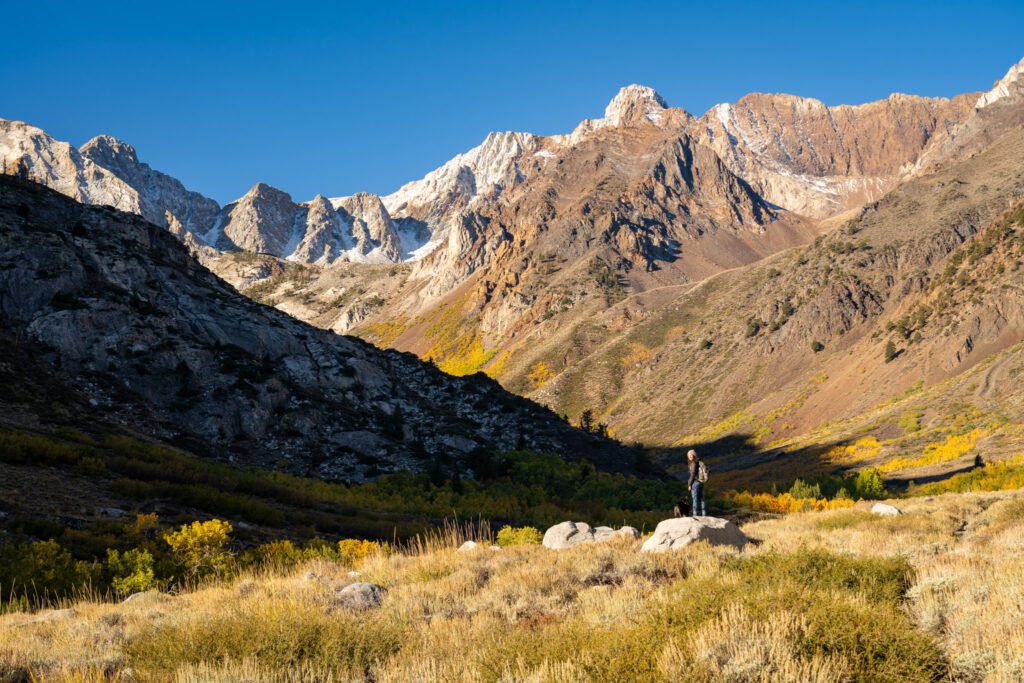
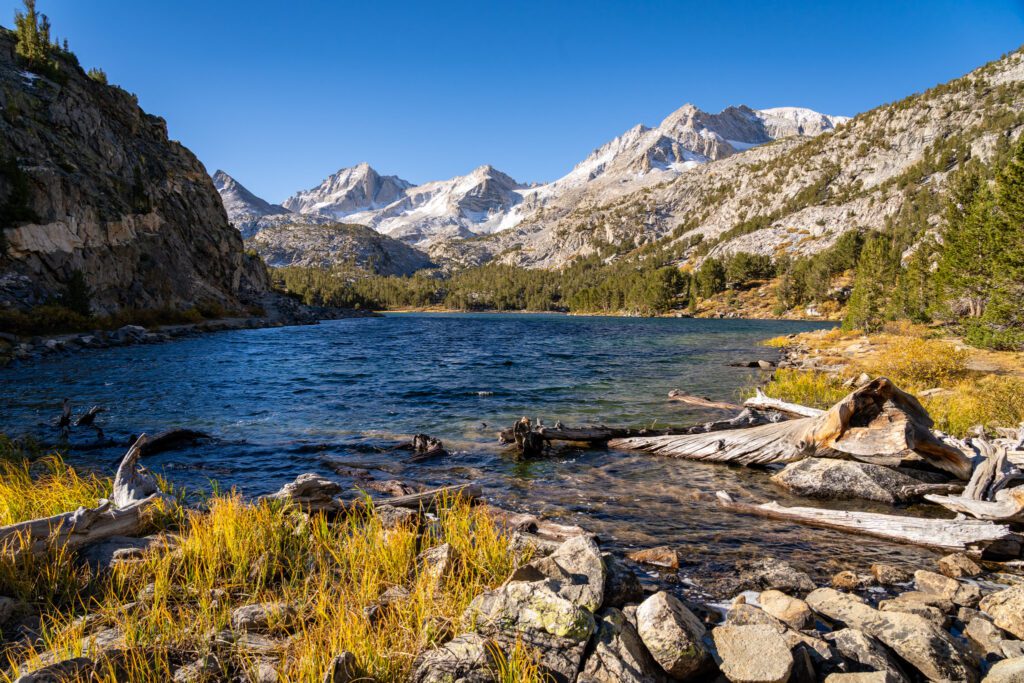
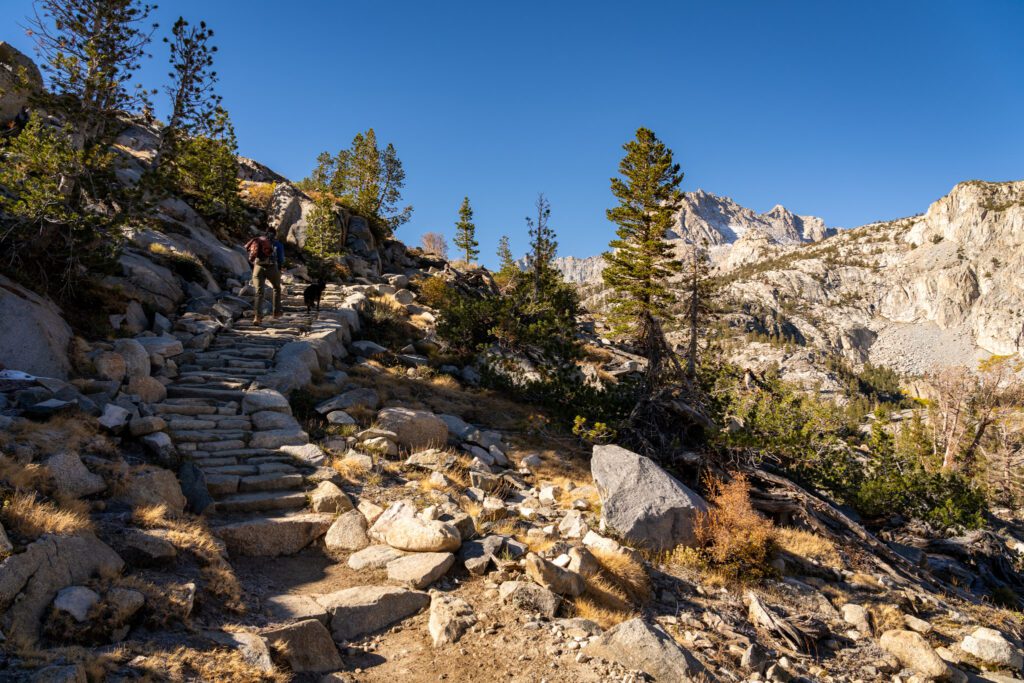
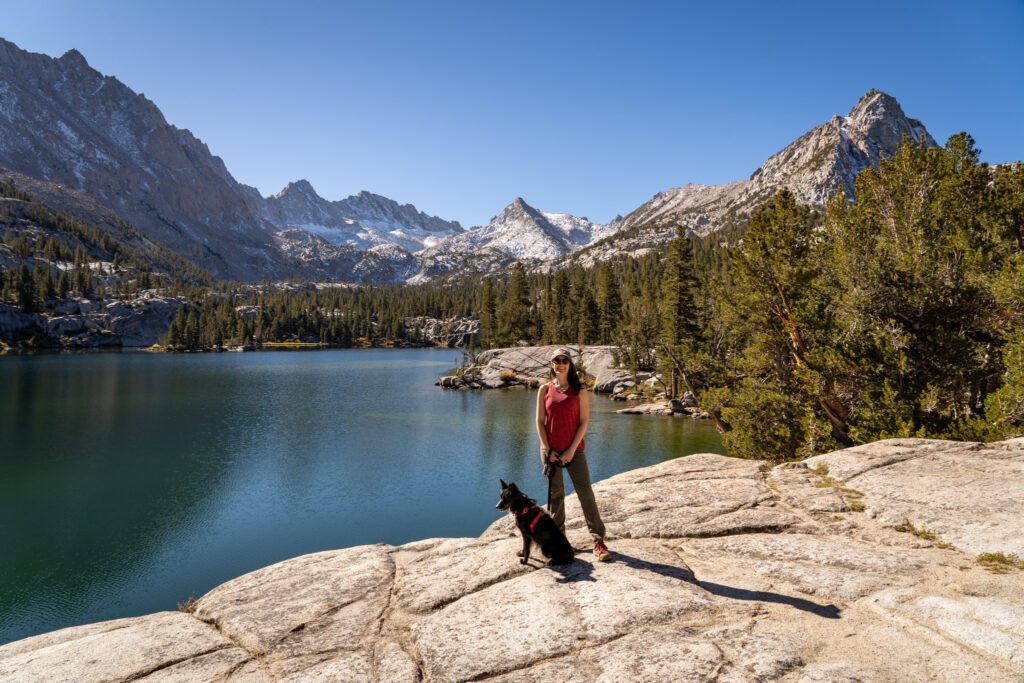
The Mammoth Lakes Basin (Horseshoe, Mamie, and Mcleod)
- Length: 5.4 miles
- Elevation Gain: 570 feet
- Trail Type: Loop (with an extra lollipop)
- Difficulty: Easy
- Pass Required? None
- Dog-Friendly? Yes, on a leash
- Trailhead Location: Horseshoe Lake Trailhead
We’re basically combining two different hikes into one longer one here because this gives you an excellent introduction to the “Lakes” part of the name “Mammoth Lakes.”
You’ll want to start from the Horseshoe Lake parking lot (here on Google Maps), and from there you’ll start with a lollipop up to McLeod Lake, a beautiful lake that has a trail that circumnavigates the shoreline.

It’s a bit of a climb (you climb more in the half mile up to the lake than the rest of the hike combined), but it’s nothing too strenuous. This leg of the hike is 1.8 miles, round trip (including the loop around the lake).
Then, you’ll come back down and immediately head out on the second part of this hike, which makes a figure 8 shape along the shores of Horseshoe Lake and Lake Mamie.
This section starts along the western shore of Horseshoe Lake and heads around the southern tip to the other side all the way out to the road.
Head right on the road to the shore of Lake Mamie, where you’ll once again head along the western shore of the lake around the southern tip, then cut left through Lake Mary Campground (and along the shore of Lake Mary, briefly).

Then it’s a walk along the road back to the car, but there are several really nice views along the way to keep you interested.
Plus, the “walk along the road” is actually a walk along a very nice bike/walking path adjacent to the road, which is a great example of the infrastructure they’ve built up here to make it a more pleasant place to explore on foot / on two wheels.
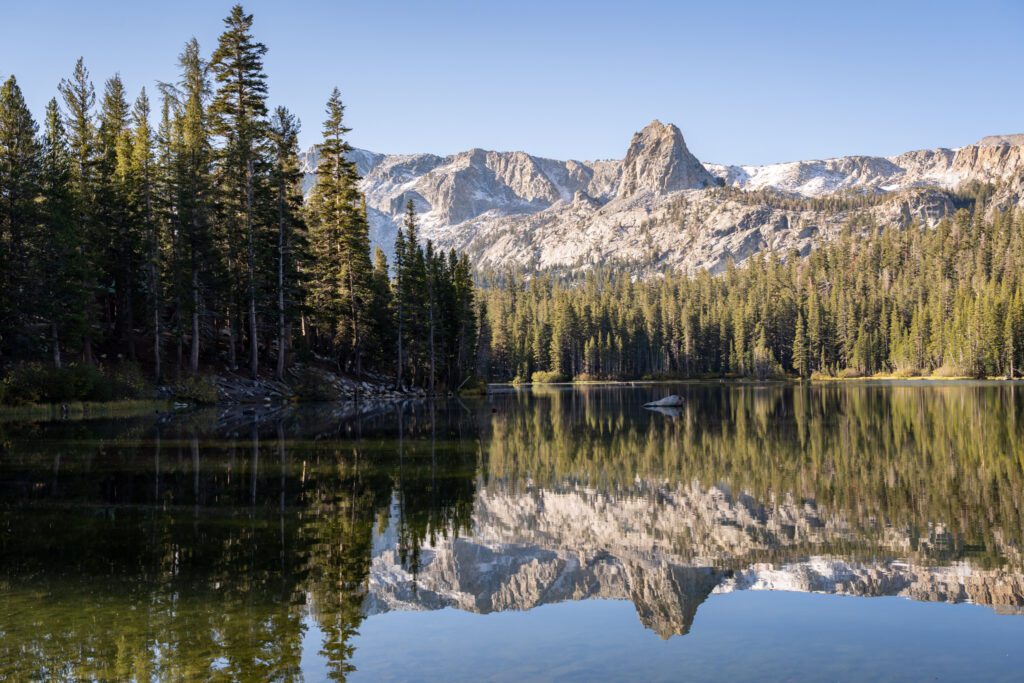
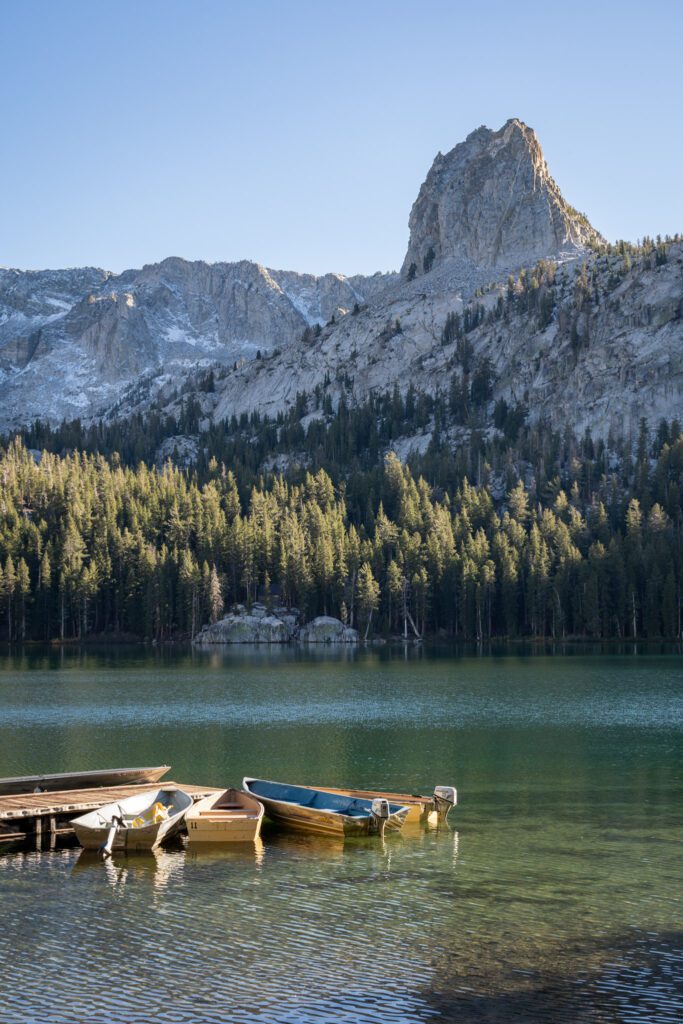
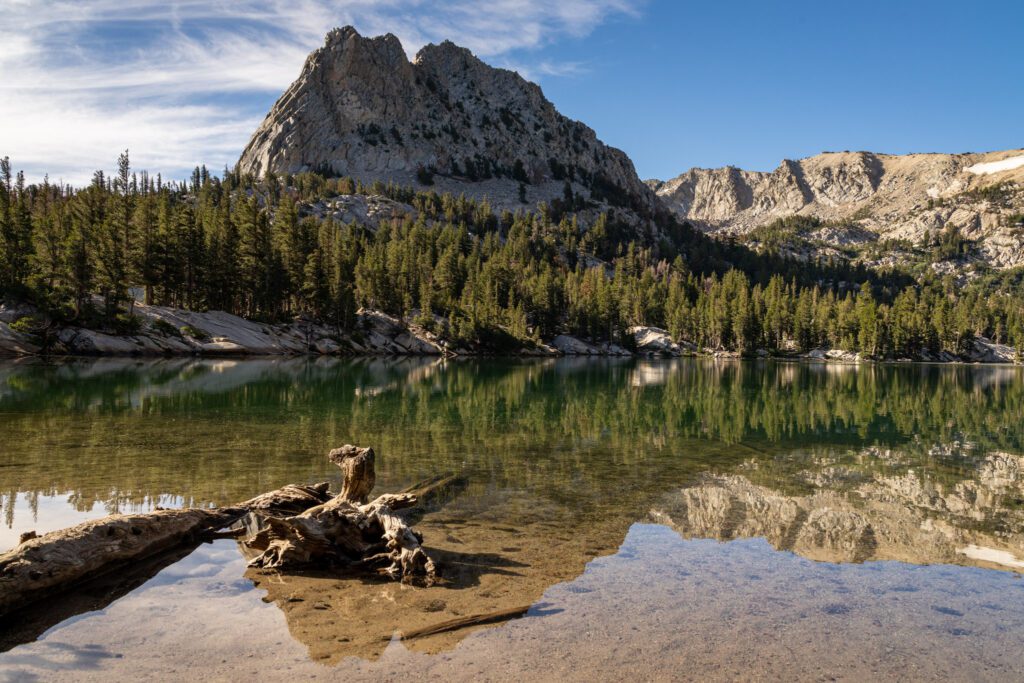
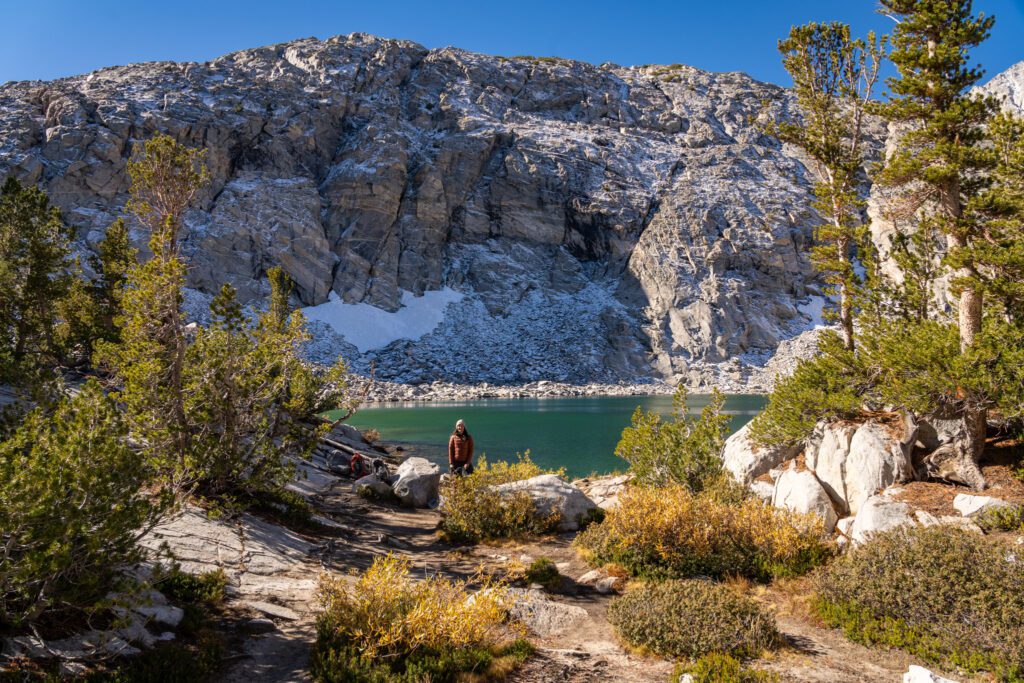
Crystal Lake
- Length: 3.5 miles
- Elevation Gain: 850 feet
- Trail Type: Out and Back
- Difficulty: Moderate
- Pass Required? None
- Dog-Friendly? Yes, on a leash
- Trailhead Location: Crystal Lake Trailhead
The climb to Crystal Lake is a short and somewhat easy hike (though rated moderate for the elevation), and a great introduction to hiking in the Lakes Basin. There’s shade for most of the way, with fantastic views, and the trail leads to a beautiful lake below an epic crag.
Between the high reward to effort ratio and the location near most of the campgrounds in Mammoth Lakes, it’s a popular trail. Expect to share the trail with plenty of other people along the way.
Getting an early start will help with that – we started at 7am and saw exactly one other group on the way up. We had the lake to ourselves at the top, and saw a steadier stream of hikers heading up as we descended.
From the Crystal Lake trailhead, which is actually at Lake George (which has a big parking lot), start off on a gentle slope, which quickly turns into a series of switchbacks that levels out for a bit before another set of switchbacks.
You’ll see Crystal Crag ahead of you, but don’t forget to look back for fantastic views of Lake George, Lake Mary, and several other lakes in the Lakes Basin.
The trail forks at almost exactly a mile. Head left to continue on to Crystal Lake. You’ll soon top out at 9,730 feet, then descend around 120 feet to the outlet of Crystal Lake.
There are trails both to the left and right of the lake. Head left for a gentler trail that leads to several beaches and easy access to the crystal clear water.
The lake is popular with adventurous anglers, and is home to brook and rainbow trout along with a golden trout hybrid. Climbers, meanwhile, head straight to the 10,364-foot Crystal Crag, home to a variety of alpine, sport, and trad climbing routes.
You can also turn this into a longer trek. Head back to the fork and take the other trail, which will take you up to Mammoth Crest, a ridgeline above the lake that has sweeping views, which adds another 2 miles and 700 feet in elevation gain to ascend the ridge (more if you want to walk along it).
At the top, you’ll be rewarded with a colorful volcanic landscape and sweeping vistas of the Mammoth Lakes Basin, the Minarets, Mount Ritter, and Banner Peak. This can also be done as part of the Mammoth Crest Loop, along with Duck Pass and Duck Lake.
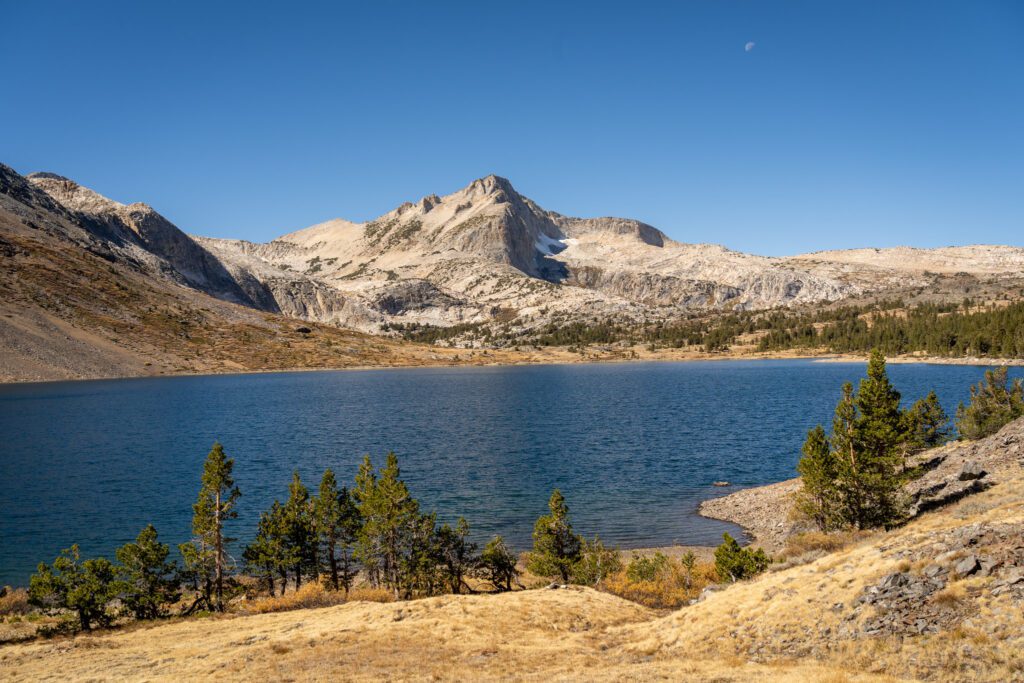
Duck Pass
- Length: 10 miles
- Elevation Gain: 2,100 feet
- Trail Type: Out and Back
- Difficulty: Difficult
- Pass Required? None
- Dog-Friendly? Yes, on a leash
- Trailhead Location: Duck Pass Trailhead (Coldwater Creek Campground)
A never-ending string of blue-green, crystal-clear alpine lakes. A grueling climb to 11,000 feet above sea level. Amazing views over the lakes and surrounding mountainous landscapes from the top of Duck Pass. Plenty of places to pull over and admire the sheer natural beauty of the Eastern Sierra.
This hike has everything you’re looking for in a high-altitude summer adventure in the mountains.
Is this our favorite hike of all time? It’s certainly in the conversation alongside bangers like the Ptarmigan Ridge Trail at Mount Baker and the Skyline Trail at Mount Rainier.
We also like that this hike is fairly customizable, and places like Skelton Lake and Barney Lake can serve as turnaround points if you’re not up for the entire climb.
However, the view from the top of the pass is breathtaking. In the sense that it’s stunningly beautiful, and the sense that it’s at just under 11,000 feet above sea level.
You’re going to want to be as acclimated to the altitude here as possible because 10,000 feet above sea level is no joke, and is generally where we start to really feel the effects of altitude. We wouldn’t do this hike unless we’d been in Mammoth (or another high altitude place nearby) for at least two days, ideally more.
This trail starts from the southeast corner of Coldwater Campground just outside of Mammoth Lakes (up in the Lakes Basin).
Pass all the way through the campground to the far end, where you’ll find two different trailheads. The first is Emerald Lake, and the second is the trailhead for Duck Pass, which is the one you want here.
Important note: There is no parking allowed in the campground if the trailhead is full, which means you’re going to want to get here early on a summer weekend to avoid adding an extra mile or so each way.
If you happen to be camping at Coldwater Campground (like we did), the trailhead is walkable from the campground, which is ideal because you don’t have to worry about parking.
There are bathrooms, a bear box, and water at the trailhead (you can get the water from spigots in the campground).
You’ll also want to start the hike early, as the pass is fully exposed by mid morning over the summer.
We started bright and early just after sunrise, and it was a brutal journey back down, with the sun relentlessly beating down on us as we descended. We remarked that it would be absolutely brutal to do that ascent when the sun is high in the sky.
This hike starts climbing steadily right away. Less than a mile in, and 500 feet up, is a spur trail that leads to the aptly named Arrowhead Lake.
The trail then levels out a bit before passing Skelton Lake after another half a mile. Continue around Skelton Lake, and then climb another mile and 400 feet to the beautiful turquoise waters of Barney Lake, which puts you at the base of Duck Pass.
This is, without a doubt, the toughest part of the hike. You’ll climb 600 feet of steep and talus-covered slope in about a mile, and at the top you’ll be at Duck Pass, which sits at 10,814 feet above sea level.
Take a few breaks as you go up and don’t forget to look back over and enjoy fantastic views of Barney Lake.
If you’ve got gas in the tank, the two lakes in the basin on the other side of the pass are worth the journey.
But you do have to drop down 300 feet and go one more mile to reach the deep blue waters of Duck Lake, one of the largest natural lakes in the area (and a bit further gets you to smaller Pika Lake).
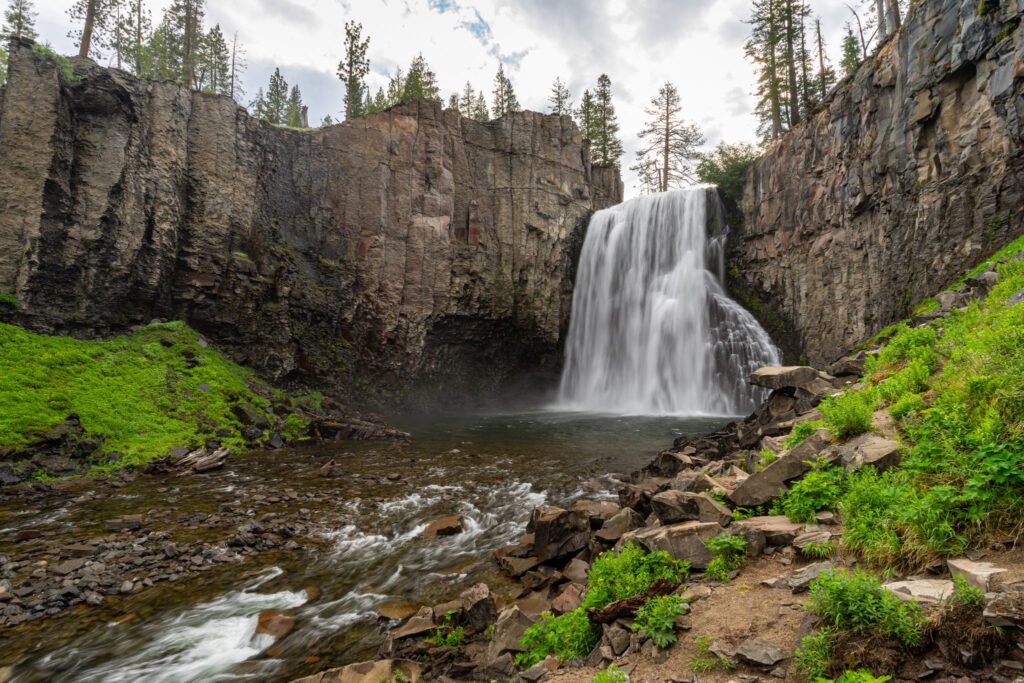
The Devils Postpile and Rainbow Falls Loop
- Length: 6.1 miles
- Elevation Gain: 700 feet
- Trail Type: Loop
- Difficulty: Easy / Moderate
- Pass Required? America the Beautiful Pass
- Dog-Friendly? Yes, on a leash (and allowed on shuttle if muzzled)
- Trailhead Location: Devils Postpile Ranger Station (Shuttle required, more info here)
This is another great bang-for-your-buck hike because you get both an excellent waterfall and one of the geologic wonders of California, the hexagonal basalt columns of Devils Postpile.
However, it’s also the most complicated to access of the hikes on this list.
The road down to the parking area is closed from early October (it closed while we were there in the first week of October) through June.
In order to get to the trailhead when the road is open, you have two options.
First, if you’re visiting when the road is open, you can drive to the trailhead and park, but only if you arrive before 7am or after 7pm.
Otherwise, you will have to hop on a shuttle bus in order to access the trailhead, which you pick up at Mammoth Mountain Lodge (here on Google Maps). It comes every 20-45 minutes from 7:30am to 7pm.
To avoid waiting in line at the ticket office, you can reserve tickets in advance here.
The shuttle costs $15 for adults, $7 for kids aged 3-15, and it’s free for children under the age of 2 (I guess kids 16-18 are treated as adults?). More information about the shuttle system here.
With all those logistics out of the way, let’s talk about the hike itself.
A geologic wonder, Devils Postpile National Monument was formed by volcanic forces around 100,000 years ago, and features unusual hexagonal basalt columns more than 60 feet tall.
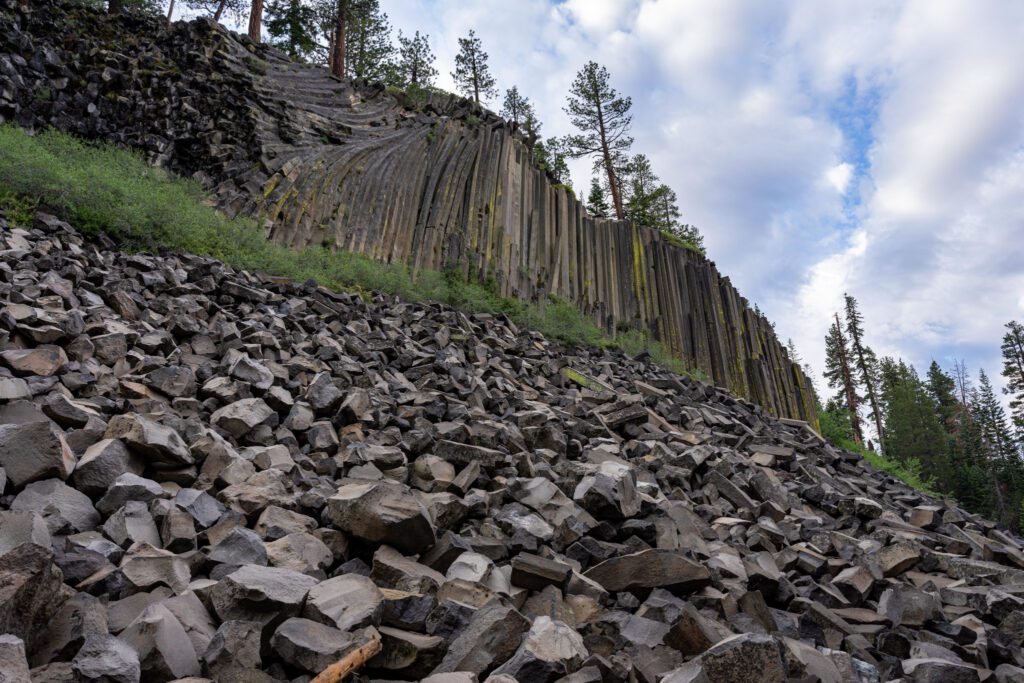
The hike starts with an easy half mile stroll to Devils Postpile, which you can climb on top of (via a short but somewhat steep trail) to see the odd hexagonal shapes from above.
Then it’s a downhill stroll – all very well maintained and manageable – down to Rainbow Falls, a 101-foot tall waterfall that is the highest falls on the Middle Fork of the San Joaquin River and named for the rainbows that often appear at its base when the sun hits it just right (usually mid-morning through early afternoon).
On the way back, we’d recommend cutting across the river at the junction with the PCT to avoid the crowds coming towards you on the trail. It’s a much more pleasant hike, and you get to walk along a portion of the PCT, one of the most famous trails in North America.
You’ll cut back across the water just before you get back to the trailhead.
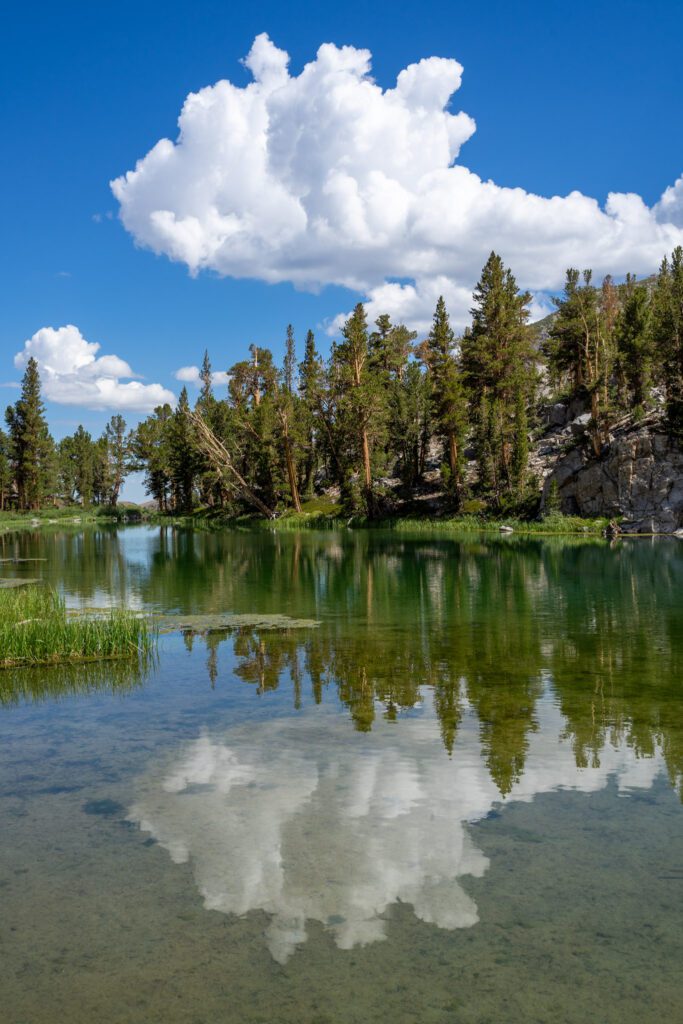
Sherwin Lakes (+ Valentine Lake)
- Length: 4.9 miles (9.7 to Valentine)
- Elevation Gain: 980 feet (1,900 to Valentine)
- Trail Type: Out and Back
- Difficulty: Moderate
- Pass Required? None
- Dog-Friendly? Yes, on a leash
- Trailhead Location: Sherwin Lakes Trailhead
This short, simple hike would make for a great adventure on your first day, when you’re trying to get acclimated to the elevation.
The payoff for the steady climb is a nice, crystal clear lake that is backed by a rocky peak. In early October, there was some fall color around the lake, and also some good color up on the hillside beyond the lake.
It’s also right outside the town of Mammoth, 10-15 minutes away from just about anywhere you might be staying in town, so it doesn’t require a lot of driving to get to the trailhead.
Unlike some of the other trails on this list that traverse multiple different ecosystems over the ascent, the trail here starts and ends in a forest of pine trees, which is classic Eastern Sierra foothills.
It’s a straightforward ascent, and you’ll start climbing from the get-go, and about half way through you hit a set of switchbacks that take you up and over, into the Sherwin Lakes Basin.
There are some nice views from the top of the switchbacks, particularly back towards Mammoth Mountain and the ski resort.
To extend your hike, you can head out to Valentine Lake, which gets you up into the granite-filled landscapes that we love in the Eastern Sierra.
However, it’s a significant addition, adding 5.5 miles and 1,100 feet of climbing (round trip).
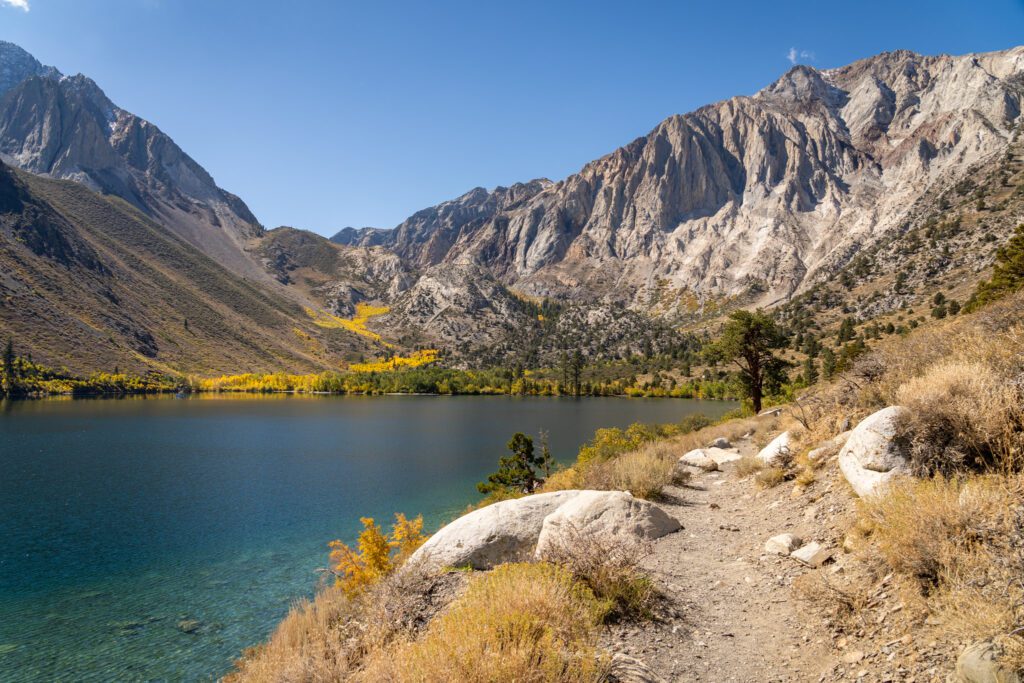
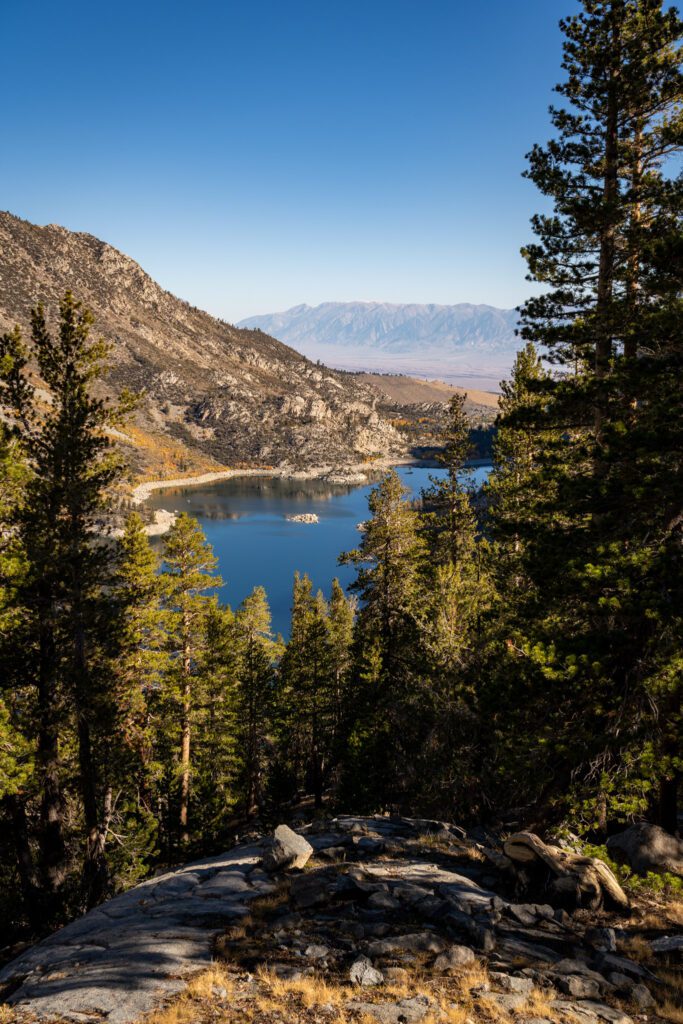
The Convict Lake Loop
- Length: 2.5 miles
- Elevation Gain: 250 feet
- Trail Type: Loop
- Difficulty: Easy
- Pass Required? None
- Dog-Friendly? Yes, on a leash
- Trailhead Location: Convict Lake Parking
This is a great, family-friendly loop that is about 20 minutes south of Mammoth Lakes. We had been to Convict Lake before this most recent trip, but only for sunrise to take photos before we were off to a different hike.
This time, we showed up mid-morning, found a parking spot (they can be hard to come by, particularly on weekends), and headed out around the lake to complete the loop.
It’s well worth the effort because you get a bunch of different views of the lake and the granite face of Laurel Mountain across the lake.
Plus, a completely different peak shows up to the party as you get to the opposite side of the lake from the parking area (I believe it’s Mount Morrison).
In terms of parking, there are multiple parking options along the lakeshore, and you can do the loop from anywhere along the northeastern shore of the lake. There are bathrooms, too.
If parking there is full, there’s an alternate trailhead (here on Google Maps) that adds a bit of distance.
Convict Lake gets its name from an event back in the 1800’s where a bunch of criminals escaped from the jail in Carson City, Nevada, and made their way to the lake. A shootout ensued, and the lake got its name.
We will say that this was one of the more crowded hikes we’ve done near Mammoth, and it makes total sense given the stats of this trail.
McGee Creek to Horseshoe Creek
- Length: 3.6 miles
- Elevation Gain: 670 feet
- Trail Type: Out and Back
- Difficulty: Easy / Moderate
- Pass Required? None
- Dog-Friendly? Yes, on a leash
- Trailhead Location: McGee Creek Trailhead
In our minds, this is the winner in terms of the best bang-for-your-buck trail on this list.
It’s a relatively short and gentle climb, and the views up the canyon start basically from the beginning, and get better right up until you cross the creek that marks the end of the trail.
Bonus points if you do this trail in the fall, when the golden leaves light up the hillsides. We did this hike in early October, and it was almost at peak fall color.
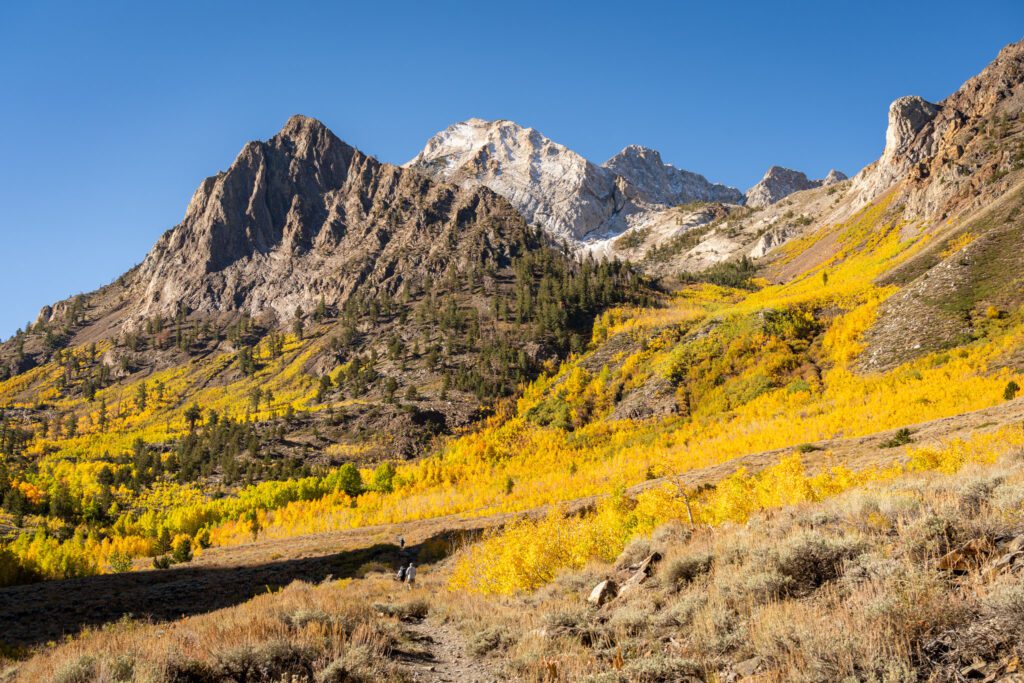
The trail starts with a steady incline, and as you climb, the peak of Mount Crocker starts to peek out from behind the ridgeline on your left.
The trail continues, eventually hitting a quick set of switchbacks to gain some elevation and then turning left.
Until about a mile into the trail, the views are strictly okay (we think), but as soon as the trail makes that lefthand turn and you start up the canyon, you’re hiking straight at Mount Crocker and various other peaks.
The views are nothing short of spectacular. And all for just over a mile of climbing with 500 feet of elevation gain at this point!
In the fall, the trees off to the left of the trail are in various shades of yellow and orange, and as you get higher you’ll end up hiking straight through several groves of aspens that make for excellent photo opps.
You’ll continue up to the base of the mountains, where you’ll cross a creek (it was fairly low when we were there in October, but our feet still got wet), which marks the end of the hike.
The trail continues past this point up to McGee Pass and beyond, and we ventured a bit up the trail to see if there was anything else worth seeing within a short hike, and found..not much.
The other destinations along the trail add significant distance and elevation gain, and we decided to save our energy for other adventures in the area.
This is an extremely popular trail, and though we got an early start and got on the trail before 8am, there were a steady stream of people heading up as we were coming down, and the parking lot was full on a Monday morning in early October.
There are bathrooms, trash, and food storage facilities at the trailhead.
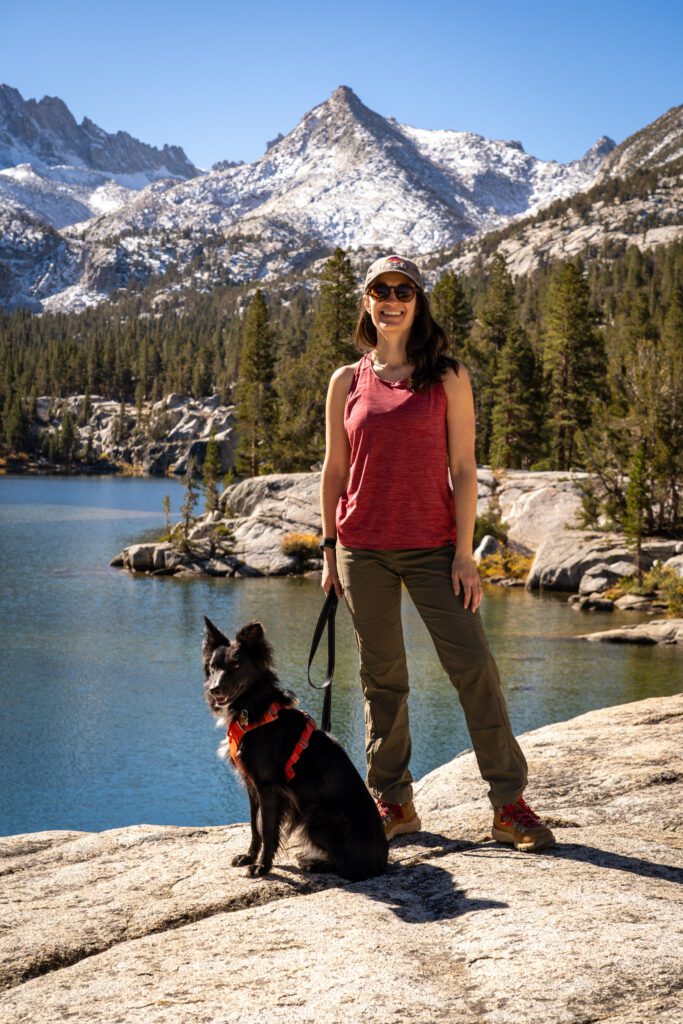
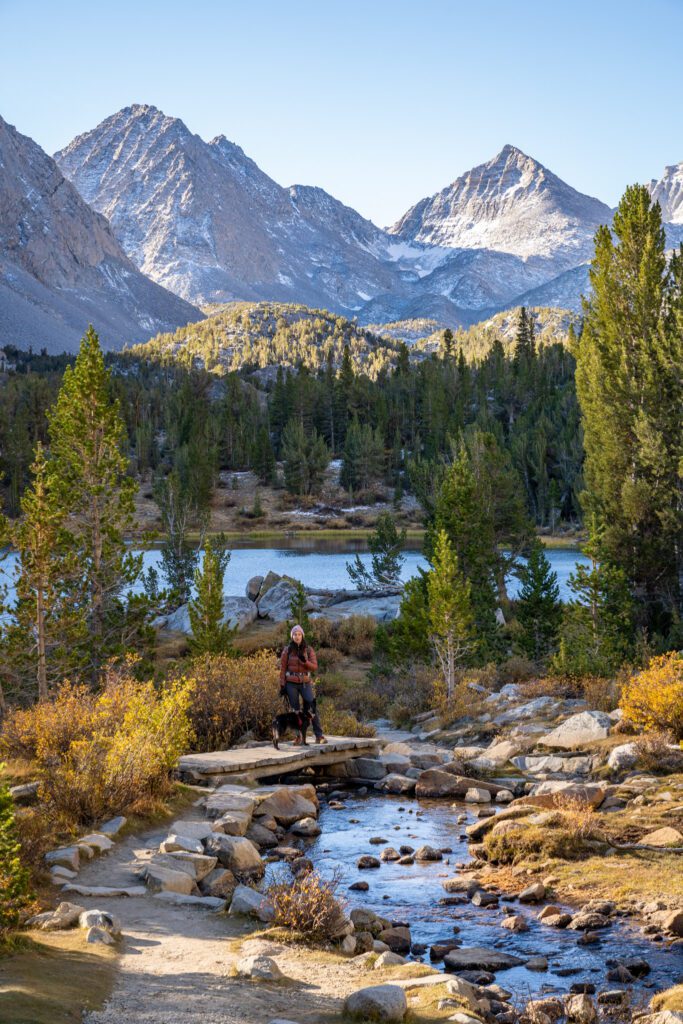
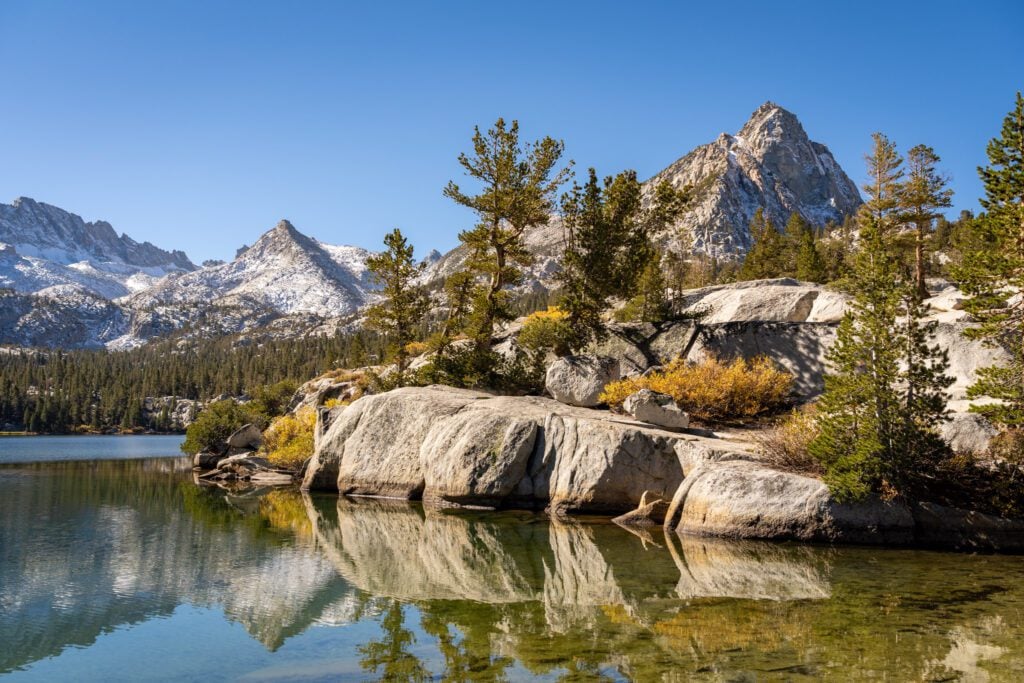
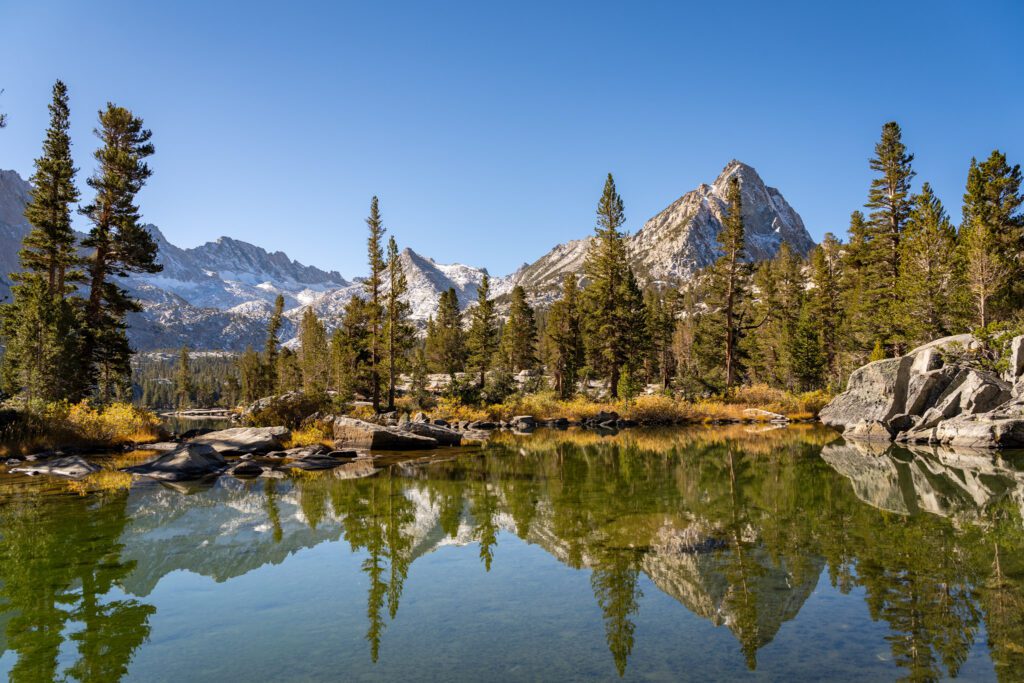
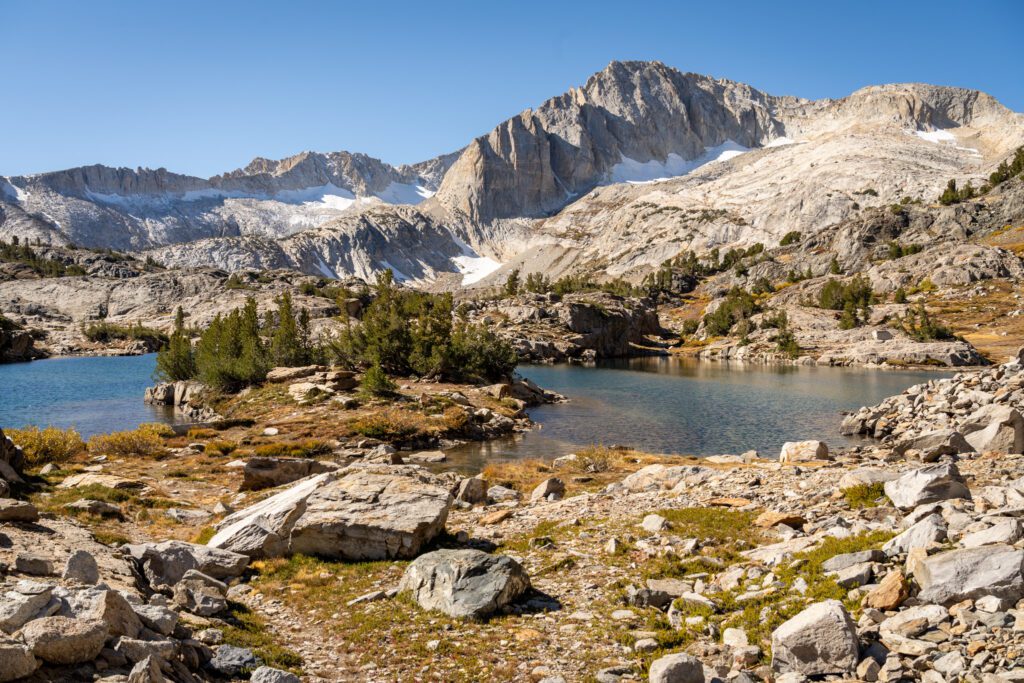
Little Lakes Valley to Gem Lakes
- Length: 7.3 miles
- Elevation Gain: 1,280 feet
- Trail Type: Out and Back
- Difficulty: Moderate
- Pass Required? None
- Dog-Friendly? Yes, on a leash
- Trailhead Location: Little Lakes Valley Trailhead
While the McGee Creek Trail is the best bang-for-your-buck, this is probably our top pick in terms of the “best” hike, taking into account scenery and effort required (Duck Pass is magnificent, but also pretty intense).
On our latest trip to Mammoth, we weren’t able to revisit our favorite hike from our first trip (the aforementioned Duck Pass) due to trail closures for restoration, which was kind of a bummer.
Lucky for us, this trail was open and it blew our expectations out of the water.
Of the trails in this guide, this is the hike that starts from the highest elevation at just above 10,000 feet above sea level. By the end, you’re sitting at 11,000 feet above sea level at Gem Lakes.
We would not recommend this hike being your first hike in the area if you’re coming from sea level.
The trailhead is at the very end of Rock Creek Road, which is worth driving while you’re in the area (especially if it’s in the fall and the leaves are turning).
There’s a bunch of parking at the trailhead (along with a toilet and bear boxes), but it was full even on a weekday in October so I can imagine that during the summer, it’s a zoo.
We started at 8am, and we only saw a handful of people on the way up (and we were the only ones that went past Long Lake up to Gem Lakes).
You can’t park along the road on the way into the trailhead, but there are a couple of smaller parking lots further down the road with more spots, but it will add a bit to your hike.
Almost as soon as you leave the trailhead the magnificent views start, and they get better and better as you climb up into the valley.
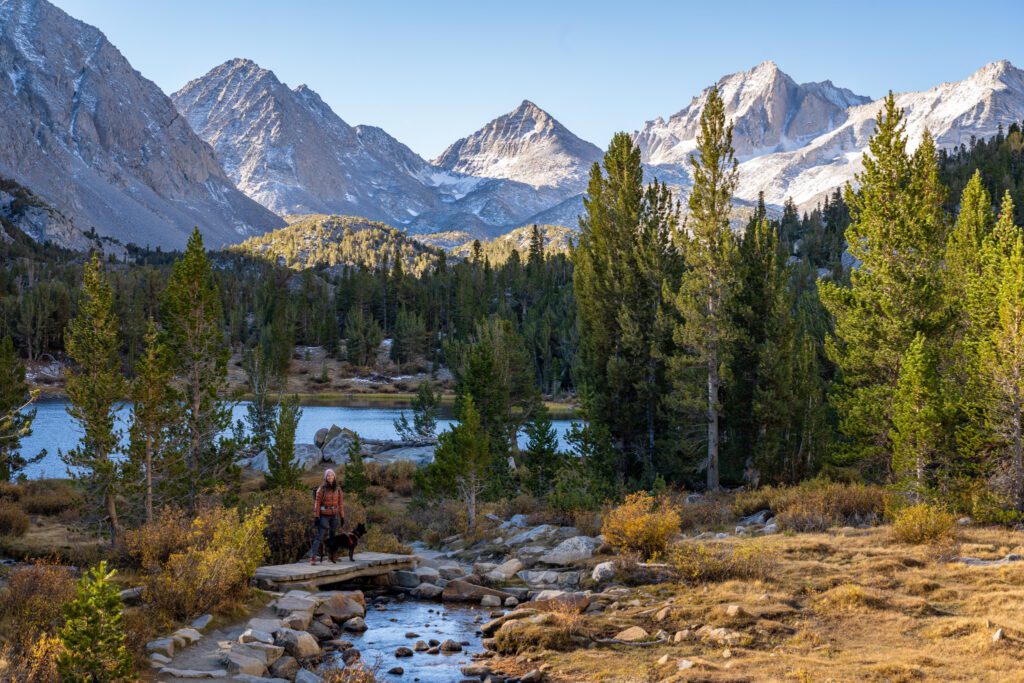
Along the way, you’ll pass by several lakes (Long Lake and Gem Lakes were our favorites) that serve as a nice resting spot for some photos, a snack, and some water.
This hike really isn’t that difficult through the end of Long Lake (though the elevation will make it feel harder than it should be), and we saw plenty of families with kids along the trail.
Past Long Lake, the climbing starts to get tougher, and you essentially climb 400 feet over the last mile and change on the way up to Gem Lakes.
However, we both agree that, if you have the energy and capability, the juice is 100% worth the squeeze. Make sure to follow the trail all the way to the end of the offshoot for Gem Lakes, where you’ll find the crown jewel of this basin.
It’s a classic Eastern Sierra (or Rocky Mountains, or Dolomites) scene, with a crystal clear blue-green lake backed by towering slabs of granite and rocky peaks. It’s magical, and it’s clearly the best lake on the hike (in our opinions).
The other nice thing about this trail is that, like many of the hikes in this guide, it’s customizable based on your physical capacity.
The hike out to Long Lake, for example, is about 4.2 miles with 600 feet of climbing, and is well worth the journey even if you can’t make it all the way to Gem Lakes.
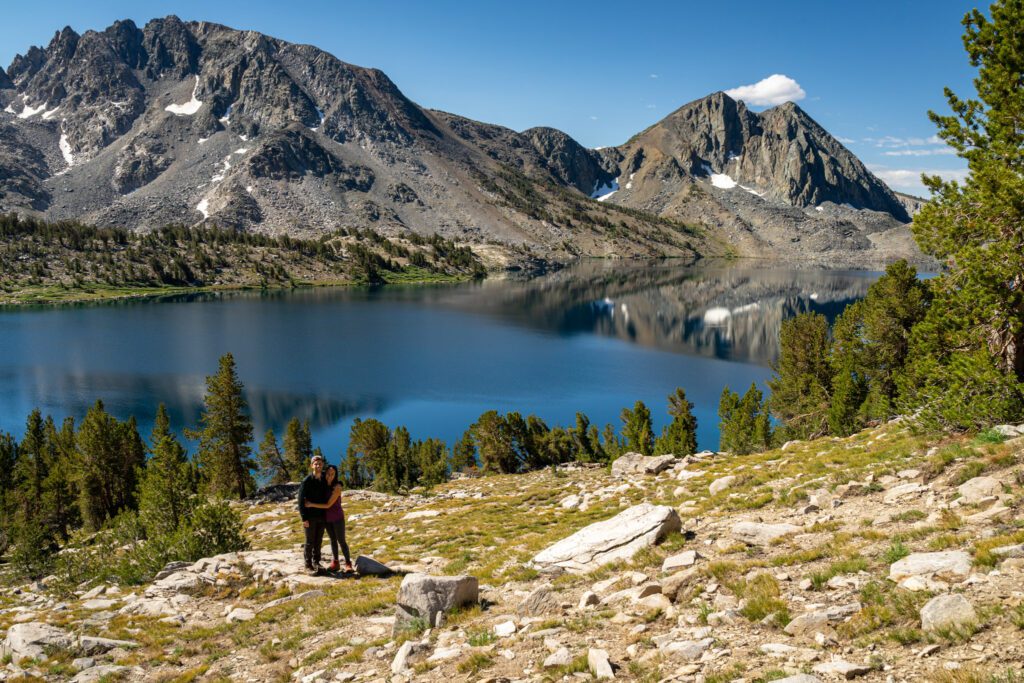
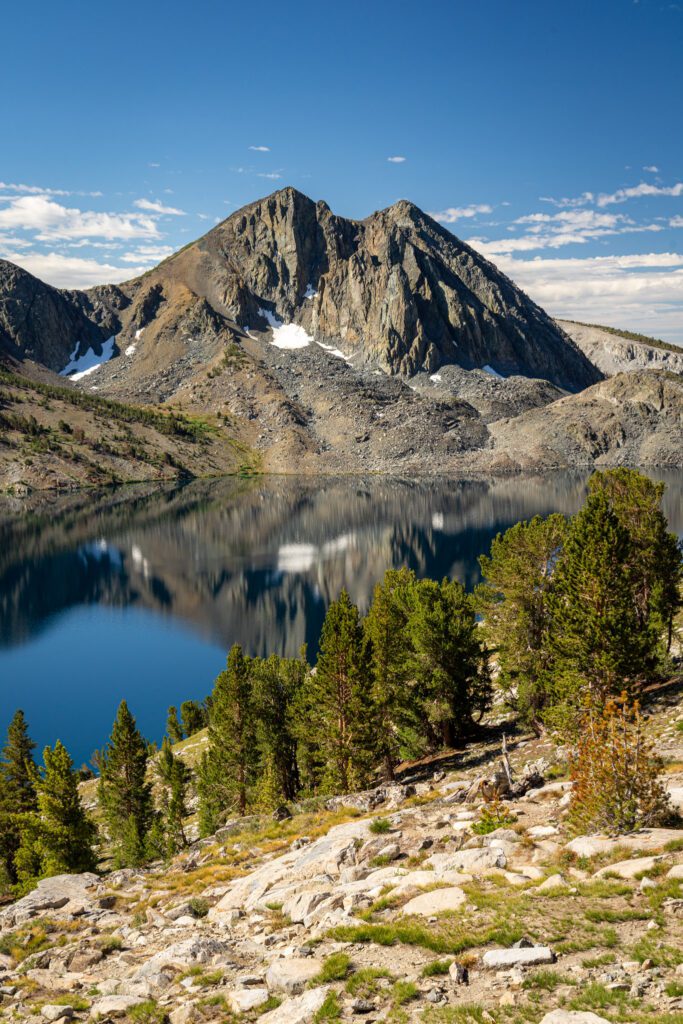
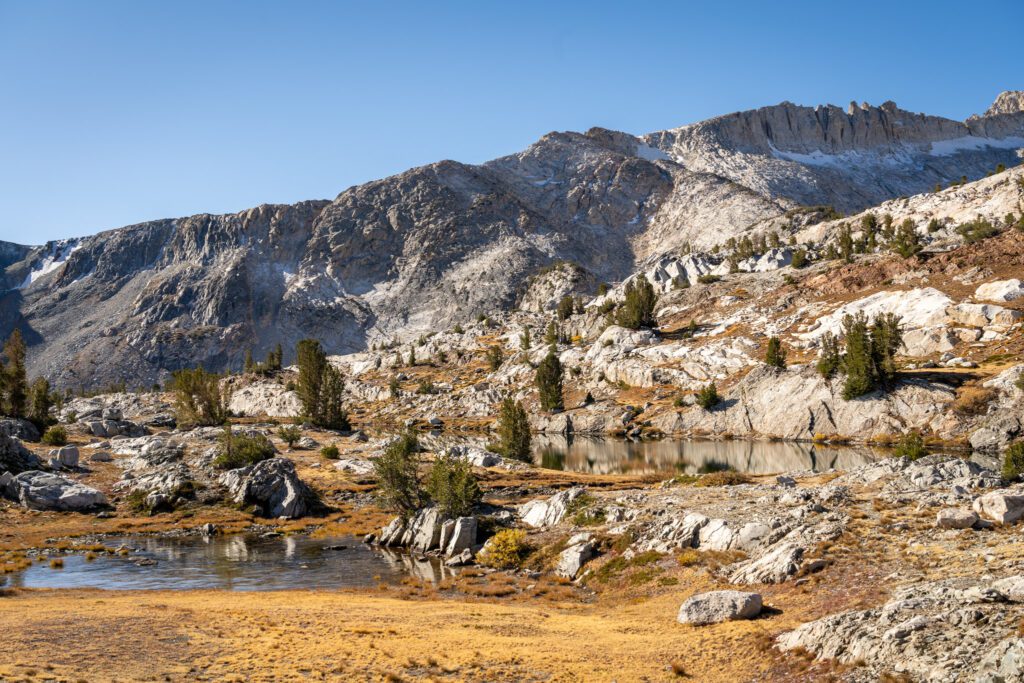
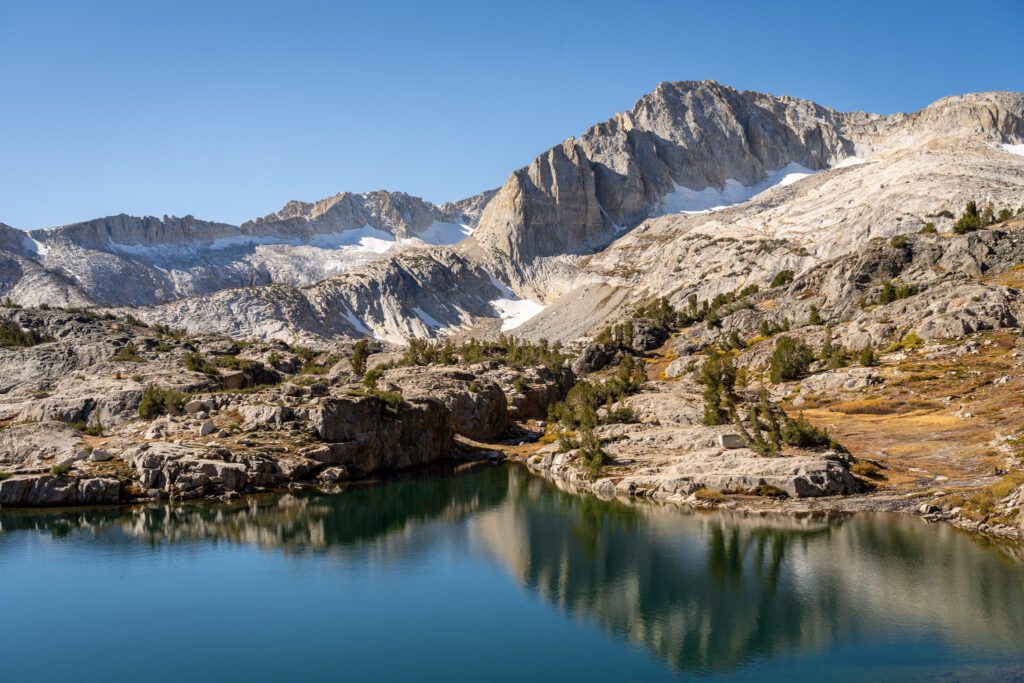
Sabrina Lake to Blue Lake (+ Donkey Lake)
- Length: 7.3 miles
- Elevation Gain: 1,730 feet
- Trail Type: Out and Back
- Difficulty: Hard
- Pass Required? None
- Dog-Friendly? Yes, on a leash
- Trailhead Location: Sabrina Lake Trailhead
First of all, this hike is in no way moderate. Sure, with the stats above, this hike would be moderate at sea level.
However, you’re starting this hike at over 9,000 feet above sea level, and you finish at 10,500. Which is HIGH.
You need to be prepared with plenty of water, food, and the right equipment for a long, unrelenting climb up a wild number of stone steps (we were very impressed by the infrastructure on this trail – those steps must have taken forever to build!).
The trail starts from a trailhead on the side of the road just below the boat launch at Lake Sabrina.
There are a few spots along the road here, but there are more parking spots at the end of the road near the marina, where there are also bathrooms and trash facilities.
Plus, an excellent view across Lake Sabrina from the dam.
The first part of this hike is relatively mild, meandering gently along Lake Sabrina’s western shore.
There’s some climbing, but nothing too intense. Even if you aren’t able to do the full hike, I would recommend going as far as you can make it, because the views are stunning (not that they aren’t stunning from the dam).
As you approach the far end of the lake, the real fun begins. You’ll pass a trail junction for Lake George and stay right, and then the climbing begins.
The second half of this hike is an unrelenting climb, full of rocky switchbacks and great views to keep you going.
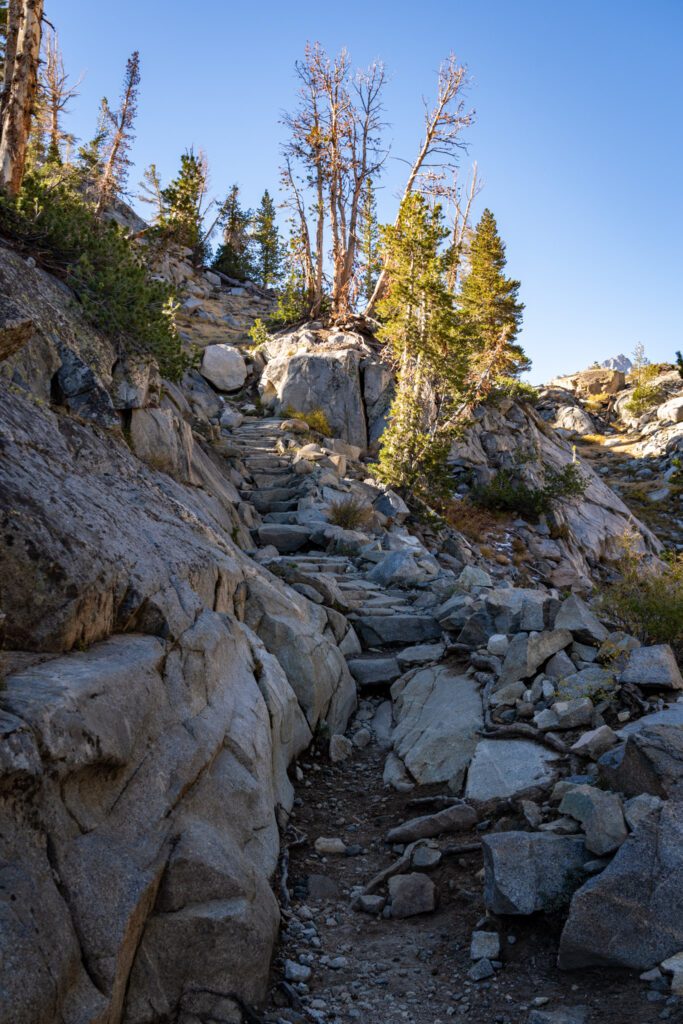
Throughout the climb, you’ll transition from the high desert (with its trademark low scrub brush), into a pine forest, and then into a granite-filled alpine wonderland as you near the top.
The transition between different ecosystems is cool, though the shade starts to go away once you’re out of the forest and it’s very exposed for the last mile or so.
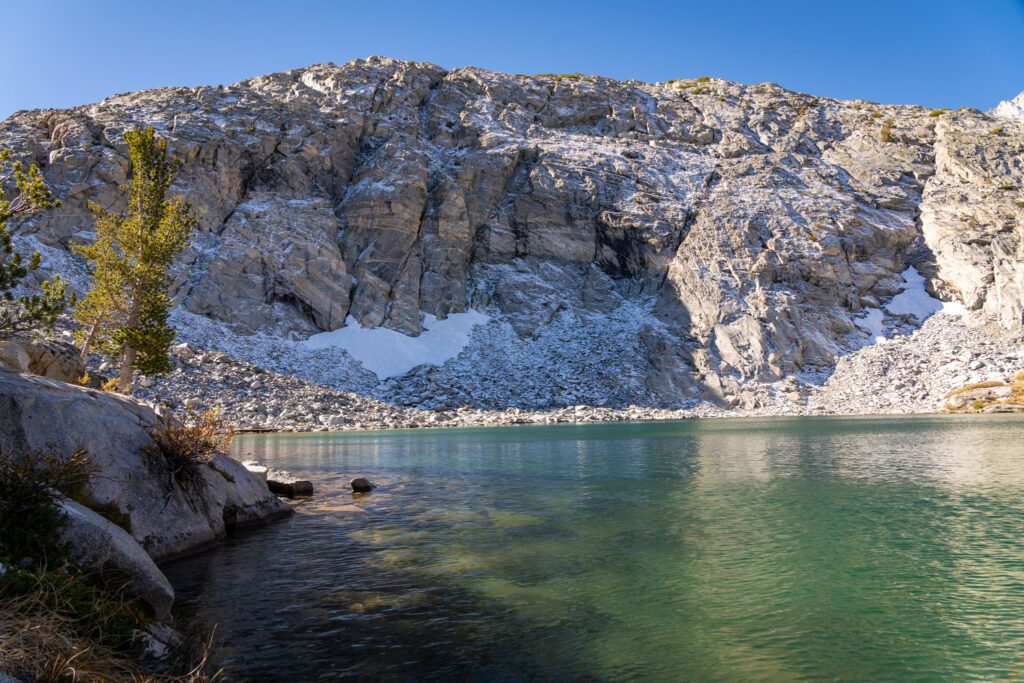
Finally, after at least once false summit and then a steep, rocky set of switchbacks, you’ll arrive at Blue Lake’s southern tip.
There are some nice views here, but you definitely want to continue along the western shore of the lake, where the views get even better and there are some great spots for lunch and a rest.
To get there, you will need to cross the creek, which is likely going to mean getting your shoes wet, even for the best rock-hoppers.
If you want to extend your hike up past Blue Lake, the next logical destination is going to be Donkey Lake (which was our original destination, but we cut it short).
From the western side of Blue Lake, it’s a hair under a mile up to Donkey Lake, and another 250 (ish) feet of climbing, because you’ve actually already done most of the hard work when you arrive at Blue Lake.
There are also additional trails out to Baboon Lake and Emerald Lakes, which are slightly longer than the climb to Donkey Lake and are probably best saved for a backpacking trip where Blue Lake is your home base.
Twenty Lakes Basin and Saddle Bag Lake
- Length: 8.6 miles
- Elevation Gain: 1,150 feet
- Trail Type: Loop
- Difficulty: Moderate / Hard
- Pass Required? None
- Dog-Friendly? Yes, on a leash
- Trailhead Location: Saddlebag Lake Resort
We have mixed feelings on this hike, and to be fair, we were warned about this by Alysha’s mom before we left for our trip (and it was also our last hike of the trip, so we were a bit jaded after 10 days of nonstop banger hikes).
On one hand, the Twenty Lakes Basin is pretty spectacular. For about three miles, you’re surrounded by the best version of the granite-filled, lake-dotted landscape you’re hoping for in the Eastern Sierra.
On the other hand, the stretches of trail at the beginning and end of the hike to get to that basin are pretty forgettable and monotonous.
If you slice this hike into quarters, the middle two quarters are truly magical.
Here’s a few pictures of the best part of this hike.
However, the other two quarters bookending that magic are… kind of a slog. It’s basically the trail along the shore of Saddlebag Lake that is the boring part of this hike.
They’re not difficult, they’re just… meh.
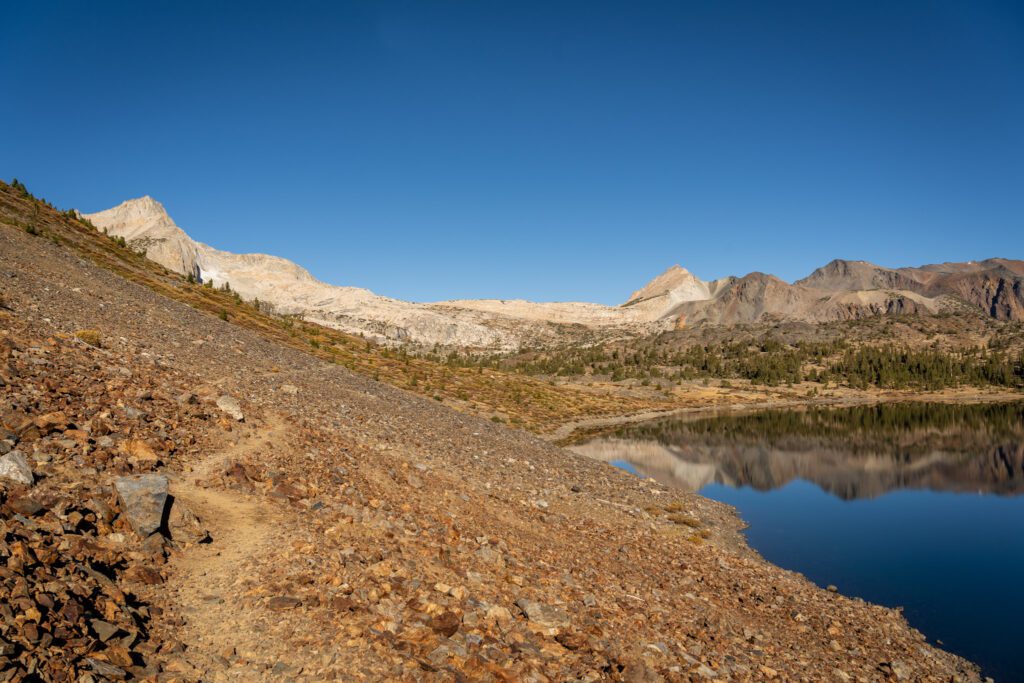
Of the many lakes you’ll pass on this hike – we counted 11, but it depends on what you define as a lake versus a pond – our favorites were Steelhead and Shamrock, which have excellent views of North Peak, the most distinctive granite mountain in the area.
Like many of the hikes in this guide, this hike starts above 10,000 feet, but because of the up-and-down nature of the trail, you only really get up to about 10,500 feet at the highest.
The trailhead is immediately before the final ascent to the Tioga Pass entrance to Yosemite, but is outside the park.
The road up to the trailhead from Tioga Road is bumpy, but should be fine for most cars.
Most of the hike is a fairly flat meander, but there are a few sections of descending on loose scree (when you are descending down into the basin to Lake Helen) and some minor routefinding on a rocky section near Shamrock Lake.
Go counterclockwise and do the full loop because that way you have the views across Saddlebag Lake towards North Peak as a nice way to start your hike, and then you’ll have that peak towering in front of you for the rest of the hike.
Our Favorite Mammoth Hikes, Mapped
Here is a handy map so that you can visualize exactly where the hikes we’ve mentioned in the guide above are located.